


Tower Hobbies Ryan STA EP
Written by Joe Hass An affordable Golden Age classic Product review As seen in the January 2018 issue of Model Aviation.
Bonus Video
Specifications
Model type: Semiscale ARF Skill level: Intermediate Wingspan: 53 inches Wing area: 424 square inches Length: 40 inches Weight: 66 ounces Power system:RimFire .32 brushless motor; 75-amp ESC; 3S 3,200 mAh or larger LiPo battery recommended Radio: Minimum four-channel recommended Construction: Balsa and plywood Covering/finish: Iron-on covering Price: $139.99Pluses
• Beautiful presentation on the ground and in the air. • Great fiberglass work. • Scalelike flight envelope at moderate power settings. • Can be easily enhanced to be more scalelike.Minus
• Assembly sequence.Product Review
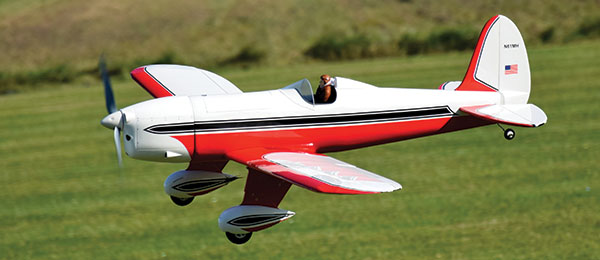
One of my all-time favorite airplanes is the Ryan STA. Whether in brightly polished metal or in the white, red, and black color scheme of this Tower Hobbies ARF, the STA wonderfully represents the Golden Age of aviation. I jumped at the chance to review this beauty. This 53-inch semiscale model arrived well protected, with multiple plastic bags enclosing the major components. A partition holds the smaller parts and supports the fuselage. The fiberglass parts are beautifully finished with matching colors. All of the hardware is included and pairs perfectly with the RimFire .32 motor and the Flight Power 3S LiPo battery that drives an APC 13 X 8 electric propeller. I used a new Tactic TTX660 transmitter, Tactic TR624 receiver, and Tactic TSX25 digital servos. The covering only required minimal tightening. The 24-page manual is filled with great pictures and assembly details. There are multiple ways to make the STA your own with simple enhancements. I’ll have more on that later.Assembly
Assembly begins with installing the aileron servos. The servos are mounted to a hatch on the bottom of each wing. The ailerons are prehinged so adding the horns and pushrods completes this phase. After following the build sequence in the manual, I would consider installing the landing gear before joining the wing halves together. There is a lot of small hardware and it is easier to deal with the smaller wing halves. Locate and separate the two 2 x 12mm bolts used to hold the elevator horn in place so that they don’t inadvertently get installed on the landing gear. Although the instructions call for removing the covering from the slots, that work was already completed on my review kit. The robust landing gear is held in place with straps. I recommend a gentle twist of the axle to add a little toe-in of the main wheels. The beautiful wheel pants are actually two fiberglass pieces that aid in assembly and provide some flexibility. The upper gear cover is held in place with two screws.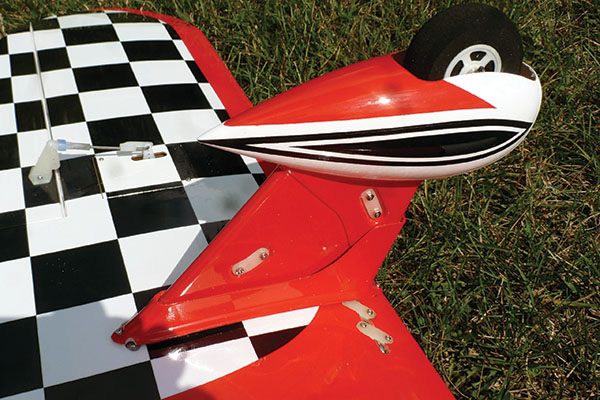
Two-piece fiberglass wheel pants enhance the scale looks.
Although the instructions indicate that the holes you drill should be centered, I found it easier to offset them slightly to allow for easier access. You could also consider holding these upper covers in place with a few drops of Foam-Tac or silicone adhesive. The lower gear cover is retained by multiple straps. It is easier to drill the holes while the covers are off of the wing. Make sure that the wheels spin freely before each flight because the lower covers are meant to move. One of the first enhancements I made was to paint the spokes in the wheels before completing the landing gear installation. The wing’s leading edge is retained in the fuselage with nylon pins. One by-product of using nylon pins is that they slide effortlessly into the fuselage. When moving on to the fuselage, first check the cowl’s fit and assembly. It is a slick arrangement, sliding on and aligning easily. The cowl is retained by a magnet. To reduce hangar rash, I prefer to install the heavy hardware in the fuselage before adding the tail feathers. That means first installing the servos, motor, and ESC. The Tactic servos required me to slightly enlarge the opening in the servo tray. The instructions supplied the servo arm dimensions. The RimFire .32 motor is a direct fit. The pictures in the manual call for the propeller adapter to be installed on the motor when it is mounted. On my aircraft, even with the propeller adapter aligned as indicated in the manual, the cowl could not be easily installed.
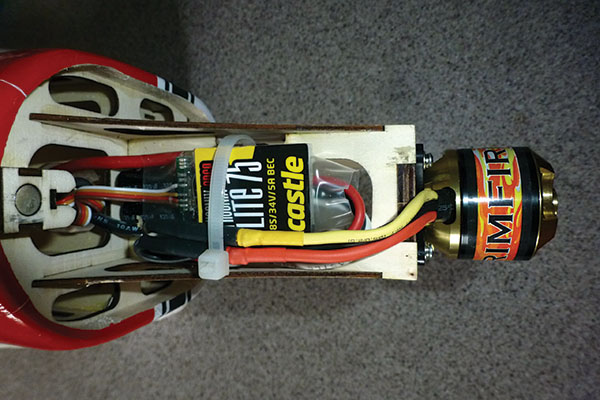
The RimFire .32 is the recommended motor and mounts easily to the motor box.
There was some extra material in the opening for the propeller adapter. You can either remove the extra material or install the propeller adapter after the cowl is snapped in place as I did. Insert the elevator joiner then the horizontal stabilizer. After checking the horizontal stabilizer’s alignment, the fit was so tight that I elected to fasten it with foam-safe CA glue. Foam-safe CA doesn’t leave any residue on the covering or on the vertical stabilizer. I temporarily installed the elevator halves to determine the proper location of the elevator horn. Removing the elevator, I drilled the holes and mounted the horn before permanently installing the elevator halves, again using foam-safe CA glue on the hinges. Another enhancement was adding Fourmost Products 3/16-inch cockpit coaming to create a clean line around the cockpit and replicate an older aircraft. Thin, foam-safe CA held the coaming in place. The instrument panel sticker looked great on the sheet, but when I went to apply it, I found that it was a black sticker on black wood. I instead applied the instrument panel sticker to a piece of white paper then used Formula 560 adhesive to attach the paper to the cockpit. Carefully look at the canopy and the lower frame sticker (the curved white one with the rivets), comparing the width of the sticker with the width of the lower edge of the canopy. Trim and sand the lower edge of the canopy so that the width of the lower edge matches the width of the sticker. Attach the canopy with Formula 560 adhesive. Beautiful aircraft such as the Ryan STA need an age-appropriate pilot. I found one in my extra goodies—he even had a silk scarf. I built up a floor to get the figure in the right position and a few drops of epoxy secured it in place. I used Formula 560 adhesive to secure the turtledeck and belly pan and allow time for alignment, and so that I could easily remove any extra glue. Formula 560 requires plenty of time for drying. The holes in the belly pan needed to be enlarged to allow the nylon wing bolts to be removed. With the wing mounted, check to make sure that the bolts don’t interfere with the elevator and rudder pushrods. The Tactic TTX660 radio made setting the control throws easy. Whenever possible, I use separate channels for each aileron in case I need to add some aileron differential. I prefer more up-elevator than recommended to help keep the tail on the ground while taxiing. Always relink your radio after all of the controls have been set up. I used the radio’s throttle-cut feature as an external arming switch. Another area that can be enhanced is the propeller. Although I painted mine silver-gray, you can have some fun replicating a wooden propeller as well. It will make your Ryan unique. The spinner includes a washer that has been turned down to fit inside. The cowl comes alive with rivet detail. It is easy to apply the rivets on the aircraft. I found it helpful to cut the strips longer than needed to give me somewhere to hold onto while positioning the stickers. I prefer using a scalpel blade to trim the stickers, but a single-edge blade or a new #11 blade will also work.
Flight
With all of the equipment installed, a check of the center of gravity (CG) found it in mid-range. It was time for some ground photos and taxi tests. There was no tendency to tip over on a paved surface and the rudder response was fine. The first flight was from a paved surface, and occurred before I put in the toe-in on the main gear. It was squirrely and I definitely switched to low rates on the rudder for takeoff from a paved surface. The flight response was excellent although it seemed slightly nose-heavy. On a paved surface, throttle management is key for taking off and landing. Don’t jam the throttle to full on takeoff. For landings, simply fly the aircraft right to the surface, cutting the power before the wheels touch. All of the basic maneuvers are easy. There is plenty of power for scalelike loops, rolls, etc. Even inverted flight only required a bit of down-elevator. Coordinated rudder helps in all areas of flight. With the first flight and a set of flying photos in the can, it was time to fly off of grass. I had added some toe-in on the main gears for this flight, increased the up-elevator to aid in taxiing in the grass, reduced exponential on the ailerons to -20% (it was set at -25%, as were the rest of the controls), and moved the battery back so that it was centered in the hatch opening.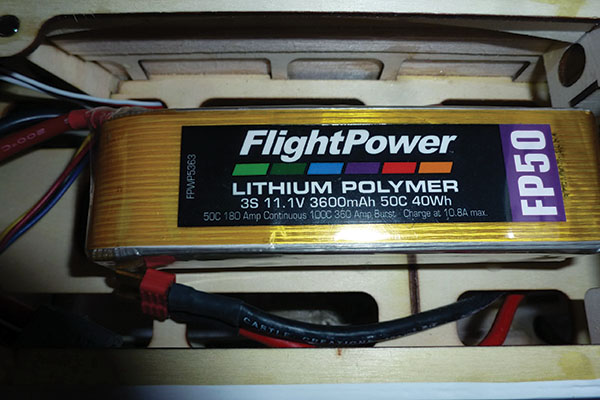
The battery is easily accessed with a removable hatch in front of the cockpit.
The takeoff run was smooth as I worked the elevator and throttle. The flight performance was improved with the more rearward CG. After more photos, it was time for the first landing on grass. I again carried power to just above the grass and then gently applied a bit of up-elevator to flair. There was never any tendency to tip over during the rollout. I was even able to taxi back. Fantastic! My thanks to my son, Chris Hass, and to John Hakala, for their help during the initial flights and photos.
Conclusion
The Ryan STA is a beautiful aircraft that presents well on the ground and in the air. At moderate throttle, it flies in a scalelike fashion. The recommended power system gives it plenty of power for anything you would like it to do. It can be easily flown off of grass or pavement and is small enough to remain in one piece in nearly any vehicle. You should add the Tower Hobbies Ryan STA EP to your aircraft fleet.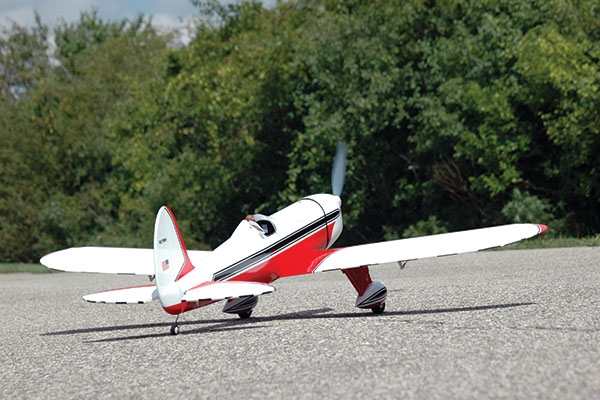
The completed Tower Hobbies Ryan STA looks nice. The only thing missing from this version are the wing struts found on the full-scale aircraft.
—Joe Hass [email protected]
Manufacturer/Distributor:
Tower Hobbies (800) 637-4989 www.towerhobbies.comSources:
Tactic (217) 398-8970 www.tacticrc.com ElectriFly (217) 398-8970 www.electrifly.com Fourmost Products www.fourmostproducts.comThis Month's Issue

Join the AMA
![]()


Add new comment