


Horizon Hobby Blade 350 QX2 AP
Article by Jon Barnes Video by Jon Barnes. Aerial photography and videography made simple. Also featured in the January 2015 issue of Model Aviation.
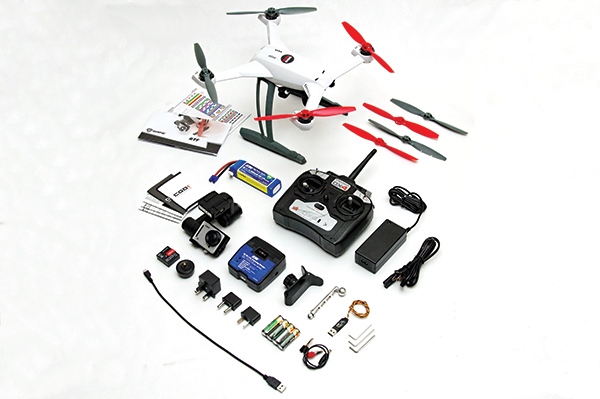
The Blade 350 QX2 AP Combo is a turnkey, complete aerial media platform. This package is anchored by the Blade 350 QX—a quadcopter product line originally debuted by Blade in 2013. The original Blade 350 QX was capable of hauling a GoPro-size action camera aloft, with the camera attached to the underside of the quadcopter with a basic antivibration isolation mount. With the release of a major firmware update, the Blade 350 QX evolved into the 350 QX2. The addition of aerial photography (AP) to the 350 QX2 name indicates that Blades’ premiere aerial media platform has matured into a comprehensive combination that includes nearly everything needed to shoot impressive aerial video and stills. The Blade 350 QX2 AP Combo is engineered to give aspiring aerial media producers—even those who may have never flown a quadcopter—a positive and successful experience. The Blade 350 QX2 AP Combo forgoes the isolation-style camera mount for the superior and newly released E-flite GB200 two-axis brushless gimbal. A longer set of landing legs provides increased clearance for the gimbal. A 3S 11.1-volt 3,000 mAh LiPo provides longer flights than the 3S 11.1-volt 2,200 mAh battery used in the first-generation 350 QX. Included with this aircraft is a small E-flite C-Go 1 camera that can capture 1080 pixels, 30-frames-per-second video and shoot 1920 x 1080 stills. All in-flight media is recorded on a micro SD card (not included). This lightweight camera features a 5.8 GHz Wi-Fi video downlink. An application for Android and iOS operating systems can be downloaded and installed on a pilot’s electronic device of choice. With the C-Go 1 app installed and running, a pilot has “eyes” to see what the camera is recording in real time using a video downlink that operates on a camera-generated Wi-Fi network. The app can be used to start and stop the recording while the 350 QX2 is in flight, and shoot still photos. A convenient spring-loaded clip is included and allows a pilot to mount a smartphone to the upper half of his or her transmitter. The included Spektrum DX4 DSMX 2.4 GHz four-channel radio controls the 350 QX2 and serves as an AC/DC balancing charger. Four spare propellers are provided in addition to the four that come premounted to the 350 QX2. Other items included in the box are a small USB programming interface, three hex keys, and a variety of documentation in several languages.
Preflight
The packet of paperwork for this product is substantial. Although several pieces are related to the warranties and the LiPo battery safety guidelines, the document that most pilots likely will want to read first is the “Getting Started” insert. This sheet of instructions is written in four languages and covers all of the basics required to get the 350 QX2 in the air and filming for the first time. A full instruction manual was not included, but I was able to download the 18-page manual from the Blade website. Although it is unnecessary to review the full manual before the first flight, any pilot who is serious about getting everything possible out of this multirotor should read it. The radio set used in the 350 QX2 is genuine Spektrum DSMX technology, but the overall complexity of this aircraft causes even the normally mundane task of binding one’s transmitter to take on added dimensions (the 350 QX can be bound in a total of four modes). Reading the entire manual will give a pilot full insight into what makes the 350 QX2 tick and what to do when it won’t go tock. Those with photographic memories will want to take a mental snapshot of the cardboard LED Codes Reference. The rest of us can just make sure that we keep this vital informational card handy when flying the quadcopter. One side of it has a color chart that defines all of the possible startup, flying, and calibration LED codes that may be visually annunciated. The other covers the various codes that may be heard when powering up and flying the 350 QX2. I laminated the English version and keep it in the 350 QX2’s case. Getting the 350 QX2 ready for its first flight is easy. Top off the flight battery using the included charger, or a faster, more advanced charger if you have one. Assembly is limited to slipping the gimbal into place, plugging the small gimbal cable into the correct port on the gimbal (there are multiple ports into which it will fit), and inserting the camera into the gimbal. A small thumbscrew locks the camera into the gimbal, but mine fit snugly in place before I installed the screw. If a pilot plans to use the Wi-Fi downlink, the antenna must be installed on the bottom of the camera. The smartphone holder and bracket are installed on the transmitter’s neck-strap mount—making it easy to switch back and forth from looking at the real-time video feed and the aircraft. A pilot who is flying FPV must have a spotter. I found that the DX4 transmitter was already bound to my 350 QX2, as listed in the instructions. If a pilot opts to use a more advanced or alternate transmitter, it must be bound to the quadcopter. There is a specific sequence of operation when readying the 350 QX2 and C-Go 1 camera for flight. Don’t be in a hurry when going through this sequence. It takes time for the GPS signal to lock and to activate and connect to the camera’s Wi-Fi network. The camera’s Wi-Fi network should not be activated until after the GPS signal is locked. I usually turn on the transmitter first, power up the 350 QX2, and install the smartphone holder onto the transmitter while the 350 QX2 goes through its initialization sequence. When a GPS lock is signaled, I switch on the camera and connect my iPhone to its Wi-Fi network. The final step is to launch the C-Go app. When using the included DX4 transmitter, the camera defaults to being parallel with the horizon. If a pilot prefers an alternate orientation, Blade has produced a video that illustrates how to change the camera angle while the gimbal is initializing. The available flight modes make it nearly imperative that a pilot has a clear understanding of each, along with its associated flight profiles and limitations. Each mode is subtly different than the others and offers varying levels of pilot assistance. At a minimum, a pilot needs to memorize the color of the status LED when in each mode. Failing to follow these instructions could confuse a pilot operating the 350 QX2. Only three of the four flight modes are accessible using the DX4 transmitter (Smart, AP, and Stability). A fourth mode, known as Agility mode, is also available. It features an unlimited flight envelope that allows aerobatics to be performed. It is for experienced pilots only. Accessing this mode requires a transmitter capable of endpoint adjustments (Spektrum DX6i or higher). Those unfamiliar with flying RC aircraft should start out in Smart Mode. This mode all but guarantees successful first flights, but this mode comes with a minor caveat or two. For all of the features of this mode to properly function, the pilot must resist the urge to stroll around while flying. For the Safe circle function to perform as specified, a pilot must initialize the 350 QX2 exactly as listed in the full manual and remain standing in the same location for the entire flight. Also, invoking a Return to Home could result in the quadcopter transitioning through the Safe circle.Flying
Because of my love for aerial photography and my flying experience, I selected AP mode for my first flight. In this mode, the focus is to keep flight as stable and smooth as possible. The flight controller restricts any throttle and control inputs applied by the pilot and attempts to self-level whenever the control sticks are neutralized. Positioning the throttle stick near the middle of its travel will cause the 350 QX2 to hold position and altitude. The overall stability of the 350 QX2 in this mode is amazing! It is easy to frame a shot using the real-time video feed. The 350 QX2 will happily loiter in place in this mode when the sticks are neutralized, even if the winds try to push it off station! I found the throttle/altitude quadrant too dampened for my tastes, but that may be because of my previous experience in flying other similar-size multirotors. Changing altitude requires a large adjustment in the throttle stick position, but the intent is to keep the video as smooth as possible. It works as intended. Add in the stabilizing effects of the two-axis brushless gimbal, and the resulting video is incredible. Other gimbals that I have flown have suffered from oscillation or stutter, but not the E-flite GB200 gimbal. It is buttery smooth and stable right out of the box. I am not sure what it takes to connect to the gimbal and edit its parameters, but I have not felt the need to dive under the hood to access the tuning parameters. This is the first gimbal that I have flown that has not required tuning to achieve optimum performance! The included E-flite C-Go 1 camera sports a form factor that is similar to the popular GoPro action cameras, but comes in at a lower price than both the GoPro HERO3+ and HERO4 versions. I was impressed by the little camera’s detail and clarity. The video is limited to one mode because it is recorded at 1080 pixels at 30 frames per second. The field of view is locked at 120°, resulting in a fair amount of fish-eye distortion—common for cameras with wide-view angles. It can be minimized by keeping the camera aimed parallel to the horizon. The effect becomes more apparent as it is tilted. I noticed that the white balance and saturation wandered, especially when transitioning between brightly lit and darker areas. This is caused by the camera attempting to read and adjust for the ambient light. I was surprised to find that the C-Go 1 does well in low-light conditions. I sent my 350 QX2 aloft in the early hours of the day, during periods of heavy overcast and fog, and even at night. The camera did a good job of capturing video in all of these less-than-favorable conditions, although the video suffers from increased noise or graininess. Maintaining orientation of the 350 QX2 is easy after the sun has set, thanks to the bottom-mounted bright red and blue lights. These orientation lights and the status LED are so bright that I can see them without my glasses! I normally cannot fly without my spectacles! The C-Go app allows a pilot to start/stop the video while in flight or switch to still mode and shoot photos. I found that the range of the Wi-Fi-relayed real-time video feed would begin to drop out at ranges greater than 200 to 225 feet. The loss of feed typically manifests itself in choppy or frozen video refreshes. Although the camera has an external antenna, most smartphones do not. This may be the reason why the video feed range is limited. There is a slight amount of latency on the video feed, but I found that it did not adversely affect positioning the AP rig to capture the footage. Although the included Spektrum DX4 transmitter adequately controls the 350 QX2, there are advantages to using a more advanced transmitter. I pressed my Spektrum DX18 Gen 2 DSMX transmitter into service as an alternate controller for several reasons. Blade has produced and posted a number of helpful videos on configuring and using alternate transmitters. Using theDX18 allows me to remotely control the gimbal’s tilt while the 350 QX2 is in flight. This mode requires that the gimbal cable be relocated to a different port on the gimbal. The added functionality allows me to slowly rotate the tilt axis in a total range of motion exceeding 90°—from slightly above horizontal to vertical orientation. My DX18’s audio capabilities are also handy when it comes to annunciating changes of state on the various flight controls. Blade includes a 3S 3,000 mAh LiPo in this AP Combo. Most pilots who enjoy aerial photography are always on the prowl for longer flight durations. With my DX18 transmitter configured for an 81/2-minute countdown timer, I found that I could safely keep the 350 QX2 in the air for flight durations approaching 10 minutes. Using a more advanced charger to replenish and monitor flight battery recharging typically resulted in approximately 2,400 mAh being put back into the 3,000 mAh battery. Flight durations are affected by a pilot’s flying style and throttle use. Flying in AP mode, with its controlled throttle programming, will likely yield the most moderate and economical current draw demands. Although the original packaging does a decent job of protecting the 350 QX2 between flights, repacking it in the box requires that the camera and gimbal be removed. I initially used the box to protect my 350 QX2 between flight outings, but it did not take me long to realize that the optional Blade 350 QX AP hard case was the way to go. It allows the camera and gimbal to remain attached. The entire AP assembly can be safely stowed in this sturdy, foam-lined case. The case has plenty of room for a transmitter, spare propellers, the included basic charger, and six flight batteries. Because of the small and potentially fragile gimbal cable and connector, leaving it permanently connected minimizes the risk of damage. I keep all of my camera gear in protective cases. Given the cost of this AP equipment, it makes sense to also keep it in a protective case.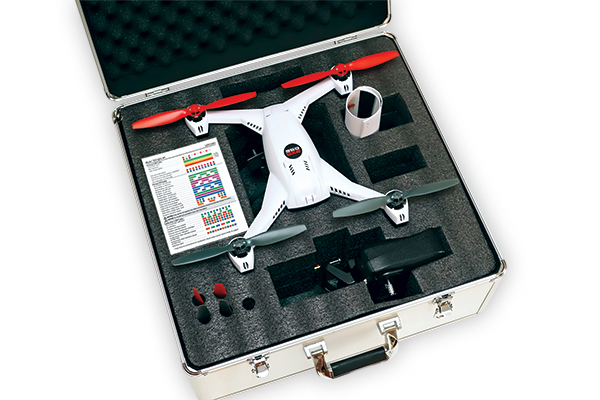
This hard case from Blade protects the 350 QX2 and allows the entire AP combo to be packed into one transportable hard case.
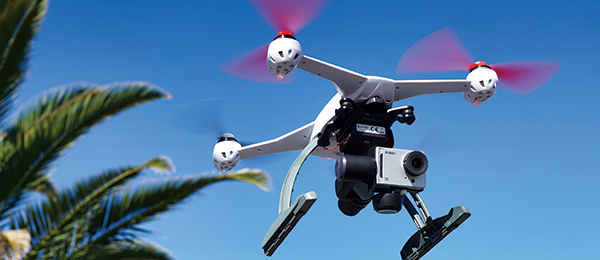
Although the flight controller has multiple modes, the AP mode helps a pilot capture smooth and stable in-flight video.
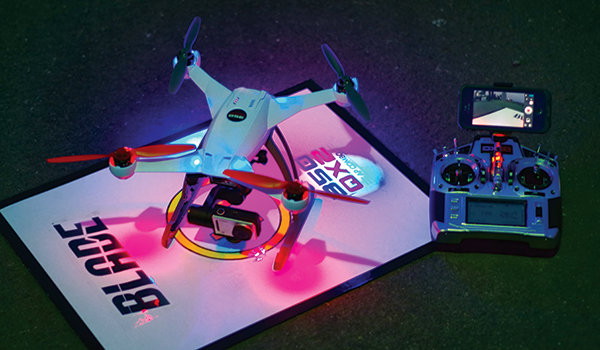
High-visibility orientation lighting makes it easy to fly this aerial media aircraft after sunset.
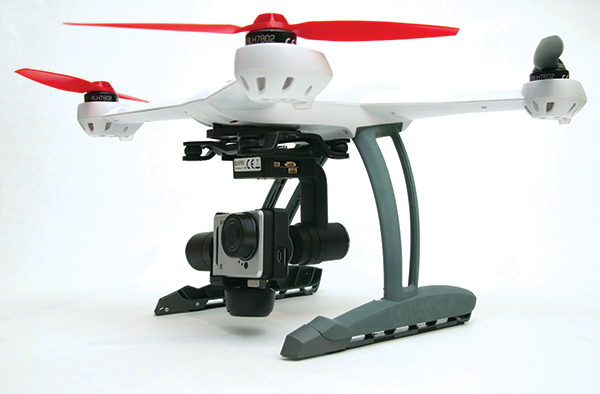
Slip the gimbal and camera in place on the underside, plug the gimbal cable in, and you are ready to start shooting aerial media with the Blade 350 QX2!
Conclusion
Throughout the course of this review, most of my flights were made in AP mode. This seemed appropriate because Blade has marketed this version of the 350 QX2 as an AP combo. This combination provides everything that an aerial media pilot needs to shoot some respectable high-definition video! I explored the other flight modes and they perform as specified. As a pilot with decades of experience in flying all types of RC aircraft, I found Smart mode disconcerting at times. This mode is sure to be a boon to greener pilots and those who may have never flown an airborne model from an external perspective. There is a small learning curve associated with the intricacies of the flight modes and the multitude of status codes that will emanate from the 350 QX2, but the normal codes, colors, and audible warnings soon become second nature. Although the C-Go 1 camera may not boast the same specifications or versatility as other action camera product lines, it can generate some impressive high-definition video—and at a lower price than many of the other action cameras! The factory-tuned GB200 gimbal is smooth and performed flawlessly throughout many flights. Having the option to add a third axis of stabilization would be the icing on the cake! The lone 1,080-pixel 30-frames-per-second video setting of the camera may be a sticking point for some videographers. In this era of nearly unlimited online bandwidth and video, however, how often do videographers opt to use video settings lower than 1,080 pixels? The protective case is a great way to affordably safeguard this capable AP rig. The large, silver-colored hard case, with the Blade and 350 QX logos printed on the sides, lends an aura of professionalism to whatever project a pilot may be using the 350 QX to shoot. I like the grab-and-go convenience offered by the optional hard case. The Blade 350 QX2 AP Combo is indeed a bona fide, turnkey aerial photography solution![dingbat] —Jon Barnes [email protected]MANUFACTURER/DISTRIBUTOR: Blade/Horizon Hobby (800) 338-4639 www.bladehelis.com SOURCES: E-flite (800) 338-4639 www.e-fliterc.com Spektrum (800) 338-4639 www.spektrumrc.com
This Month's Issue

Join the AMA
![]()


1 comments
case
Add new comment