


Horizon Hobby Hangar 9 P-47D Thunderbolt 20cc ARF
Written by George Kaplan Warbird Excitement comes in a convenient size Product Review As seen in the June 2018 issue of Model Aviation.
Specifications
Model type: Semiscale ARF Skill level: Intermediate to advanced Wingspan: 67 inches Wing area: 825 square inches Airfoil: Symmetrical Length: 58 inches Weight: 11 to 13 pounds Power system: 20cc gas engine or equivalent electric motor system Radio: Five-channel minimum, six-channel for retracts; six standard servos or seven if gas powered Price: $399.99Test-Model Details
Engine used: Evolution 20cc gas Propeller: APC 15 x 8 Radio system: Spektrum DX18 transmitter; Spektrum AR9350 receiver; seven Spektrum A6110 servos Ready-to-fly weight: 12 pounds Flight duration: 15 minutesPluses
• All laser-cut wood construction. • Huge battery, radio, and tank hatch with a quick-release latch. • Two-piece, plug-in wing with aluminum tube. • Many scale extras included (dummy radial engine, an antenna, guns, bombs, etc.) that can be added to suit your taste. • Three scale sticker sets included. • Designed for included fixed gear or optional electric retracts. • Cowl is attached with hidden bolts for a cleaner, scalelike look. • Functional flaps work well and aid in slowing the aircraft for landings.Minuses
• The included drill template to mount the Evolution 20cc engine was not correct, leaving holes that were spaced 0.5 inch too wide. • Wing bolt holes in the fuselage did not align properly and required work to elongate.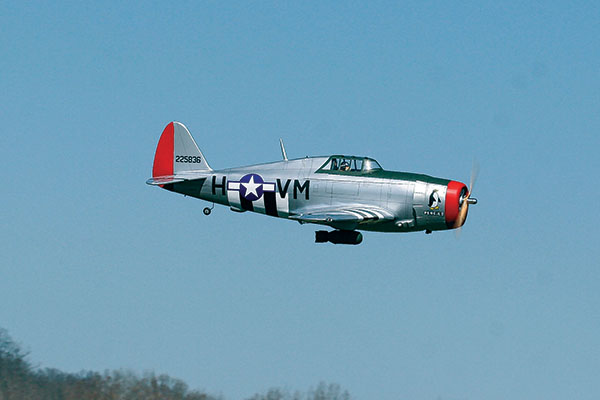
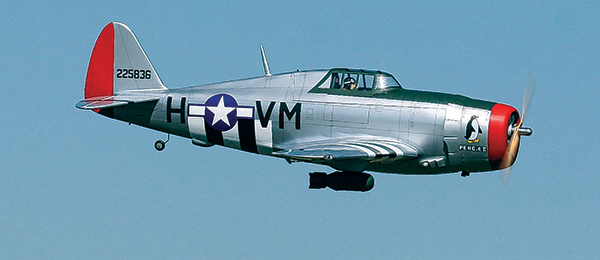
The author found the Hangar 9 P-47 Thunderbolt 20cc to be an absolute joy to fly. From the maiden flight through dozens of sorties, its wide flight envelope gives it the ability to do everything a warbird should do and more.
Bonus Video
Product Review
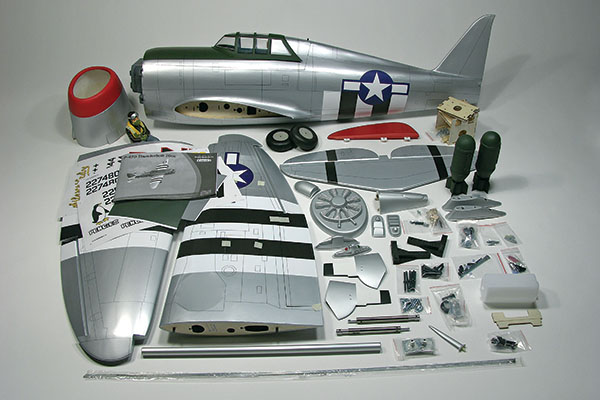
I know what you’re likely thinking: Oh, boy, another P-47 ARF. There are probably more P-47 models on the market right now than at any other time, so what makes this one worth looking at? If you want to add an average-size warbird to your fleet, this Hangar 9 20cc P-47 is a great-flying model, and the Evolution 20cc engine is a perfect match for the airframe. Now that I’ve shown all of my cards, stick with me and let me explain to you what Horizon Hobby has come up with. It’s not without a couple of problems, but I’ll tell you how to get around them. Although the P-47 was never one of my favorites, I’ll show you why this Republic Razorback now is. The kit comes in a large box and everything is held in place with miles of clear shipping tape. All of that tape did its job because the parts made it from the factory to my shop with no damage, dents, or even scuffs from parts rubbing together. After taking the time to unpack and inspect everything, I was pleasantly surprised to find that the entire airframe is constructed from balsa and plywood—no foam here. Everything was nicely rigid and robust. A lot of care and planning look to have gone into the design and there are many laser-cut, interlocking pieces that make up the structure of the fuselage and both wing halves. Yes, there are quite a few vacuum-formed plastic bits, but these are mostly smaller to add scalelike details here and there. The airframe is covered with a pressure-sensitive “stick-on” type of covering with a satin aluminum finish. Printed on this covering are all of the panel lines, hatches, the stars and bars, and invasion stripes. A solid grouping of hardware is included. Whether it’s the larger things such as the fixed shock-absorbing main gear, the foam tires, and the tank, all the way down to the hinges, motor mounts, clevises, and control horns, all of the hardware is included, and it is all of good quality.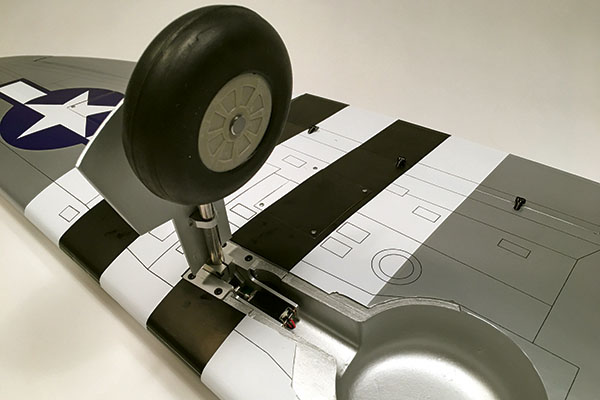
Fixed main gear is supplied in the kit, but Horizon Hobby sent along these optional electric retracts for the review model. They feature an oleo strut for shock absorption and have been rock-solid from the get-go.
I mentioned some scale detail pieces earlier. It’s worth adding that among these parts is a pilot figure, several vent/exhaust ports, and a dummy radial engine. Surprisingly, two completed bombs and two wing pylons are also included. If you were to try to add these to any warbird, it would take a while to design your own or adapt what might be available on the market. With Horizon Hobby including these in the kit, it not only saves you time, but you get more value for your money and have great-looking, removable hardware that matches the scale of the P-47. One final part to highlight is the well-made fiberglass cowl. It’s prepainted and matches the color and detail of the fuselage well. The P-47 is precovered in a nondescript, brushed-aluminum color scheme with D-Day invasion stripes. You can choose to leave it like this or utilize one of the included sticker sets to add the markings and nomenclature of three well-known full-scale Thunderbolts (Pengie II, Silver Lady, or Burma Yank).
The P-47 comes precovered in this attractive aluminum scheme with D-Day invasion stripes. It also includes a wealth of scalelike details such as a dummy motor, ordnance pylons, dummy bombs, exhaust ports, and an antenna.
Assembly
Now that you have an idea of the individual parts of this P-47, let’s dive into the manual and see how all of these pieces fit together. A copy of this manual is available on the Horizon Hobby website and the link can be found in the “Sources” section. Assembly starts with installing the flaps. Using the included horns and hinges, they are fitted into the precut holes and slots and held in place with epoxy. Ailerons are attached next and utilize CA-type hinges. The aileron control horns are epoxied in position and the aileron servos are mounted inside of the wing on removable hatches. After hooking up the pushrods and clevises, the flap servos are installed. It’s worth noting that the flap servo compartment is larger and there’s room for two servos in each bay. It is the first time I’ve seen this, and it makes sense because you can properly mount a wide range of servo brands, allowing both servos to operate as needed without reversing a Y harness. On each wingtip, there’s a two-piece vacuum-formed navigation light that needs be attached. Each piece must be cut out and trimmed then canopy glue is used to hold it in place. While the navigation lights are setting up, the main gear can be attached. As noted earlier, the kit comes with fixed gear, but this review model came with optional electric retracts. Instructions to cover either mounting option are included and I found that installing the retracts was as simple and as painless as any retracts I had ever installed. Even the steps that are needed to secure the gear doors to the struts worked as advertised. After mounting the wheels and axles to the struts and verifying that everything was lined up (proper toe-in angle of roughly 1°), the wing halves were finished. Next up was installing the horizontal stabilizer. This was when I encountered the first problem. To measure and adjust the stabilizer, you must first attach the wing halves to the fuselage. When sliding on each wing half, I found it impossible to line up the hole where the mounting bolt attaches. Some investigation found that the servo wires must pass through too small an opening. A few minutes with my rotary tool enlarged these openings on the fuselage and made it easier to get the wires inside without pinching them. That was only part of the problem. I discovered that the wing bolts still wouldn’t install. More inspection showed that by making the holes slightly oval in the top of the fuselage’s bolt fixture, I could finally get the wing bolts to thread into the wing. This took some time because I didn’t want to remove any more than necessary. I trimmed a little, trial-fitted the parts, then trimmed some more until I got both halves to properly come together. Now construction could continue by attaching the horizontal stabilizer. After verifying its alignment and trimming the excess covering, it is epoxied in place. After the epoxy has cured, the elevator halves and rudder are installed, as well as their corresponding control linkages. Running the pushrods through the fuselage is a cinch because of the preinstalled support tubes, and there’s one for each elevator half, the rudder, and the tail wheel steering pushrods. There is a separate tail wheel cover included in case you choose to add an optional retractable tail wheel. That’s a nice touch! It’s time for the powerplant installation. Three laser-cut plates are included with the kit (one for electric; one for a Saito four-stroke engine; and one for the Evolution 20cc). They lock on the firewall and can be used to drill the properly spaced mounting holes. This doesn’t work in the case of the Evolution’s mounting plate. After drilling these holes and mounting the motor mount beams, I found that the beams were spaced too far apart—so much so that the motor was swimming in the space between the beams. I checked everything and found that the supplied template was wrong.
The P-47 is a good kit, but it had a flaw. The included 20cc mounting template has holes that are spaced too far apart. If drilled using this template, the beams will be roughly 0.5 inch too wide.
I removed the beams from the fuselage and set it aside for the evening. I came back the next day with some fresh eyes and decided that by working backward, I should be able to get the engine in the right spot. Working backward meant going through the steps to mount the cowl first. With the cowl in position, I could use it to verify the other mounting measurements and slowly work the engine into the proper position by first mounting the Evolution 20 to the beams. I then needed to hold the fuselage vertically. To do this, I slid the wing tube in the fuselage and rested each end of the tube on a pair of high-backed chairs. They held the fuselage off of the ground and kept the firewall relatively horizontal. I put the engine/mount assembly in place on the firewall and placed the cowl in position. Then it was simply a matter of taking my time and slowly moving the engine so that it was centered in the cowl opening. When I was happy with the position, I carefully removed the cowling and marked and drilled the correct holes to mount the beams. These properly spaced holes were roughly 1/2 inch narrower than those in the mounting template. With that problem solved, the tank and its three-line fuel system were installed. Although black tubing was included, I opted to use Du-Bro Tygon tubing because I like to be able to see the fuel flow. When attaching the tank, I found it strange that the manual instructs you to hold the tank with a rounded bottom in place on a flat surface. Instead, why not ensure that the tank won’t slide by utilizing the two pieces of triangle stock that are included for the electric motor installation? They’re not used and it’s easy to position them on each side of the tank and attach them to the floor with CA adhesive.

If you power the P-47 with a system that requires liquid, the author found it best to modify the tank mounts to help this rounded tank fit in a square hole. He recut an upper brace to match the curvature of the tank and used the included triangle stock to help support it on the shelf.
After hooking up the throttle servo, I placed the ignition battery and module under the tank floor then the receiver battery next to the tank. The receiver was positioned near the cockpit area on its own pad.
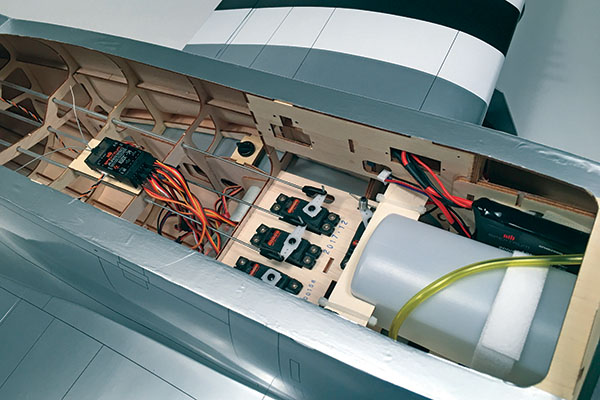
Removing the huge canopy/hatch reveals a cavernous area in which all of the radio and fueling gear fit. The batteries were mounted near the firewall for balance.
When I had finished installing everything, I set the throws and rates, glued the pilot in place, and attached the canopy. I then installed all of the other included scale details. Each wing has removable pylons—each with an attachable, but not droppable, bomb. Gun tips can be installed in the leading edge of each wing. Three exhaust ports can be glued in position and the (removable) top aerial antenna can be screwed in place. When everything was assembled, I checked the center of gravity, which was on the aft end of the specified range. Because it was still within the range, I left it as it was.
Flying
As luck would have it, the first decent day that I had to maiden the P-47, there was enough crosswind at the field to make things interesting. After the obligatory ground shots and a warm-up of the engine, it was time to see if the P-47 handled as well in the air as Horizon Hobby claims. Taxiing came first and the P-47 didn’t disappoint. There’s more than enough steering to maneuver on relatively smaller runways and the model is big and heavy enough that it won’t weathervane while taxiing. Holding a touch of up-elevator to keep the tail wheel on the ground was just the ticket during the first takeoff. When at a good speed, the elevator was relaxed and the P-47 went straight down the runway and lifted off. A few trim passes later, I was well into the pattern, doing low, high-speed passes for my photographer and having a ball doing it. When opening up the Evolution 20, the P-47 will really groove. Sure, it’s too quick to be a scale speed, but it was fun. With the photos out of the way, I put the Thunderbolt through its paces—flying it like a warbird would fly. Rolls and loops looked great, if I do say so myself. Loops will naturally drop off in speed as you crest the top, and it takes a good amount of speed to perform a properly sized loop, just as it should. More advanced maneuvers such as a Split-S, Immelmann turn, and half-Cuban turnarounds are smooth and really show off how well the P-47 handles. But it’s not all about big maneuvers; eventually you must land. To aid in this, the included flaps do a wonderful job of slowing the Thunderbolt and do so without a lot of ballooning if lowered at a scalelike speed. I set the flaps up on a three-position switch and found that I never needed more than half flaps. Regardless of the flap setting, the Thunderbolt was completely controllable and showed no tendency to stall, which is rare for a warbird.In Conclusion
I’ll be the first to admit that the P-47 was never one of my favorite warbird designs; however, Hangar 9’s 20cc P-47 has turned into one of my favorite airplanes to fly. It’s perfectly mated with the Evolution engine, which provides plenty of power and speed, as well as 15-minute flight times. The P-47’s wide flight envelope makes it a great dogfighter at speed, but a docile, controllable design when it comes to landing. It’s easy to transport to the field and is big enough to have a great presence in the air, but not so large that you need a truck and trailer to transport it. If you’re in the market for a warbird, I strongly recommend that you check out this Hangar 9 offering. You’d be hard-pressed to find more bang for your buck in a size that’s just right for an average pilot. —George Kaplan [email protected]Manufacturer/Distributor:
Horizon Hobby (800) 338-4639 www.horizonhobby.comSources:
Spektrum (800) 338-4639 www.spektrumrc.com P-47D Thunderbolt manual Du-Bro (800) 848-9411 www.dubro.comThis Month's Issue

Join the AMA
![]()


1 comments
Was the motor brand new?
Add new comment