


Don't Forget About Guillow's
Written by Bob Benjamin They make excellent RC model projects Product Review As seen in the July 2018 issue of Model Aviation.
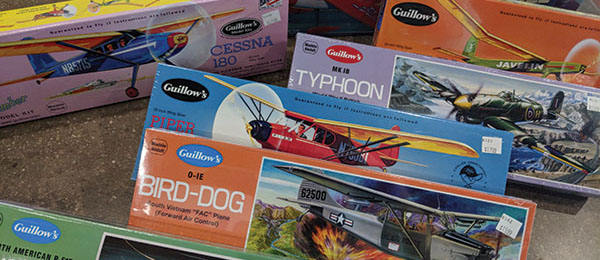
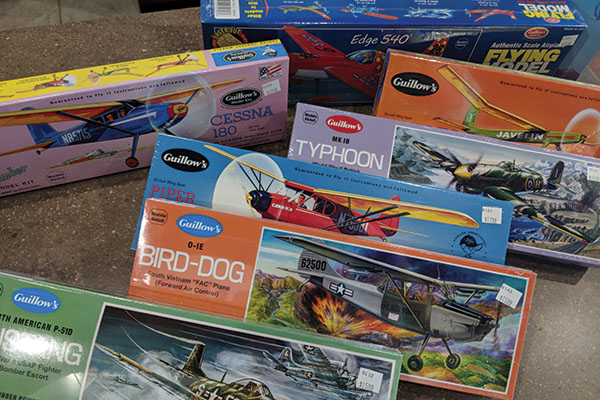
Guillow’s—what does that name mean to you? If you have been around the model airplane hobby for any time at all, you probably recognize it as the name of the company that makes little balsa stick-and-tissue kits.
Cover photo by Kyle Jaracz
Most older modelers have likely built a couple of them and learned a lot in the process. Nearly all of the kits are scale models designed for rubber-powered Free Flight (FF). Their performance can be limited, which is one of the reasons why there has always been plenty of interest in converting them to use different types of power. It’s no secret that many of the Guillow’s kits that are sold don’t get finished. Some are maybe never started. There are several reasons why this happens. When you open one of those brightly printed kit boxes, you discover that although they are small, Guillow’s kits can be complicated. They consist of several small, intricately shaped balsa wood parts that require considerable finesse and even more patience to “come out right.” They are also intended for tissue covering, which is an old-time model-building skill that can be hard to learn to do well. On the other hand, the plans you’ll find in Guillow’s kits, especially the newer ones, are good. They are loaded with details and useful information, and they are accompanied by helpful illustrated, step-by-step construction guides. Unless you are confident that you know what you’re doing, however, they can be intimidating. With all of that considered, why have Guillow’s kits been around for roughly 80 years and why do they continue to appear on the shelves of hobby stores, museum gift shops, and plenty of other places that would surprise you by carrying model airplane products? There are probably dozens of them on store shelves within a short driving distance of where you are right now. Why? People buy them—lots of them. Guillow’s model airplane kits promise fun by exciting our imagination. A well-built one grabs your attention. These kits can be turned into attractive, appealing, little scale model airplanes, and it’s hard not to look at one and wonder, “Could I build one that well?” Think of all of those “what if” smiles of anticipation that the sight of one of those boxes has inspired. That’s happened to you, too, hasn’t it? We could argue that just that sort of response describes (and supports) the design philosophy of today’s Guillow’s kits, but there’s more to it than that. The Paul K. Guillow company has a long history of producing balsa model airplane kits that fly, and it’s time for me to share a story of some of my own experiences with Guillow’s models.
My Story
When I was a kid in the 1950s, I was enthralled by model airplanes. At the time, Guillow’s produced not only several series of built-up balsa scale kits (including the little 10¢ sheet balsa aircraft that might fly across the back yard if you built them right, and the tiny, solid models that you carved from balsa blocks), but also a line of “gas engine-powered” Control Line (CL) flying models. The one I remember best was the Barnstormer. It was a big, graceful contest airplane intended for the CL “Stunt Pattern” (Aerobatics) event. It was designed by master modeler Lou Andrews, who had flown several of them to win lots of big contests in the early 1950s. I could never afford one, but I have exciting memories of older pilots flying Fox .35-powered Barnstormers over the grass of my town’s baseball field on warm Sunday afternoons. At the time, Guillow’s also produced dedicated RC kits when that type of model flying was a rare, experts-only branch of model building. The Trixter Beam, also designed by Lou, was one of the few rugged, dependable kit-based designs that you might encounter if you found a small group of modelers flying RC aircraft off in the far corner of a farm pasture. I had the privilege of meeting Lou and flying with him a few times during the late 1960s. One weekend in 1967, he showed up at our flying site in Ipswich, Massachusetts (another farm pasture), with the original Beam prototype of the Guillow’s kit. The aircraft was already more than 15 years old at that time. In those days, models such as the Beam had flown under the tentative and occasional control of rudder only, using single-channel radios that operated on vacuum tubes and dry-cell batteries. Lou had installed a then-state-of-the-art Bonner Digimite eight-channel proportional radio, but the model still had its original red and yellow silk and dope finish. Even then, I knew enough about the technology of controlling model airplanes using radio signals to understand that Lou’s model being there and still flying was a small miracle. By that time, Lou had left Guillow’s and formed Andrews Aircraft Model Company (AAMCO) to produce his new Aeromaster biplane, along with a whole series of related designs. There were several AAMCO airplanes at the field that day, but it was the old Trixter Beam that I recognized as a tribute to his mastery of model airplane building, his skill of making old radios work, and the level of discipline and attention to detail that permitted Lou’s old Guillow’s Beam to be there. In those days, the RC equipment that I could afford wasn’t much better than the tube-type single-channel stuff that had once been state of the art along with the Trixter Beam. Like many other model builders in those days, I struggled to keep what I had working long enough to get in an occasional “run-the-tank-dry” flight before something failed. Having plenty of patience and determination was only part of the deal. Regardless of the respect that I had for Lou and the models he built, it would take far more than admiration on my part to do anything about it. I knew it would be a long time before I’d be able to pay for all of the requisite stuff that went into building anything like an Aeromaster of my own. Despite all of that, I made a solemn promise to myself. Someday I would learn how to design, build, and fly RC model airplanes that would be good enough to command that same kind of respect from other model builders. Along the way, I discovered that with the gift of unusual abilities comes the responsibility to share and pay it forward. For me that meant writing down and explaining what I have learned to anyone who might be interested. It occurred to me that in addition to the big, complex RC scale airplanes that I previously described in my “Master’s Workshop” column in Fly RC magazine (which has ceased publication), several of my readers wanted to learn about building smaller, simpler models. As I found myself devoting much thought to the notion of sharing, I recalled my day with Lou and the Trixter Beam. That challenge came back to me as a question: What about all of those Guillow’s kits? That wasn’t anything new. I am far from being the first model builder to take an interest in converting them into something beyond rubber powered. Since the 1950s, people have been “beefing up” the structures and turning them into flying CL models. If you’ve ever had one, you know that the plans for many of the larger kits already include directions for converting them to glow engine power—often for a .049 engine. Many kits also included a rudimentary CL bellcrank. If you were a good builder, you could make that work well. The plans often included references to “RC conversion” as well, but I suspect that few single-channel RC Guillow’s models ever flew reliably. For a long time, the type of RC equipment that would make a successful conversion possible—let alone practical—did not exist. It could not be purchased or built, no matter how good of an aeromodeler you were. All of that has changed. Micro RC systems and brushless electric power are a perfect match for dozens of Guillow’s kits that have been there all of this time. There are dozens, if not hundreds, of modelers making (and flying) those conversions. I first became aware of this via RCGroups and I’m sure there are other informational networks that I’m not aware of. A vast amount of experience is being accumulated and shared on the internet. I want to emphasize that nearly all of the Guillow’s kit conversions I will share here come from other builders. In large part, I’m just passing on what I have learned as I take advantage of my good fortune of having a way to ensure that many people get to read what I write. Note: To you builders out there who have inspired me, there is no way that I could ever attribute this stuff (give credit where it’s due) without leaving someone out, so I will simply say that you know who you are and thank you.Aircraft Modifications
It’s time for me to let you in on some of the plans for me to write more about Guillow’s kits. For some time, I have been working closely with designer Mark Tennant of Guillow’s. Mark and I have had several conversations about possible RC conversion modifications ranging from the bare minimum (such as adding control surfaces and a motor mount), all the way to things such as adding retracts that will work right and stay attached to a model without making it grossly overweight. While we were at it, we gave serious attention to the issue of wing incidence and airfoil. Most Guillow’s kits use a flat-bottom airfoil with a sharp leading edge set at considerable positive incidence. This is okay for FF rubber power, but not for electric RC conversions.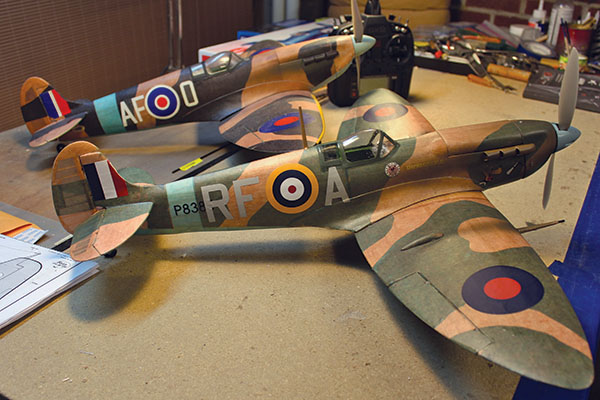
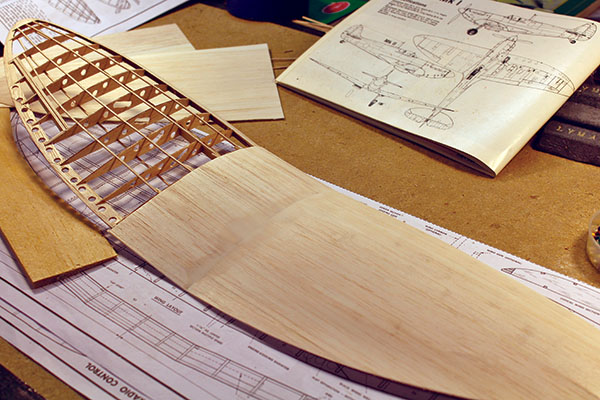
The “brown” airplane in the rear is the author’s number 1 that uses an original Guillow’s flat-bottom wing. The “green” number 2 in the foreground uses the new wing section from Guillow’s.
I must also mention that some of the newer, larger kits feature a thicker, semisymmetrical section set at a lower incidence angle. We are taking all of that into consideration.
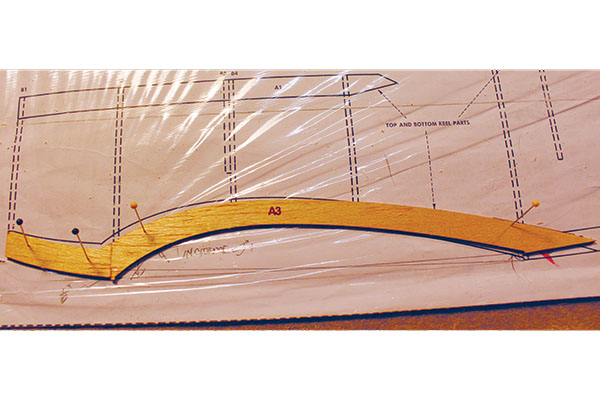
Perhaps the most important issue for a successful RC conversion is to realize is that the “old” rubber-powered FF airfoil is set by design at an extreme positive angle of incidence. In this first Spitfire (the brown one), the author retained the flat-bottom airfoil but reset the incidence to 0° to help control “zoom-climbing” at high power. You can see the changes that he made in the main/center wing saddle part (A3) to define that adjustment.
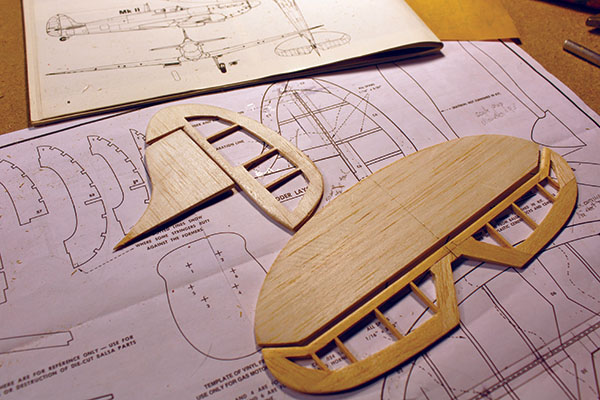
In the original kit, the horizontal tail surface is set at 0° incidence, which is just what you want. The only necessary changes to the tail are to add separate moveable rudder and elevator, increase the thickness/strength of both surfaces to make adding hinges practical, and the increased loads that will come with successful RC flight. You can see the 1/24 balsa sheet skin that will be glued to the side of the vertical fin frame.
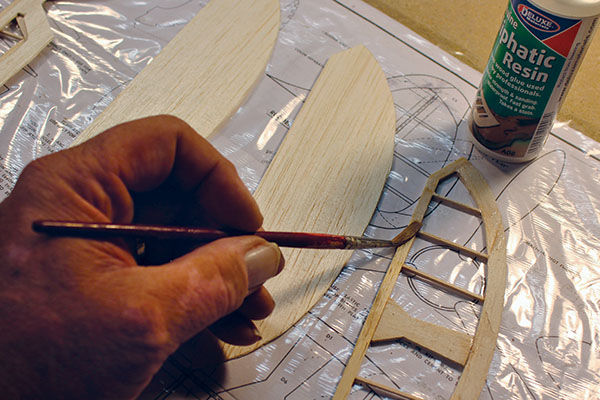
This is the assembled/sanded horizontal stabilizer frame next to the precut 1/24 balsa sheet top and bottom skins that have been cut to shape. The author used his favorite method of brushing a coat of Deluxe Materials Aliphatic Resin glue onto every part that comes in contact with the skins. In the case of this Kit No. 403 Spitfire, the horizontal and vertical tail surfaces are symmetrical so there’s no difference between top and bottom or right and left.

This is the complete set of tail surface components all sanded to shape. Radius and taper were put into the edges.
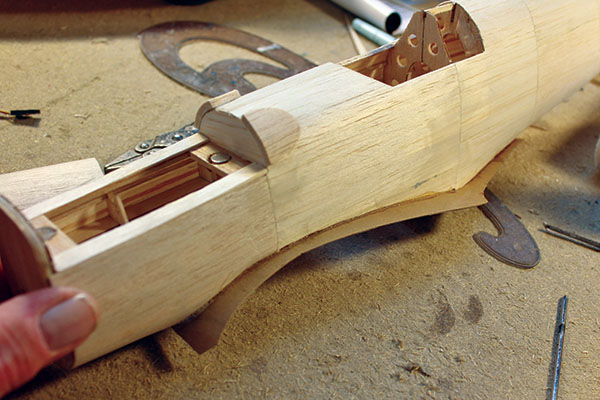
The completed fuselage framework per the kit instructions, with a lightweight sheet balsa skin over it. Attached (at front) is the 1/64 plywood removable wing saddle plate that still needs some trimming. All of the incidence changes dictated by the modifications are incorporated into the fuselage.
One of my new tasks is to build two airplanes from the same kit—one with the FF wing section and the other with the “new” one so we can make some useful comparisons. Mark confided his interest in getting the airfoil issue sorted out by sending me several sets of custom laser-cut ribs sized for the Spitfire, but with the new airfoil. I am working with those to determine to what degree this will enhance the RC-friendly factor. Mark has also told me that he will be watching closely to see what individual electric RC pilots do with the Guillow’s kits that interest them. I can tell you that Guillow’s takes interest in RC conversion of its kits seriously. Whatever might happen in that respect in the future depends on the feedback you give to Guillow’s about your interest in such things. I am committed to the idea that for years, the Guillow’s kit line has been a “sleeper” to readers such as you and merits more attention.
The Basics
It’s time for me to discuss some of the questions that I have heard about Guillow’s conversions. I’ll start by giving you the basic course based on what I have learned through building/converting the two Kit No. 403 Spitfires in the photos. Please note that I have put all the details about those models in the accompanying captions and used this main text for general information. Based on all of the material that I have read, perhaps the most common question is: Will it work? The answer is yes, but as I stated earlier in a different context, only with some conditions. Guillow’s kits are for model builders—people who enjoy devoting effort and taking the time to make things fit and line up correctly. If you don’t have confidence in your ability to construct wings and tail surfaces that are flat and true, and to make a former and stringer fuselage that does not look like a lumpy banana, complicating the job by adding RC components will not make it easier. I suggest that if you can build a Guillow’s kit “stock” without feeling that you have to make excuses for your work, you are ready for this stuff. If not, practice. The same goes for flying small RC scale model airplanes. Will it be too heavy? Maybe. That part is up to you and it comes down to model building skills and good planning. Learning to sand properly has a lot to do with it, and this is not something that applies only to Guillow’s kits.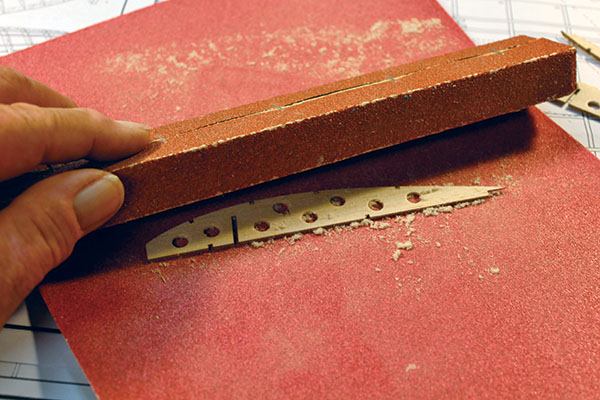
Several builders have mentioned lightening holes, which are common in full-scale construction. Instead of attacking an already built-up structure with a Dremel tool, the author planned ahead and cut whatever holes he thought were required before assembly. A process he has never seen before in print involves using an ordinary 1/4-inch paper punch to cut small holes such as these. Sanding every sheet balsa part before assembling is probably the most important weight-saving step you can take.
I have also heard the question, “What about all of that heavy balsa in the kit, along with some questionable die cutting?” During our discussion of these articles, Mark explained to me that Guillow’s is aware of those issues and he asked me to remind you that (in his words), “We don’t have a problem replacing balsa due to subpar, out-of-spec wood or bad die cuts that [will] hinder the modeler from enjoying and making the kit. If a modeler is making a kit for [a] certain aspect, like RC flying, there’s no problem helping them out by replacing heavy sheets they may have gotten in their kits with lighter die/laser-cut stock.” All you have to do is ask. Write, email, or call customer service. As for that die cutting, it helps to remember that most of these kit designs are at least several decades old and that cutting dies, which are demanding and expensive to make, wear out. Guillow’s responded to that problem by reengineering its kit design and production to use laser-cutting. Not all of the kits have been changed over, but that’s worth waiting for. Both of my Spitfires came from these new laser-cut kits and they got it right.
The framework of the left wing panel sanded to shape represents the quality of work that the author discusses. The next step is to finish the left wing with more balsa sheet.
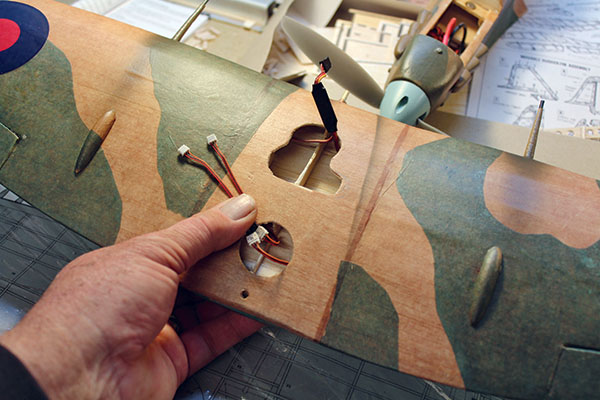
This is the top center wing surface of the author’s number 2 Spitfire, the green one, all ready to go. The little white connectors are for dual Spektrum A2020 Nanolite aileron servos and the black connector at the front is for the retracts. The finish is dyed silkspan.
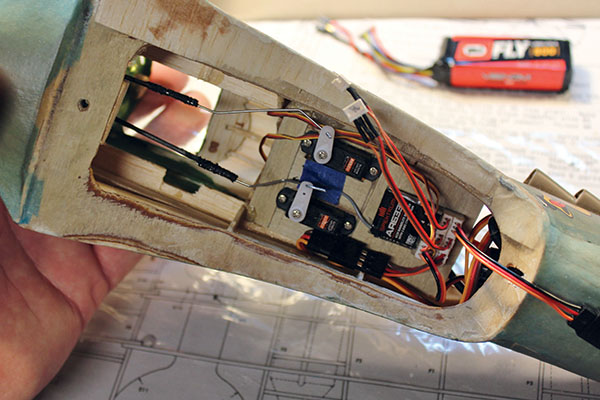
This is the fuselage bottom/radio bay of the number 2 model. That’s all Spektrum gear, including an AR6335 receiver. This gives you an idea of how to mount the radio equipment.
The author built a battery access hatch into the top/front of the fuselage that looks like this. Electric conversions are easier if the wing doesn’t need to be removed to access the battery.
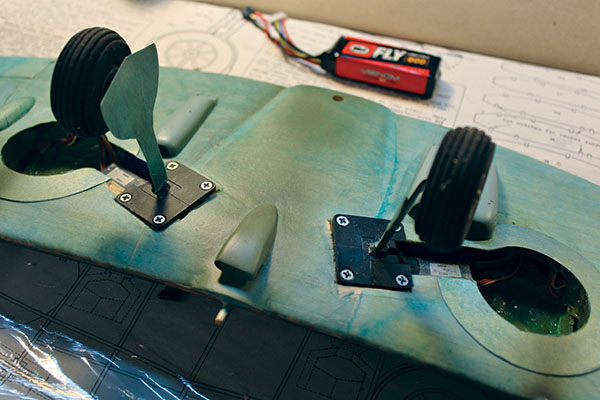
The bottom of the wing center section of model number 2, with slightly modified E-flite 10- to 15-size electric retracts.
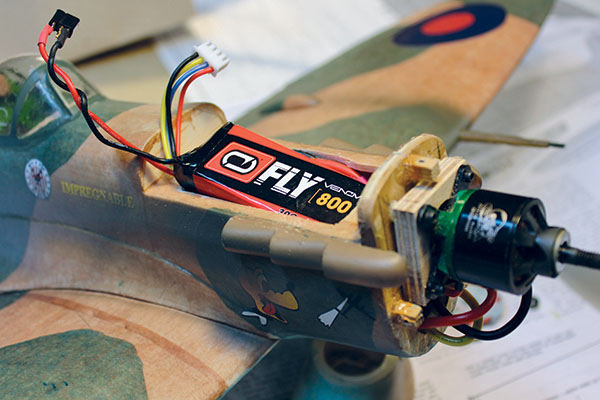
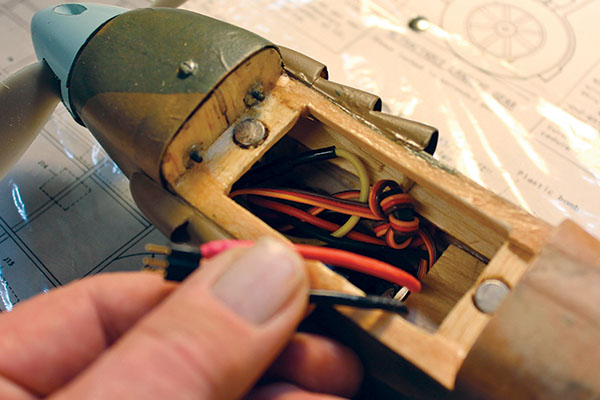
With the nose open for inspection, you can see a Venom FLY 800 mAh 3S LiPo battery pack ready to be pressed the rest of the way into place. The motor is an Innov8tive Designs Cobra C2213/26 running from a Cobra 33-amp ESC.
—Bob Benjamin [email protected]
See more great Guillow's projects!
In 2016, Model Aviation celebrated Guillow's 90th anniversary with a feature article and asked our readers to share their Guillows projects, which you can see in the gallery below! Click each photo to see a larger version and read what the owner had to say about the model. Please note that we are no longer accepting new submissions for this gallery.
Guillows at the National Model Aviation Museum
Learn more about Guillows with the National Model Aviation Museum's History Project!Sources:
Guillow’s (781) 245-5255 www.guillow.com Guillow’s on RCGroups www.rcgroups.com/forums/showthread.php?t=827861This Month's Issue

Join the AMA
![]()


1 comments
Guillow’s kits
Add new comment