


Graupner Husky 1800
Written by George Kaplan A versatile and enjoyable sport aircraft Product Review As seen in the April 2018 issue of Model Aviation.
Bonus Video
Specifications
Model type: Sport scale ARF Skill level: Intermediate to advanced pilots Wingspan: 71 inches Wing area: 550 square inches Airfoil: Flat bottomed Length: 47 inches Weight: 5-3/8 pounds; 6 pounds with updated CG Power system: Preinstalled brushless outrunner motor and 40-amp ESC; 4S 2,200-3,000 mAh LiPo battery required Radio: Servos come preinstalled; radio and receiver required; if used for glider towing, optional servo needs installed Price: $329.99Pluses
• This PNP kit includes the motor, ESC, and servos. • Carbon-fiber wing joiner. • Quick wing-release mechanism with a positive snap locks wing in place. • Two magnetic hatches give quick access to the receiver and LiPo battery compartments. • Three multicolor scale sticker schemes included. • Preinstalled LED lights for navigation, landing, and strobe. • Includes standard wheels and larger foam tundra tires for rougher fields. • Optional float and ski sets give the Husky 1800 the ability to operate virtually anywhere.Minus
• The Husky is tail-heavy using the 82 mm CG placement stated in the manual. Moving the CG forward to 70 mm improves flight performance.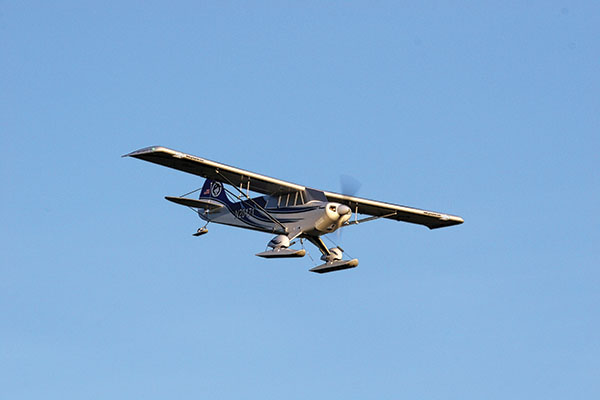
Outfit the Husky with the optional ski kit and you can take off from snow, sand, and even thick grass. The skis bolt right onto the main gear.
Product Review
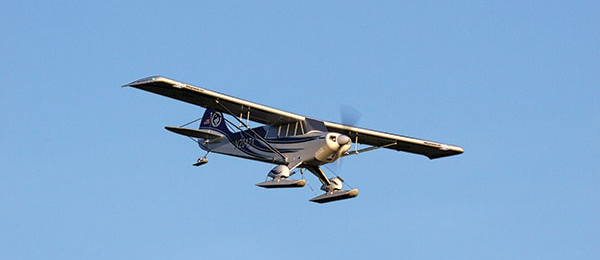
The full-scale Aviat Husky is a tandem, two-seat, high-wing light utility aircraft built by Aviat Aircraft in Wyoming. It entered production in the mid-1980s and has received many power and performance updates. Its great flying characteristics and large load-carrying ability make it popular with commercial and private pilots. Graupner USA has come out with an RC version of the Husky 1800. The company states that the model has the same Short Takeoff & Landing (STOL) capability as the full-scale aircraft and captures its scale looks. Graupner not only provided its Husky kit for this review, but also sent along optional float and ski kits. Being one who has always been interested in graphic arts and design work, what struck me first was the printing on the outside of each of the three boxes. A typical kit has a simple label slapped on a plain box, or maybe the top of the box has printing. Graupner’s boxes have nice artwork covering all six sides of the boxes. They are great to look at and informative. In the case of the optional skis and float kit boxes, the assembly and mounting instructions are on the back of the box. All of the parts arrived in great shape thanks to the abundance of foam protection, polybagging, and wrapping of the airframe components. The Husky 1800’s airframe is mostly made of what Graupner refers to as SOLIDPOR. It is similar to EPP foam, but more rigid, and provides a nice, smooth finish and feel to all of the surfaces. Inside the “hard points” of the airframe are many parts made from injection-molded plastic. This same plastic is used for some of the Husky’s parts, such as its wheel pants. I was struck by the quality of the plastic and the molding. With this being a Plug-N-Play (PNP) model, much of the work is completed at the factory. This includes the small stuff such as preinstalled carbon-fiber reinforcing, hinging and attaching the control hardware, installing the pushrods, etc. Many other tasks, including servo installation, attaching the wing struts, the motor and ESC installation, and installing the navigation lighting system also come completed. One thing that’s not done at the factory is applying the stickers, giving the pilot the option to finish the model to match his or her taste. Huge pressure-sensitive sticker sets are provided in scalelike red, yellow, or blue schemes. Rounding out the contents are two types of landing gear (conventional with wheel pants and larger tundra tires), a spinner and propeller, four lengths of carbon-fiber rod, and a multilingual instruction manual.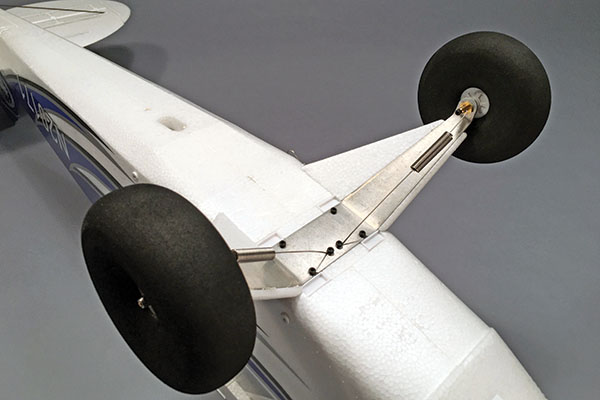
These large foam tundra tires are included with the Husky kit. You can switch from the regular tires and wheel pants to these in roughly 5 minutes, and everything bolts in place.
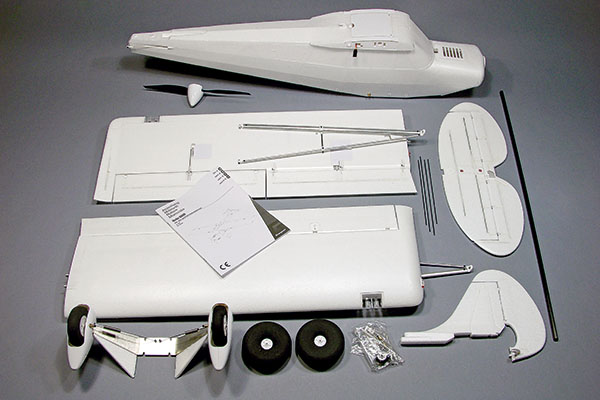
There aren’t many parts needed to finish the Husky’s assembly. To go from this point to flight ready takes slightly less than an hour, although decorating it with the included sticker sets will increase that time.
Assembly
There wasn’t much for me to do to assemble the airframe. Everything can be done in a few hours—most of which is spent applying the stickers. You can see the steps by downloading a copy of the manual from the Graupner USA website. Although the first step in the manual is installing the main gear, I recommend first applying the stickers before everything is assembled. The stickers are pressure sensitive and die-cut, preventing wear and tear on your scissors. For the most part, the decals line up as they should, but there were gaps around the edge of the vertical fin and the top of the fuselage. I cut and pieced together some of the leftover matching sticker “bleed” area to help fill in the gaps. It didn’t look great up close, but it helped hide the seams when viewed from a few feet away. After the stickers were applied, the steel main gear was attached to the fuselage. It’s quite sturdy and includes a couple of tension springs to help support it. Now you can choose which type of landing gear to use for your initial flight. The conventional gear includes a pair of 31/2-inch foam tires, a set of axles, and wheel pants that have two halves that bolt together. Another option is the larger 41/4-inch tundra tires that are wider and have their own separate axles. Work now shifts to the rear of the fuselage where the tail surfaces and tail wheel assembly are bolted into place. After attaching the pushrods to the control horns to the elevator and rudder, four pieces of carbon-fiber rod are glued in place to add support to the tail surfaces. Although the manual doesn’t suggest it, I chose to use foam-safe CA adhesive on the foam model, to be safe. At this point, all that’s left to do is some radio installation work. The Husky 1800 comes with preinstalled servos, but the servo extensions need to be properly positioned. Included are the servo extensions for the aileron and flap servos, as well as the navigation lights. The ends of these extensions are glued into the pockets, which are molded into the left and right root joint of the wing. Mark the connectors to help you assemble the Husky at your flying field! To complete the Husky, add the receiver of your choice and power it up for the first time. (Don’t install the spinner and propeller until you have properly set up the Husky. Safety first!)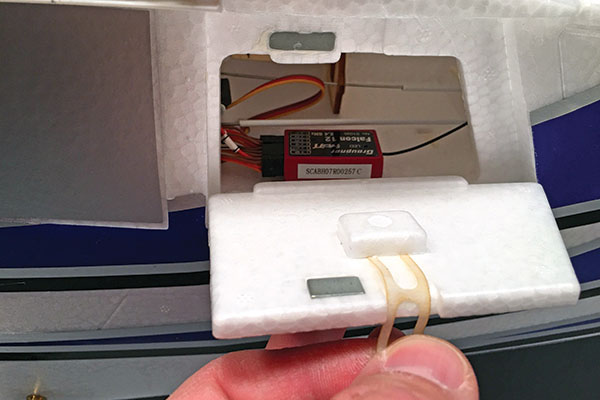
This small hatch on the fuselage’s port side gives you access to the receiver compartment. If you choose to use the Husky as a towplane, you can also mount the tow-release servo in this area.
You might notice that I’ve only focused on the fuselage until now. That’s because the wing halves are ready to go right out of the box, except for attaching the stickers. Each wing half incorporates an aileron and flap servo. The control linkages and surface hinging come preinstalled. Even the wing struts and jury struts are ready to go. The red and green LED navigation lights on each wingtip and strobe lights on the wing plug into the LED controller located in the fuselage. A unique attachment mechanism locks the wing halves into the fuselage. Each half has a small, hinged lock that securely snaps the wing into place. While it’s locking, it is also drawing the wing into the fuselage for a snug fit. There is a finger hole molded into each lock so that you can unsnap it and remove the wing panel.
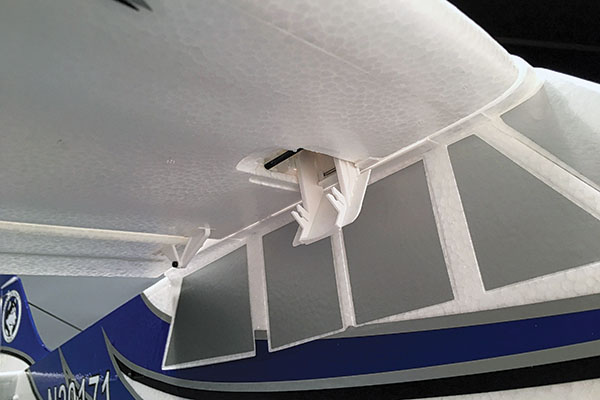
No screws are necessary to attach the wing. These built-in locks snap each wing half in place and draw them tight to the fuselage.
With everything in place and using the recommended battery, the Husky balanced where the manual recommended (82 mm). The total weight, including the battery, was 53/8 pounds.
Flying
When it came time for the Husky 1800’s maiden flight, I packed up everything and headed to a large grass field that is used for high school football practice. Pointing it into the wind, the Husky was off the ground quickly (in approximately 5 feet), as advertised. I expected it to be a docile, smooth-flying model, but while doing the mandatory photo passes, I wasn’t comfortable with it. If I was flying slow and steady, the Husky flew as expected, but in the turns and when throttled up, it was all over the place. I first thought that it was tail-heavy, but I wasn’t sure. A few flights later, I still hadn’t figured things out. I could have activated the built-in stability of the Falcon 12 receiver, but that would only mask the problem. I headed home and after tinkering with the model and searching the internet, I stumbled upon a thread where someone was also having a similar problem. That person found that moving the center of gravity (CG) forward solved the problem, so I tried it. Moving the CG forward from the recommended 82 mm to roughly 70 mm dramatically improved the Husky’s flight characteristics. Moving the CG required adding a fair amount of nose weight. Instead of adding a lump of dead weight, I slipped in another 2,400 mAh battery—one on top of the other. It’s a snug fit, but required no trimming for the brand of battery that I was using. I also rewired the battery connection so that I could use both batteries at the same time, in parallel, for longer flight times. It was a night and day difference flying the Husky with the new forward CG location. There was no more dropping off in the turns, no more crazy pitch changes when changing the throttle, and better still, no more super-sensitive elevator! The Husky requires some aileron-rudder coordination in the turns. It’s easy to turn the aircraft using the rudder with a touch of up-elevator to hold altitude. Its flat-bottom wing doesn’t lend itself well to aerobatics, but you can coax aileron rolls out of the Husky. Loops, lazy eights, and hammerheads are more the Husky’s forte. There’s plenty of power to pull it through most of these maneuvers, but it’s not a 3D machine, nor should it be. For a flat-bottom airfoil design, after it’s inverted, it flies well, requiring less down-elevator to keep it level. Snaps and spins under power are tight and have a quick rotation, but if they are performed with the power off, they are slow and more like a barrel roll. I set the flaps on the Husky on a three-position switch (none, half 35°, and full 70°). Using the flaps, the Husky can get off of (and onto) small runways because it can fly at ridiculously slow speeds while still remaining controllable. One other thing I haven’t really touched on is the Husky 1800’s preinstalled LED light system. Although noticeable during the day (if you point the lights out), they are best viewed during early morning or late evening flights, or even at night—giving the Husky an extra bit of scale realism.Accessorizing the Husky
As shipped, the Graupner Husky 1800 is capable of taking off from pavement, grass, rough fields, and even dirt. As if the included standard wheels and tundra tires weren’t enough, Graupner has two other options. The first is a ski set. Included in this add-on are skis that attach to the main wheels and a smaller ski that attaches to the tail wheel. Each of the skis bolt into place and include a set of springs that hold them at the correct angle and provide some shock absorption. In a matter of a few minutes, you can outfit the Husky to tackle snow. If water is more your thing, an optional float set is available. Some assembly is required, but when finished, it is a sturdy setup with twin floats and steerable rudders on the back of each float. A string is attached to each rudder and to a modification on the tail wheel assembly. It works, but it’s finicky to get right. Each float has the option for a servo to be installed and attached to the preinstalled pushrods. You then will have to run extensions from the servo up the float struts and into the fuselage. (Servos and extensions are not included in the float package.) Regardless of the surface you want to fly from (or land on), it appears that Graupner has you covered. There’s one more thing. The Husky has the capability to be converted into a towplane for gliders. By installing your own servo in the fuselage, it can be attached to the preinstalled tow hookup on top of the fuselage and allow you to tow sailplanes with up to a 2-meter wingspan.
This optional float kit adds to the Graupner Husky 1800’s versatility. The foam floats are supported by a metal structure and can quickly be attached or removed from the fuselage.
In Conclusion
It’s hard to describe the tremendous amount of thought that clearly went into this Graupner Husky 1800 kit. The company did a great job of capturing the look of the full-scale Aviat Husky. Everything fits well and all of the molding is first class. The mechanism used to “snap” the wing halves to the fuselage works well and holds each half firmly in place, even during aerobatic flights. After the CG location is corrected and the aircraft is flown as intended, the Husky 1800 makes a great STOL model, especially when its flaps are extended. Depending on the throttle setting, it can slowly fly in small parks and ball fields or take up a lot of sky at a club field with more throttle. An average flight with the 2,400 mAh LiPo battery lasts 8 to 10 minutes. Going up to a larger battery (4,000 mAh or higher) can allow you to fly for roughly 15 minutes.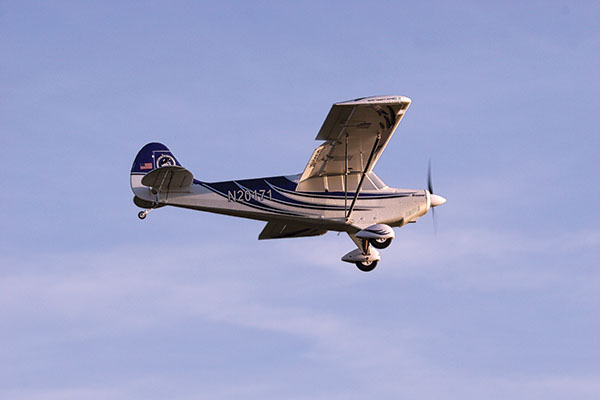
The Husky is capable of STOL landings and takeoffs. To perform those well, you need flaps. This shows the Husky’s large flaps halfway deployed on this slow flyby.
—George Kaplan [email protected]
Manufacturer/Distributor:
Graupner USA (855) 572-4746 www.graupnerusa.comSources:
Kinexsis LiPo battery (800) 338-4639 www.horizonhobby.comThis Month's Issue

Join the AMA
![]()


Add new comment