


A Beginner's Guide to 3D Printing
Written by Jay Smith Creative modeling at your fingertips How-to As seen in the February 2018 issue of Model Aviation.
Bonus Video
Download the Barnstormer Figure!
Download the Barnstormer (.stl format, posted with the permission of Dremel)
3D Printing Commonly Used Terms
3D file is a file that represents a three-dimensional file. 3D model is a three-dimensional model of an object. ABS Acrylonitrile Butadiene Styrene is a strong and durable thermoplastic polymer commonly used for 3D printing. Additive Manufacturing is the process of building up a three-dimensional object, one thin layer at a time. CAD is Computer-Aided Design software used to create 3D models for printing. CNC is Computer Numerical Control that provides the automation of machine tools using computers. Extruder is a group of parts that handles feeding and extruding of the build material. Filament is the base material, such as ABS or PLA that is used to 3D print objects via fused deposition modeling (FDM). PLA is Polylactic Acid, a biodegradable thermoplastic polymer made from plant starch, used as a 3D printing material. Printbed is the surface where the printed part is formed. Some printbeds are heated, allowing them to be used with different printing materials. Resolution is the surface quality of a 3D print, normally defined by the layer height. Slice is one layer of a 3D-printed model. STL is the most popular file format used in 3D printing. TPU, or thermoplastic polyurethane, is a soft, flexible plastic that retains its shape and form.Dremel DigiLab 3D40 3D Printer
Specifications
Height: 20.25 inches Width: 16 inches Depth: 15.9 inches Cord length: 5 feet Filament diameter: 1.75mm Weight (without spool): 35 pounds Filament type(s): PLA filament Amperage: 1.8 Warranty: Limited one year Voltage: 110 volts to 120 volts Minimum layer thickness/resolution: 100 microns Maximum build depth: 10 inches Maximum build height: 6 inches Maximum build width: 6.7 inches3D Printing Basics
Before attending the New York Maker Faire a few years ago, I had no firsthand experience with the use of 3D printers. I had read about them online and in Make magazine, however, the experience of seeing several modelers actively printing items using various materials gave me a much greater appreciation of this technology. After spending a few hours in the 3D printing area, I left impressed by the technology and excited to continue following the advancements in this promising area of designing and printing on demand. I also thought that one day I would like to have one, and pondered all of the items that I could make. In the few years since my first experience with 3D printing, the technology has come a long way. Printing speeds have increased while the cost of machines has decreased. Although the use of 3D printing as a hobby is growing, 3D printing’s primary use in 2017 was in product development. I decided it was time to give a 3D printer a try, and after doing a little research, I reached out to our friends at Dremel to see if they would be willing to provide a Dremel DigiLab 3D40 3D printer on loan. Dremel agreed to provide the 3D40 to me for three months so that I could get some hands-on experience for this feature. The purpose of this article is not a review of the printer, but to share my experiences for anyone who might be interested in investing in a 3D printer.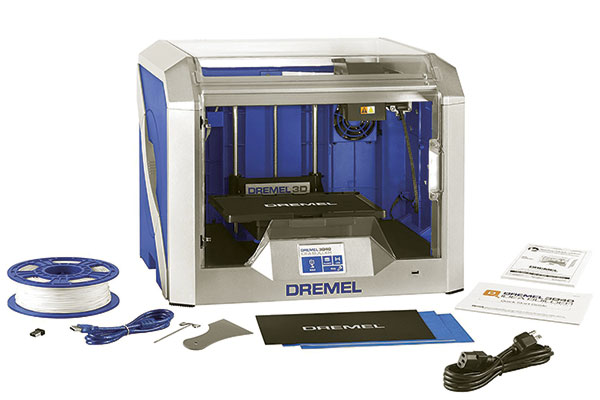
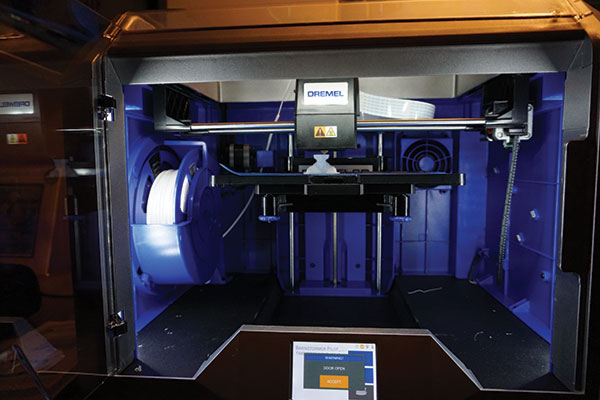
This is everything included with the Dremel 3D40 3D printer. When this article was written, the printer was available for $889 on Amazon. Photo courtesy of Dremel.
I chose Dremel because I have had positive experiences with the company’s products for approximately 40 years and it offers great support. Nearly anyone who has been in the hobby for a while is likely to be familiar with the Dremel brand and has probably owned or used one of its rotary tools. The 3D40 has some features that really appeal to me, including being ready to go out of the box, a full-color touchscreen, Wi-Fi-enabled remote printing, semiautomatic leveling, included software, and at the time, access to products I could easily print from the Dremel website. While I was waiting for the 3D40 printer to arrive, I watched the handful of videos on Dremel’s website, which covered the basics for getting the machine set up and how to use it. I also browsed Thingiverse, which is a free website that has files that can be used with a 3D printer, laser cutter, or CNC router. Searching the following topics provided promising results: RC pilot, 47 things; RC, 1,824 things; and drone, 4,660 things. The number of items you can download and print is staggering and the items are so varied that it’s likely that anyone could find something of interest to download and print.
Hobbico released the AquaCraft Cajun Commander with free 3D-printable files available on the compny’s website to print a footrest, duck call, and gun rack. Photo courtesy of Hobbico.
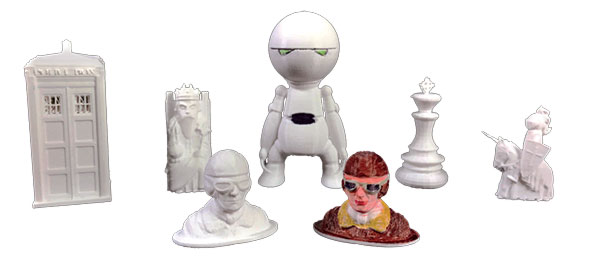
When the large box with the 3D printer arrived, I was excited to unpack it and start printing all of the cool items I never even knew I needed. I installed the included white PLA filament on the side of the Dremel 3D40, adhered the build tape to the build platform, and connected the printer to my Wi-Fi network. The printer included a USB thumb drive with some basic files to get started with 3D printing. Although I couldn’t wait to print my first pilot figure, it made sense to start simple, so I selected a chess piece and eagerly waited for the printer to heat up to the appropriate temperature (220° Celsius) and start printing. The 3D40 does not have a heated printbed, so it only prints using PLA, and only after heating enough to melt the PLA. After reaching temperature, my printer began zipping around slightly above the printbed. The full-color touchscreen cheerfully showed my progress and the time remaining to finish the project.
The 3D40 is printing a barnstormer pilot figure. The 1.5-inch pilot took 43 minutes to print and weighs 0.2 ounces.
Because it was going to take 40 minutes to finish, I decided to step away for a bit from my home office where the printer was set up. Out of habit, I flipped off the light. It was then I realized that my printer was plugged into the outlet controlled by the switch. As I switched the light and printer back on, I hoped that it would happily continue printing, but that was not the case. If you lose power to the 3D40, you must remove your unfinished project and start over. It turned out to be a good lesson. Knowing that some projects can take many hours, I hoped not to have a power outage while printing. If you live in an area prone to power outages, an uninterrupted power supply might be a good option. When looking to take a downloaded file from a website and prepare it to print on the 3D40, I used a web-based program on the Dremel website called Dremel 3D Idea Builder. This allowed me to import the downloaded file into the program then make any changes to it before printing. To prepare the file to print, you have the option to “Repair” the file, which analyzes the file and repairs and rotates it to work best with the printer. This step is not required to print. Next is “Layout,” which allows you to move and rotate the item to be printed, as well as adjust the scale, making it smaller or larger. Being able to move the item being printed is helpful because it normally defaults to printing in the center of the printbed and will wear out the build tape faster. I like to move items around when space allows. “Slice” is the final step. It allows adjustments to the layer height (speed), perimeters (the strength or weakness of the item), and infill density (hollow to solid). After all of that information is selected and the slice completes, you will then be ready to click “Build” and start printing. It is also at this point that you will be told the amount of time required to complete printing.
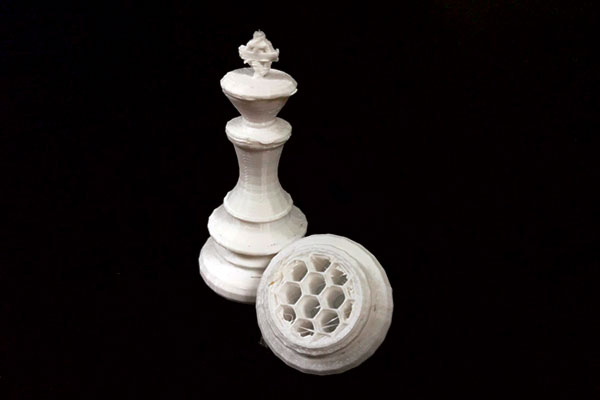
When printing an object, you can select the infill density, which determines how hollow or solid the item will be when it is printed. This chess piece shows the honeycomb that is used inside for support.
Dremel had several items on its website that could be printed, including a barnstormer pilot figure that I liked and printed. Unfortunately, after a website redesign, these files are no longer accessible. I contacted Dremel support to inquire about the files and was told it was likely that they would not be made available again. The representative I spoke with referred me to Thingiverse to find numerous items to print.
Observations
I have found that it is best to start simple when selecting things to print. The more complex the piece, the longer it will take; it could even require that parts be printed separately. It is important to level the printbed before each item is printed. With the 3D40, you can select leveling on the touchscreen and the machine will test the printbed. If adjustments are required, you simply turn the knobs located under the printbed in the direction listed on the screen. It is also important to ensure that the build tape is stuck securely to the printbed. The build tape is basically a large piece of blue painters’ tape. It is also helpful to clean the tape with rubbing alcohol between prints to make it easier to remove the completed item from the printbed. An object removal tool is provided; however, I have found that it is normally easy to remove items by gently rocking them back and forth until they come free. Using the removal tool could possibly damage the build tape if you are not careful. The 3D40 is completely enclosed, with access coming from a clear top lid and a clear door on the front. Being enclosed helps cut down on a slight plastic smell when the unit is heating and printing. Having an enclosed unit also helps with the noise level when printing. The 3D40 is no louder than my inkjet printer, and it didn’t bother me to be working in the same room while it is printing. As mentioned earlier, this machine prints using PLA. The color that came with the machine is white. Dremel sells several other colors and you can switch colors anytime you want.
PLA comes in various colors. It can be painted or colored using markers, as shown in this example.
PLA can be painted or markers can be used to color it. When using markers, you need to be careful because the colors can bleed a little while being applied. Inexpensive water-based paints are another good option. If you decide to invest in a 3D printer, be prepared to feel like a kid in a candy shop when you realize all of the items that are available and free for you to download and print. After you are comfortable with that, you can begin to manipulate these files to produce the items you want. You can also design and print your own creations.
Conclusion
I have found that 3D printing is like aeromodeling because you can tailor your level of engagement to meet your time and needs. If you want to print a camera mount for your racing quad, for example, you can find several options that you simply need to download and print, or you can create your own.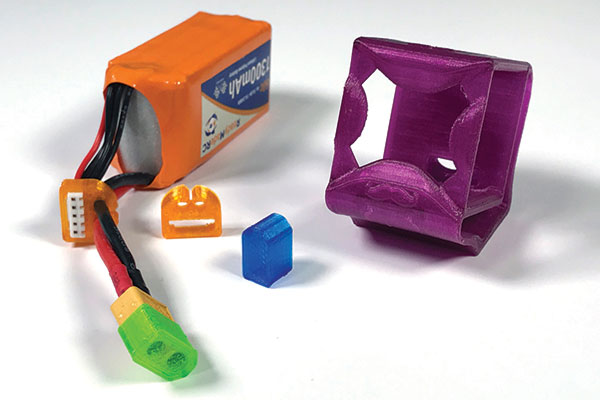
The camera mount, battery lead cap, and balance tap holder are all printed with TPU and were purchased online. TPU filament is a soft, flexible plastic that retains its shape and form.
If you are not ready to invest in a 3D printer, but you have items that you would find useful, you can purchase completed items or pay to have your own designs printed using many types of materials. Whatever you decide, the world of 3D printing is open to you. —Jay Smith [email protected]
Sources:
Dremel (844) 437-6533 www.digilab.dremel.com Maker Faire www.makerfaire.com Thingiverse www.thingiverse.com AquaCraft Cajun Commander www.aquacraftmodels.com/boats/aqub5722-cajun-commander/index.phpThis Month's Issue

Join the AMA
![]()


4 comments
3d files
Went to Aquacraft and decided
Back sometime in the '80s, I
Thanks for the info on 3D
Add new comment