


Helicopter Flight Training
Written by Jim Ryan A simple path from hovering, to forward flight, to nose-in hovering How-to As seen in the December 2017 issue of Model Aviation.
Budding helicopter pilots today have more training options than ever, but the basic learning process is still the same. After you wrap your head around the “pat-your-head and rub-your-stomach” challenge of basic hovering, the next tasks are to learn forward flight and nose-in hovering. When you master these basic skills, helicopters get to be a lot of fun. What I’d like to present here is a simple program to progress from forward flight to nose-in hovering.
Choosing Your Trainer
Many pilots start with a lightweight micro heli and work their way up, while others start with a larger helicopter and work with an instructor. Still others begin with a quadcopter, because drones use much the same control inputs as helicopters, but are more durable and easier to fly. There really is no one “right” way. In shopping for a trainer, I suggest looking for one with a rescue or bailout mode. A rescue button is a great safety feature, and just knowing it’s there helps to calm training nerves.Flight Simulators
Flight simulators are excellent training tools for flattening the learning curve. Not only does a simulator eliminate training jitters because a crash can be “repaired” by hitting the reset button, but in my experience, simulators are slightly easier to fly. This is a double-edged sword in that even the best simulators can’t take the place of real-world flying; they’re simply not as challenging. I’ve always been able to do more advanced flight maneuvers on a simulator than I have been able (or willing) to try with my large helicopters, but simulators are great for mastering the basics and raising your confidence level. Throughout your training, you should alternate time on a simulator with training time at the field, always working ahead on the simulator before trying each new step with your helicopter.The Training Area
The ideal training area should be large, flat, and unobstructed. With a large, open area, you have room to bail out any time you get rattled, but in your backyard you quickly run out of options. Even if you’re learning with a small helicopter or quad, I recommend that you find a space that’s larger than you think you need. Make sure the area is clear of people and pets; even a small helicopter can cause serious injuries.Initial Forward Flight
I teach my students to start forward flight by standing in the middle of the flying area and flying slow circles around themselves. This has some important advantages. First, the helicopter is at a constant distance, so you don’t have to worry about it getting too far away. Also, you don’t have to fly back toward yourself. Start with slow circles, flying at a comfortable and safe distance of 30 to 60 feet, depending on the size of your heli. Keep close to the ground. As the old saying goes, “Don’t fly any higher than you’re willing to fall.” If you stay close to the ground, any mishap is likely to be minor.
Forward flight is easier if you fly a large circle around yourself. The helicopter never gets too far away, and if you get confused, you can pivot to a nose-out hover. For safety, make sure you have a spotter to watch your surroundings.
So that you don’t develop a preference, alternate between flying clockwise and counterclockwise circles. Every couple of laps, slow to a hover, make a gentle turn away from yourself, and then ease into forward flight in the opposite direction. As you become more confident, gradually increase speed. Notice that in forward flight, the heli wants to climb. This is because of a phenomenon called effective translational lift. With the rotor flying in cleaner air, it becomes more efficient, and you’ll need to ease off collective a little to stay at low altitude.
Figure Eights
After you become comfortable with basic forward flight, the next stage is to move outside of the circle and begin flying Figure Eights. At the start, the Figure Eights should be flattened and arched so that you’re flying half circles around yourself, but with a turn at each end. Begin flying slowly and gradually increase speed.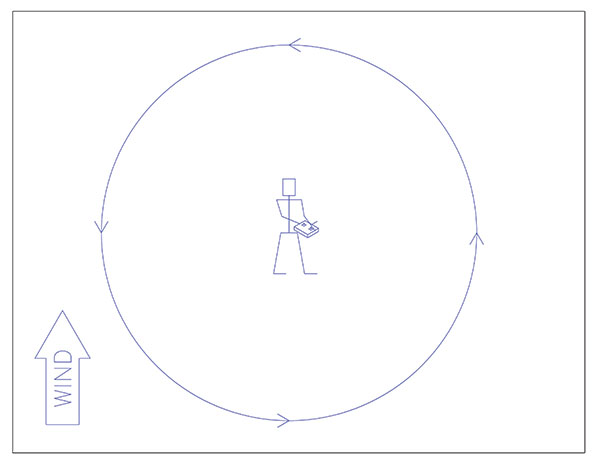
Start flying gentle circles around yourself, alternating direction. In the early stages, you can cheat a little by skidding, with the nose pointed slightly away from yourself. Be sure to use a spotter.
As you become comfortable with this exercise, you can slowly straighten the Figure Eight until it looks more like a symbol for infinity. Even now, you’re not so much flying toward yourself, but rather flying parallel to an imaginary flightline.
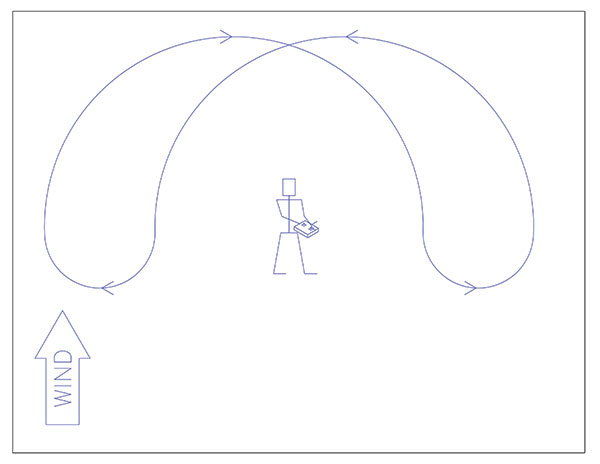
When you’re comfortable in forward flight, start flying an arched Figure Eight. This is an easy step from flying circles.
The advantage of a Figure Eight is that all of your turns are away from yourself. Anytime you become confused, you can simply turn away, and you’re back in a nose-out hover. Besides, cruising back and forth and flying Figure Eights is fun! You can start to enjoy flying, rather than just hanging in a hover.
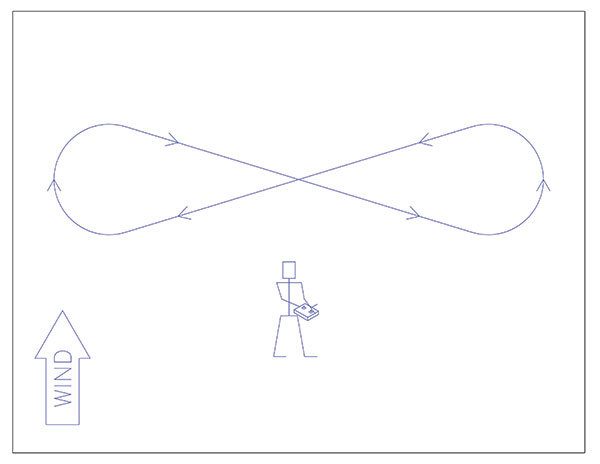
Gradually flatten the Figure Eight until you’re flying back and forth along an imaginary flightline. Continue making all of the turns away from yourself.
As you become more comfortable, gradually make the rings more round, so that you progress from an infinity symbol to two overlapping circles. Now you’re ready for the last step.
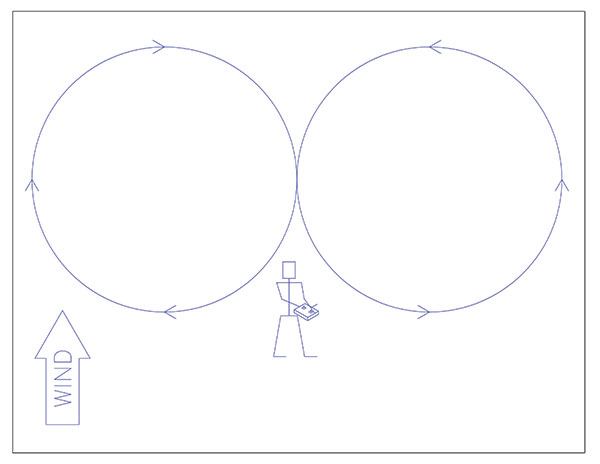
Make the Figure Eight rounder until your flight path is two overlapping circles. Start to hesitate at the nose-in point on each lap to get comfortable hovering in a nose-in attitude. At some point you will be able to do this without thinking.
The Nose-In Hover
All of these exercises have been designed to make you comfortable flying toward yourself in forward flight. The advantage is that in forward flight, you don’t have to contend with the three flight axes of pitch, roll, and yaw being reversed when you’re nose-in. Forward momentum takes care of pitch, and the heading-hold gyro takes care of yaw, so you really only need to think about roll (left/right cyclic). If you’ve flown fixed-wing RC or even driven an RC car, you’re already accustomed to that. Throughout these exercises, continue training on the simulator, always working ahead. By this point, you should be comfortable in a nose-in hover and even doing pirouettes on the simulator. The idea is to get your brain (and hands) accustomed to unconsciously putting yourself inside the heli, regardless of orientation. The last big step starts with flying a large, circular Figure Eight. At the center of the maneuver, you’re momentarily flying nose-in. Now practice hesitating as you reach a nose-in position. Don’t force it. Be happy with a second or two of hesitation and then continue slowly around the circuit. If you start to get rattled, kick in tail rotor so that you pivot to a nose-out attitude.
Basic hovering is the first step for any new helicopter pilot. Yaw control is easiest if you focus on the nose instead of the tail. Learn to focus on whichever end is pointing away from you. Work at basic hovering until simultaneously controlling all four flight axes is instinctive.
Gradually increase the length of the nose-in hover. You’ve already become accustomed to reverse roll control, so concentrate on controlling the tail. When I was learning, I found it easier to control yaw if I looked at whatever part of the helicopter was pointed away from me. In nose-out flight I focused on the nose, and in nose-in flight I focused on the tail. It helps if you fly at a slight angle. Because you’ve already mastered this on the simulator, you’ll find that tail control becomes instinctive and unconscious. As your hesitations become longer, you’ll see that you have mastered pitch reversal (fore/aft cyclic). Doing all of this unconsciously might not come automatically, so don’t try to force it. At this phase in your training, it helps to constantly work at it. I flew two or three times a day during this phase, and the steady work really helped. Once nose-in hovering becomes instinctive, flying helicopters becomes a lot of fun, and you can move on to the next big challenge. Good luck! —Jim Ryan [email protected]
This Month's Issue

Join the AMA
![]()


Add new comment