


Tower Hobbies Sbach 3D EP Aerobatic Airplane ARF
Written by Josh Bernstein A budget-friendly aerobatic performer Product review As seen in the March 2018 issue of Model Aviation.
Bonus Video
Specifications
Model type: Electric aerobatic ARF Skill level: Intermediate to advanced Wingspan: 49.6 inches Wing area: 482 square inches Length: 47.5 inches Wing loading: 20 ounces per square foot Weight: 4 to 4.3 pounds Power system: RimFire .32 outrunner brushless motor or equivalent Radio: Minimum four-channel Construction: Wood with iron-on covering Street price: $139.99Test-Model Details
Power system: ElectriFly RimFire .32 42-50-800 brushless outrunner; Hitec Energy Sport 80-amp ESC with 5-amp SBEC Battery: Turnigy nano-tech 14.8-volt 3,300 to 4,000 mAh 25C to 50C LiPo Propeller: Xoar 14 x 7 Beechwood; APC 13 x 8 thin electric Receiver: Futaba R3006SB FASST 2.4 GHz six-channel receiver Radio system: Futaba 6K transmitter; four Futaba S3150 slim digital servos Ready-to-fly weight: 67 ounces Flight duration: 7 to 9 minutesPluses
• Unlimited vertical performance with recommended power system. • Wide flight envelope includes sport, precision, aerobatics, and 3D. • Visually striking color and design scheme aids in visual orientation. • Fits in most passenger vehicles without wing removal.Minuses
• Higher wing loading results in noticeable post-stall instability and wing rock. • Inadequate speed of recommended servos limits 3D performance.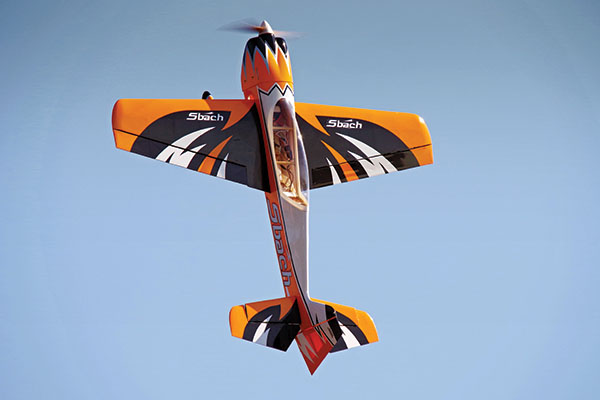
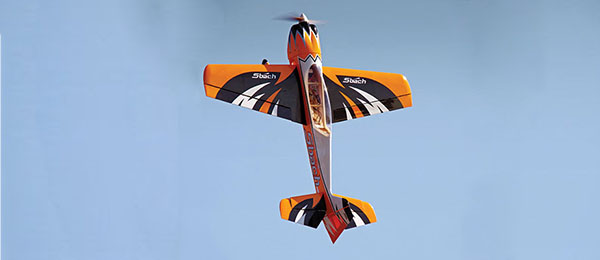
Swinging a 14 x 7 propeller, the recommended power system provides unlimited vertical performance.
Product Review
Named for its designer, Philipp Steinbach, the full-scale Sbach 342 (XA42) gained popularity in a short period of time. Its single-seat predecessor, the Sbach 300/XA41, won the first competition it entered: the unlimited category at the German Aerobatic Championships in 2006. This win came five months after the aircraft’s maiden flight. Two years later, the Sbach 42/XA42 was released. Extremely curvaceous, the airframe looks fast simply sitting on the tarmac. The RC community was quick to embrace this dreamy-looking machine, and for much of the past decade, manufacturers have been turning out scale versions. From tiny profile foamies to massive 40% beasts—the Sbach 342 has taken its place among the most popular RC aerobatic designs. I was pleased to hear that Tower Hobbies would be releasing a version that was sized (and priced) for the masses. As most experienced RC pilots will tell you, the wingspan limit for a model transported in an average-size vehicle without its wing being removed is somewhere in the neighborhood of 50 to 52 inches. Considering the universally accepted axiom of “bigger flies better,” the Tower Hobbies Sbach 3D ARF, with a wingspan of 49.6 inches, is sized to maximize flight performance while minimizing setup time. No wing bag or tools are necessary—grab the airplane, your radio, and a few 4S 3,300 to 4,000 mAh LiPo battery packs, and you’re good to go. A word about this Sbach’s design: If you are a scale airplane purist, you’ll notice that the Tower Hobbies Sbach 3D differs slightly from the full-scale version. Some airframes scale down well, and some don’t. The feature that arouses such passion in Sbach enthusiasts (the uniquely curved nature of the fuselage) makes scaling it down challenging, but considering its size and aesthetics, I found this version appealing.Assembly
This Sbach arrived well protected with foam, cardboard, and plastic separating and securing each part. I inspected each piece for obvious signs of damage (none found) before examining the airframe’s quality. This is a well-made airplane, utilizing many modern approaches to airframe design. The motor box is solid and its rigidness flows aft through the firewall, anchoring to the landing gear and battery location. The landing gear is solid; however, considering that its retention depends on somewhat thin plywood, hard landings should be avoided. The fuselage sides utilize solid sheeting, but there appears to be no loss of strength or glaring weight penalty. Because this is a budget-priced ARF, you won’t find carbon-fiber supports running the length of the fuselage. CA hinges are utilized for all of the control surfaces, with the ailerons conveniently preinstalled at the factory. Because incorrect or off-color matching is a common complaint among wooden ARF fans, I paid extra attention to how the fiberglass wheel pants and cowl visually flowed with the covering. I was pleased that the Sbach’s covering is contrast free. The manual includes an addendum regarding the retightening of the airplane’s covering. As is recommended by most ARF manufacturers, going over your airframe with a covering iron on medium heat will pay dividends. I chose to outfit this Sbach with components recommended by Tower Hobbies. They include a powerful RimFire .32 800 Kv motor controlled by Hitec’s Energy Sport 80-amp ESC, which uses a 5-amp SBEC that provides 5.5 volts to the Futaba S3150 slim digital servos.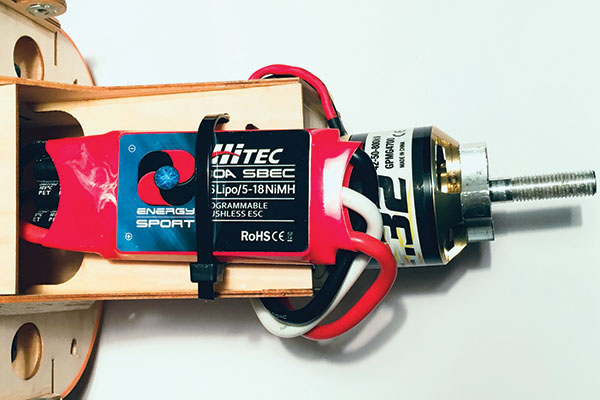
Trusted and reliable, the RimFire .32 brushless outrunner and Hitec 80-amp Energy Sport ESC are a potent combination that is easily accessed with cowl removal.
Although the S3150 produces ample torque—more than 50 ounce-inches—and its slim body slides perfectly into the equally slim servo pockets, speed is lacking (.24 seconds per 60°). If this Sbach was designed and marketed for 3D purists then this would be more of an issue. (It’s easily remedied by slightly widening the servo pockets to accept a wider range of faster servo options.) Two 6-inch servo extensions are necessary for the ailerons, along with at least a 12-inch extension for the elevator. Although a Y adapter can be used for ailerons, using a six-channel receiver allows for a dual aileron setup in your radio. This permits a pilot to make sub-trim and travel adjustments for each aileron. If you are somewhat experienced, the Tower Hobbies Sbach build will be standard, but there are a few steps that deserve extra attention. Although the servo and control horn installations follow traditional guidelines, the aileron servo arm linkage uses an L-bend and plastic retention clip. This requires marking and cutting the control rod to create a 90° bend. With the ailerons taped in place, attach the control rod. When the clevis is attached to the threaded side of the control horn, mark where it will need to be bent 90° to pass through the servo arm 5/8 inch from the arm screw. Cut off the remainder of the rod, leaving roughly 1/4 inch past the bend to pass through the servo arm and the plastic retention clip. This results in excellent control linkage geometry and slop-free operation.
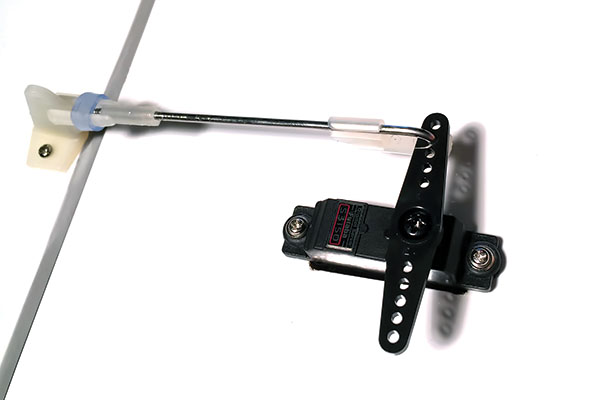
Following the aileron linkage assembly guidelines results in proper geometry and zero control surface “slop.”
You need to install alignment pins and retention tabs in each wing half by using CA glue or epoxy. After the pins have set, mix some 30-minute epoxy and install the retention tabs. With the wing tube in place, test fit the wing for proper retention tab positioning. Before the epoxy sets, install the wing retention bolts to maintain positioning. When the epoxy is dry, remove the bolts and carefully slide the wing from the fuselage. Although the horizontal stabilizer and elevator installation process is straightforward, the elevator’s joiner wire is installed before the CA hinges are added. Before applying the epoxy, I spread some petroleum jelly around the hinge line to keep excess epoxy from locking the joiner wire to the hinge area. Tower Hobbies sells packages of CA adhesive applicator tips, which are useful when installing CA hinges. These thin extensions slide over your tube of CA glue for precise and drip-free gluing. Utilizing a pull-pull setup, the rudder installation process involves several steps. In place of a traditional control horn, a torque rod with a double-sided horn is used. At this point, you can install CA hinges and glue the rudder in place, following the same process that was used for the elevator. Run two lengths of the included line through the rudder’s torque-rod horns. Small cable swages to crimp the line are included. Applying CA glue to the lines’ ends helps thread them through the tight swages. If you are unable to squeeze both lines through, you can tie the line off behind the swage with multiple knots and soak it in CA glue. After running these lines up through the fuselage, cross them and use the included brass couplers and clevises to attach them to your double-sided servo arm. When complete, the pull-pull line should have no slack, but also should not be overly tight. The rudder should move smoothly with no slop.
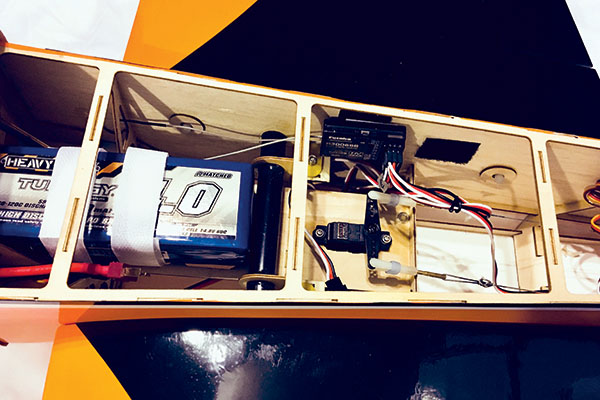
The fuselage has plenty of room for the flight battery and radio gear. The author used a Futaba T6K transmitter and R3006SB FASST 2.4 GHz six-channel receiver.
The large canopy utilizes two pins with springs at the front and two tabs at the back. The canopy is removed by sliding it forward, slightly compressing the pin springs until the rear tabs have cleared, and lifting upward. Installation was tricky because the pins did not line up with the corresponding holes. After trimming the pin length and widening the holes with a file, the canopy went on without a hitch. Bench test your airplane with a wattmeter before its maiden flight. With a Xoar 14 x 7 beechwood propeller and a 4S 4,000 25C to 50C LiPo battery pack, the RimFire .32 pulled a maximum current of 73 amps at 1,050 watts. With approximately 80% efficiency and an all-up weight of 67.3 ounces, this results in a power-to-weight ratio of 200 watts per pound (which is ideal for unlimited vertical performance). Achieving the recommended center of gravity (CG) required some extra effort (inverted, 83mm aft of the wing’s leading edge at the fuselage). Even with the ESC placed underneath the motor box and directly aft of the motor, I needed to move the larger 4S 4,000 mAh LiPo battery pack as far forward as possible. Using smaller battery packs, such as 4S 3,000 to 3,300 mAh, might require adding a few ounces of weight to the motor box area.
Flying
After completing range testing, bind-free servo deflection checks, and confirming proper CG and propeller tightness, I taxied the Sbach to the flightline and brought power up for a scale takeoff. With the RimFire .32 swinging the Xoar propeller, rollout was short, which was expected for an aerobatic airplane of this size. I climbed to a higher altitude before leveling off for trimming and in-flight CG testing. After trimming the airplane to fly straight and level upright, I rolled it to test its CG in an inverted position. With the recommended 4,000 mAh 4S LiPo battery pack set as far forward as the battery tray allowed, the Sbach 3D required gentle pressure on the elevator stick to maintain level, inverted flight. This is the sweet spot for aerobatic/3D airplanes. A slightly nose-heavy aircraft results in a good balance of sport, precision, and 3D flight, with balloon-free landings. I put the airplane through some basic sport and aerobatic maneuvers. At more than 67 ounces, the Sbach 3D is slightly heavier than comparatively sized 3D ARFs. One might expect the extra weight to be an issue when transitioning to 3D testing, but when flying the Sbach as a sport and traditional aerobatic airplane, that extra weight is beneficial. Carving through corners with tracking that is often found in heavier precision airplanes where a higher wing loading is a plus, this Sbach performed well, drawing big lines in the sky. The airplane felt competent performing traditional aerobatic maneuvers such as stall turns, inside and outside loops, inverted flight, Immelmanns, etc. When it comes to precision maneuvers, setting up an aerobatic airplane must include tests for pitch and roll coupling. An aerobatic airplane with significant coupling will be a chore to fly. A model will rarely display no coupling. Modern radios have preprogrammed coupling mixes at the ready, so dialing in a small percentage of rudder-to-aileron and rudder-to-elevator mixing is easy. When I was entering my first knife-edge maneuver, I noticed some coupling and it was clear that mixing would be required. This was not unexpected because one of the effects of the Sbach’s design is that with the stabilizer placed slightly higher than the wing, pitch coupling becomes more of an issue. Taking the time to properly set up a new airplane pays dividends. With this Sbach flying level and true, and with a proper CG and coupling appropriately mixed out, I felt comfortable exploring the airplane’s more advanced capabilities. I spent some time pushing through precision maneuvers such as fast knife-edge passes and patterns (ovals, half-loops, Figure Eights), as well as point rolls, and long, slow rolls. The precision mannerisms of this Sbach provide ample practice for pilots who are looking to progress. After 6 minutes of mixed-throttle flight, I lined up for a landing. Reducing power to slightly below 1/4 throttle, the Sbach 3D settled in nicely for a scale landing. I tested the battery, which showed 3.85 volts per cell (roughly 50% remaining). Following the common guideline of leaving 20% remaining in your flight packs, pilots should expect flight times of 6 to 7 minutes of aggressive flying, and more than 9 minutes of moderate-throttle sport flight. With sport and precision flight testing complete, it was time to determine whether or not the Tower Hobbies Sbach deserved its 3D moniker. At slightly more than 67 ounces with a wing area of 480 square inches, this Sbach has a wing loading of 20 ounces per square foot—numbers more commonly found in sport airplanes. (This could be why many Sbach fans view their models in the context of a traditional aerobatic airplane versus a hardcore 3D aircraft.) What does this mean in practical terms? Don’t look to this model to be a 3D trainer. If I were looking for a stable (or floaty) 3D airplane to practice low-and-slow post-stall maneuvers (such as hovers and harriers), this wouldn’t be my first choice. Many aspects of 3D flying benefit from a higher wing loading. For experienced 3D pilots, wing loading is often seen as a subjective preference. Also, because of the Sbach’s large wing, there is ample lift. After subsequent flights, I found that I didn’t notice the extra weight. To maximize 3D testing, I opted for a smaller 4S 3,300 mAh LiPo battery pack, keeping the airplane as lightweight as possible. When it was airborne, I began the Sbach’s 3D testing with some moderate-intensity tumbling maneuvers. Although the airframe appeared willing and able, almost immediately I felt the limitations of the Futaba S3150 servos. Although I didn’t notice any blowback (a servo’s inability to hold the surface against the airflow), these servos simply lacked the speed required for true 3D flight. Many 3D maneuvers require snappy transitions, so a delay in servo response is a major obstacle. I reduced my radio’s exponential settings, which slightly increased the apparent servo speed. I spent time playing with pop-tops, blenders, knife-edge spins, and Lomcováks. The airframe felt eager to perform these maneuvers, but the servos’ inadequacies frustrated my attempts to wring out the airplane. I explored maneuvers that did not require such quick servo response. With some noticeable wing rock, particularly in upright harriers. Pilots who are not fully competent with harrier maneuvers will initially want to keep the Sbach a few mistakes high. Inverted harriers, with the vertical stabilizer and rudder hanging down like a keel in clean, undisturbed air, were more stable. I found myself performing low, inverted harrier passes up the runway with a confidence usually reserved for more premium airframes. Although the slower servos made hovering more challenging, the RimFire .32 provided gobs of thrust. Full-throttle punch-outs from a hover became almost addictive. The Sbach performed flat spins surprisingly well, but with its elevator deflecting to 40°, which is slightly low for 3D, more throttle than usual was required. I noticed that the highly visible color scheme made maintaining visual orientation a breeze. It cannot be overstated how impactful servo performance is during this style of flying. There is a reason why more seasoned 3D pilots are moving toward high-voltage (HV) servos to maximize torque and, more importantly, speed. One of the many benefits of the Futaba radio system’s R3006SB receiver is its ability to run Futaba S3174SV HV S.Bus2 servos (sold by Tower Hobbies as a drop-in option for this Sbach). Although it’s a more expensive and slightly more complicated setup, the faster servos would allow this Sbach airframe to truly show its 3D capabilities. A set of 6-volt Hitec HS-85MGs should provide spirited flight characteristics. Focusing purely on this Sbach’s 3D capabilities, however, would be selling it short. Toward the end of flight testing, I focused on the airplane’s sport and traditional aerobatic mannerisms. Although the servos were inadequate for 3D, they provided ample speed and power for a wide range of flying maneuvers. As a machine for carving big, clean holes in the sky, the Tower Hobbies Sbach 3D did not disappoint.Conclusion
Considering its price point, the Tower Hobbies Sbach 3D makes a solid sport and aerobatic airplane. If outfitted with a set of snappy servos, it could perform high-energy 3D maneuvers, while providing more-advanced 3D pilots acceptable low-and-slow mannerisms. It looks outstanding, fits in most vehicles without wing removal, and its large canopy makes battery installation a breeze. The Sbach 3D makes a great “first wood aerobatic ARF build” and, for those intermediate and above pilots looking for a good-looking, nicely performing, 3D-capable aerobat, the Tower Hobbies Sbach 3D would make a fine addition to any hangar. —Josh Bernstein [email protected]Manufacturer/Distributor:
Tower Hobbies (800) 637-4989 www.towerhobbies.comSources:
Futaba (217) 398-8970 www.futabarc.comThis Month's Issue

Join the AMA
![]()


Add new comment