


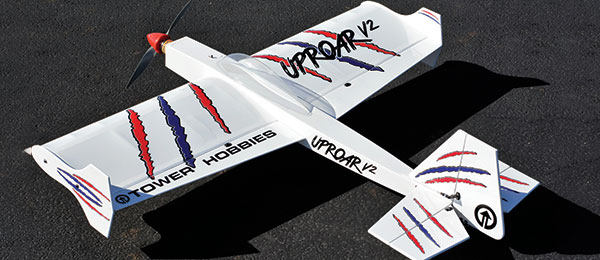
Tower Hobbies Uproar V2 .46 GP/EP ARF
Written by Fitz Walker Aerobatics on a budget Product review As seen in the October 2017 issue of Model Aviation.
Bonus Video
Specifications
Model type: Sport aerobatic Skill level: Intermediate to advanced Wingspan: 47.6 inches Wing area: 630.8 square inches Length: 48.1 inches Wing loading: 16 to 17 ounces per square foot Weight: 74.5 ounces Power system: .46-cubic-inch two-stroke or ElectriFly RimFire .32 brushless electric Radio: Four to five channels required Construction: Balsa/plywood Price: $99.99Test-Model Details
Motor used: ElectriFly RimFire .32 brushless outrunner Speed controller: Castle Edge Lite 75 Battery: FlightPower 4S 4,350 mAh LiPo Propeller: APC 13 x 8E Radio system: Futaba T8J transmitter; Futaba R2006GS six-channel receiver Servos: Four Tactic TSX20 Ready to fly weight: 62 ounces Flight duration: 6 to 10 minutesPluses
• Well built and easy to assemble. • Easy to fly with a wide flight envelope. • Accepts multiple powerplants.Minus
• Low-rate rudder not very effective.Product Review
Fun-fly models have been a staple of RC modelers and RC clubs for many decades. Although they would not likely win any awards for looks, they are often in a class all to themselves with a focus on excellent flying qualities, simplicity, and durability. They are no-frills airplanes designed to perform exceptionally well in the air. The Tower Hobbies original Uproar was introduced more than 20 years ago, and it seems that the company decided it was time to upgrade its venerable design for the modern era in the form of the Uproar V2. This revision is a step up in performance, in addition to accepting both electric- and glow-power systems right out of the box. Notable changes from the original Uproar to the V2 include: • Longer tail and nose moment. • All control surfaces resized. • Different aileron planform to help both roll authority and high-alpha stability. • Different wing airfoil for improved aerobatics. • Tip plates, plus a taller canopy to help knife-edge performance and help ailerons work through stall speeds. • Plug-in wing panels rather than a one-piece airplane. • Hatches on the top and bottom for equipment and battery access.Construction
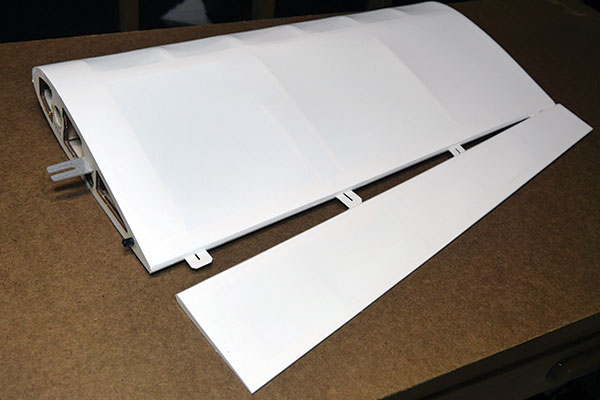
Like its predecessor, the new Uproar V2 is an all-wood ARF, factory covered with iron-on Oracover film. I didn’t notice any wrinkles in the model I received and the build quality looked good, with no noticeable defects. The Uproar V2 doesn’t have a lot of pieces, so construction is relatively quick. All of the control surfaces are preslotted from the factory for the included CA hinges.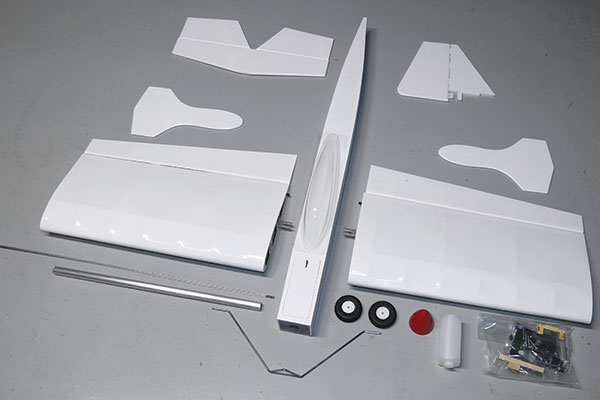
The Tower Hobbies Uproar V2 has only a few major subassemblies and abundant hardware.
Construction starts with cutting the wing covering away to reveal the aileron servo mounts. These mounts are designed for mini servos, but if you want to use standard-size servos, there is plenty of space to trim the openings for them. With such a big, thick-wing airfoil, it is easy to reach in and grab the servo leads without needing a pull-string guide through the wing. Clevis hardware is quite stout with a screw pin that looks unlikely to ever break off of the control horn. The servo side of the linkage utilizes a simple 90° bend and a snap-on keeper. After removing a cleverly hidden balsa tail filler block, the tail fins slide in, are aligned with the wing, and finally glued into place with epoxy. All of the parts fit into place wonderfully and aligned so well that I did not need to shim the tail to match the wing. Instead of a crossbar, the elevator halves use individual pushrod linkages. This nice, easily adjustable setup prevents misalignment of the elevator halves under load while flying.
CA hinges are installed at the factory and only need to be glued. Note the metal wing mounting plate.
After mounting the elevator and rudder servos, it was on to the business end of the model. If you choose to use a glow engine, the firewall is fuelproofed at the factory. Both the 6-ounce fuel tank and engine mount are included in the kit. Because I will be flying the electric version, I used the conveniently marked holes to drill and install the M3 blind nuts into the firewall. These holes lined up perfectly with the RimFire .32’s rear X mount. Mounting the APC 13 x 8 propeller required trimming the spinner slightly, although this is common for high-pitch electric propellers. The battery/fuel tank platform is removable via four screws and allows easy servicing. After smearing a thin layer of epoxy onto the platform, I attached a strip of Velcro to mount the FlightPower 4S battery.

There is ample room in the front for a large 4S LiPo battery.
In the back of the manual is a drill template for mounting the main landing gear, which I found extremely helpful for locating and installing the undercarriage. The tail wheel is also nice because it is spring loaded, and the mount uses brackets to attach to the lower portion of the rudder. Installing the canopy is probably the most time consuming, although that is like saying the most time-consuming part of putting on your shoes is tying the laces. You will need to trim the vacuum-formed plastic in a two-step process then glue it to the fuselage with canopy glue. A special note should be made regarding the livery. Two huge sheets of peel-and-stick decals are supplied and the individual prints need to be cut out by hand. A nice touch is that detailed instructions and even placement measurements are printed on the decal sheets. This is the first time I’ve seen such attention paid to decal placement and it was a welcome addition.

Hatches in both the top and bottom of the fuselage allow easy access to the interior.
Flying
Assembly at the field is quick. Each wing panel is secured with a single hex-head screw clamping down on a metal plate extending from the wing. All of this is accessed via the lower hatch. The manual lists three control rates for all surfaces: low, high, and 3-D. I set up my transmitter for all three rates (except for the elevator, for which I used only high and 3-D). At full tick, the RimFire .32 pulls 53 amps for roughly 760 watts of power. All of that power is not needed because the Uproar V2 leaped off of the ground before I could even advance to full power. This airplane wants to fly, and fly it does. It might actually be allergic to the ground. The recommended CG felt comfortable and the model was stable in all flight attitudes. Cycling through the different control rates, I thought the high rates were great for general sport flying, while the low rates were mild and trainerlike. The 3-D rates were where the real fun began, but the aircraft definitely needed the recommended 50% to 60% exponential. I thought the rudder was too weak to be of much use for aerobatics at the low-rate setting, so I mostly kept it on the 3-D rate. Landing the V2 is almost too easy. The airplane will fly very slowly. Even if there is a slight breeze, expect to be able to land it nearly vertically. I think the wheels might be mostly for show because it barely needs them for either takeoff or landing. If you are easy on the throttle, you will be rewarded with long flight times.Aerobatics
The V2 Uproar certainly puts the “fun” in fun flying. This is a great, neutrally stable airframe that is comfortable doing nearly anything you could want to do with it. Rolls are axial and loops are easy with no tendency to snap under aggressive movement. Knife-edge flight requires a bit of speed to fly level, but it exhibited little cross coupling. Inverted flight is as easy as upright. Snap rolls were good after I increased the rudder throw to nearly the physical limits. Positive roll control is maintained no matter how slowly you fly and the roll rate with the ailerons on the 3-D setting is quite fast. Although the V2 Uproar is not technically a 3-D airframe, with the throws cranked up, it can do basic 3-D flying. Even with my limited 3-D skills, I could hover it.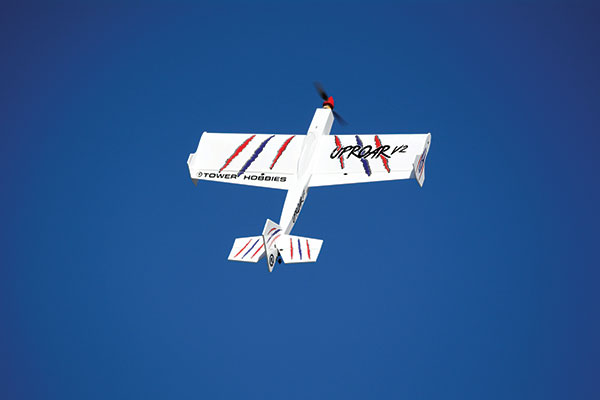
The recommended electric motor setup has an abundance of power with out-of-sight vertical performance.
Its performance with the RimFire .32 motor is exceptional, with unlimited vertical climb. It is not an intimidating airplane to fly. I could easily see this model as a good second or third aircraft after one tires of his or her trainer. Because the side-force generators (wingtip plates) are simply screwed on and hence optional, I wanted to compare flight characteristics with them installed. With the winglets on, I could land slower and perform better knife-edge flying. With the winglets off, the rolls seemed crisper and vertical performance was slightly better (likely because of the weight difference). Other than that, I didn’t notice any major changes to the flight characteristics.
Final Thoughts
The V2 is a remarkable airplane that, on low rates, is an easy and relaxing model to fly. With the throws cranked up, it is 3-D capable. It builds quickly and is well designed and built. Removable wings allow the V2 to fit in the most compact of vehicles, and a choice of wet or dry powerplants gives it diversity. The Tower Hobbies Uproar V2 is suitable for a broad range of flying skills—a true fun-fly model. —Fitz Walker [email protected]Manufacturer/Distributor:
Tower Hobbies (217) 398-8970 www.towerhobbies.comSources:
Futaba (217) 398-8970 www.futabarc.com Castle Creations (913) 390-6939 www.castlecreations.comThis Month's Issue

Join the AMA
![]()


Add new comment