


Great Planes Ultra Sport GP/EP ARF
Written by Andrew Griffith A new take on a popular design Product review As seen in the August 2017 issue of Model Aviation.
Bonus video
Specifications
Model type: Sport aerobatic ARF Skill level: Intermediate Wingspan: 55 inches Wing area: 564 square inches Wing loading: 22 to 26 ounces per square foot Airfoil: Symmetrical Length: 49.5 inches Weight: 5.5 to 6.5 pounds Power system: .46 to .55 two-stroke glow engine; .70 four-stroke glow; or RimFire 55 electric Radio: Full range five-channel minimum Construction: Built-up balsa and light plywood Covering/finish: MonoKote and paint Street price: $199.99Test-Model Details
Motor/engine used: O.S. 55AX two-stroke glow engine Receiver battery: LiFeSource 1,300 mAh LiFe Propeller: APC 11 x 7 Radio system: Tactic TTX 650 with TR625 receiver; five Futaba S3001 servos; one Futaba S3170G retract servo Ready-to-fly weight: 6 pounds, 1 ounce Wing loading: 24.8 ounces per square foot Flight duration: 15 minutesPluses
• Another worthy sibling in the popular Ultra Sport family. • Proven design that is fun to fly. • Supports both electric and glow-based power systems. • Large hatch for easy access to radio components or flight batteries.Minus
• Some knife-edge coupling was present no matter what CG adjustments were made.Product review
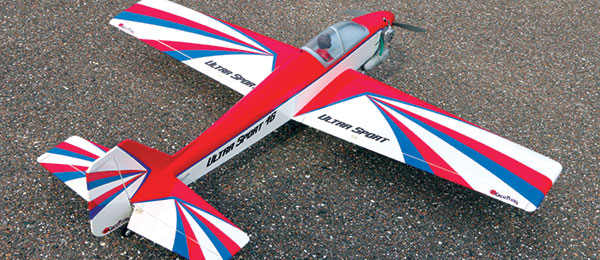
The Ultra Sport is a popular design and for good reason. I have flown many of them and always enjoy the mix of sport and precision flying for which the Ultra Sport is known. The new Ultra Sport supports a variety of power systems, including both two- and four-stroke glow engines. For those who prefer to charge batteries over cleaning up oil residue, an electric option is available. The Ultra Sport was the first airplane that I flew with retractable landing gear many years ago. It was with equal measures of nostalgia and curiosity of what Great Planes would do with modern techniques applied to a proven design that I accepted the review assignment. Following in that tradition, the new Ultra Sport comes in a tail-dragger configuration with mechanical retracting main landing gear.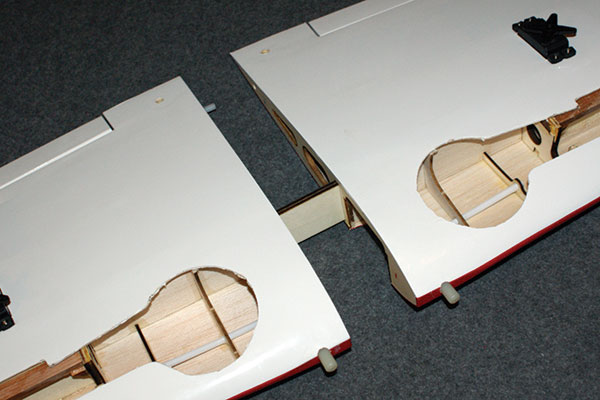
Retractable landing gear sets the Ultra Sport apart from many sport models. Because the author’s Ultra Sport uses a glow engine, he elected to fuel proof the wheel well areas with Z-Poxy finishing resin.
After unpacking the kit and looking everything over, I was impressed. The parts were well protected during shipping. The covering was applied nicely—with merely a few spots requiring some heat. The fiberglass cowl is stout without being heavy and the paint perfectly matched the covering. The red, white, and blue color scheme is well thought out and looks good both on the ground and in the air. I will equip the review model with a two-stroke glow O.S. 55AX engine, which is at the upper part of the power range. Byron Originals Rotor Rage 30% Helicopter Fuel will feed the O.S. engine, and a Tactic 2.4 GHz six-channel radio will provide guidance.
Assembly
After inspecting the kit’s contents, I sat down with the instruction manual. The instructions are clear, there are plenty of photographs, and it appeared that everything was well covered. I planned to assemble the Ultra Sport using Zap CA adhesives, Z-Poxy 15- and 30-minute epoxy, and Z-42 threadlocker that are all available from Frank Tiano Enterprises. The first step was to clean up any wrinkles on the covering and seal any edges. The covering job was well above average so this took little time. I used a cotton ball soaked with MonoKote Trim Solvent to go over all edges of the trim accents. This is a great trick to make features such as points and stripes stay put. The wing is assembled first. The ailerons are factory hinged and a tug on each hinge showed that they were glued well. The Ultra Sport is configured with one servo per aileron and pull strings are provided to route the servo wires into the fuselage. The ailerons can be driven by a Y harness, or if you have a spare channel, you can mix the ailerons in your transmitter. This allows you to fine-tune things such as aileron differential or use flaperon mixing. Instead of the Phillips-head screws provided with the servos, I prefer to use 9/16-inch servo screws from RTL Fasteners. The holes were drilled and prethreaded, and the threads were hardened with a drop of thin Zap CA glue. The control rod installation is accomplished by installing the nylon clevis, control horn, and FasLink retainers when the servo arm that is 90° to the servo body is identified. Center the servo and rotate a four-spoke servo arm 90° at a time until the closest to 90° is obtained. Most have one that is perfectly square so you can get good alignment without subtrim. Prepare the other wing in the same manner. The gluing surfaces of the plywood wing joiner and the nylon alignment pins were scuffed with 80-grit sandpaper. The joiner halves were coated with 30-minute Z-Poxy and clamped to dry, and the alignment pins were glued and inserted. You should clean excess epoxy with rubbing alcohol and let everything dry.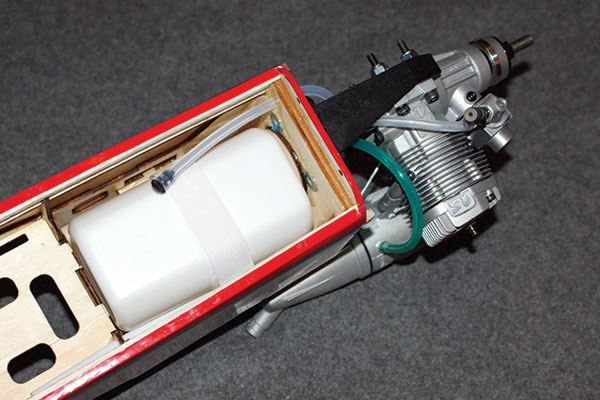
The O.S. 55AX engine was a great match for the Ultra Sport. There is plenty of room under the hatch for either batteries or the fuel tank. The author opted to build his aircraft with a glow engine.
After scuffing the outside gluing areas of the wing joiner and root ribs, I did a dry fit to make sure everything fit well and lined up. I used 30-minute Z-Poxy to coat the joiner rod, the alignment pin, the joiner socket, and the root ribs. Everything was joined, taped, weighted, and allowed to cure. When the wing assembly was dry, I removed the weights and installed the mechanical retractable landing gear. Because I am using glow fuel, the exposed wood in the retract wells was fuel proofed using Z-Poxy finishing resin. The retract units are included with the kit and I used the recommended Futaba S3170G retract servo. The mount is sized for the S3170G, so everything drops right in. It is glued to the center section and the servo is mounted as previously documented. After assembling the struts per the instructions, all setscrews were secured using Z-42 threadlocker. Each wheel was set for just a hair of tow-in to improve ground handling. I recommend that you follow the measurements in the manual precisely when setting up the retract servo arms. Getting the geometry right is the key to driving the retract units from up and locked to down and locked. With the wing assembled, I turned my attention to the fuselage. The wing is bolted in place to provide the references needed to align the tail surfaces. Modelers commonly must sand the stabilizer saddle or shim the stabilizer to get the correct horizontal alignment, but the Ultra Sport was dead-on. The covering was removed from the gluing surfaces so I scuff-sanded the exposed wood and installed the horizontal stabilizer with 30-minute Z-Poxy. Like the ailerons, the elevators came prehinged with the CA hinges glued in place. Understanding the rudder installation sequence before gluing anything is important. The tail wheel bushing is glued into the fuselage first with 5-minute epoxy then the CA hinges are dry fitted. Apply some epoxy to the tail wheel steering arm, slide the rudder into place, and use thin CA to glue the hinges. The rudder and elevator servos are installed with RTL Fasteners servo screws in the same manner as the other servos. The control rods are likewise identical, utilizing wire pushrods, nylon clevises on the control surface, and an L-bend and nylon FasLink retainer on the servo end. Everything went together perfectly and there were no binding or alignment issues.
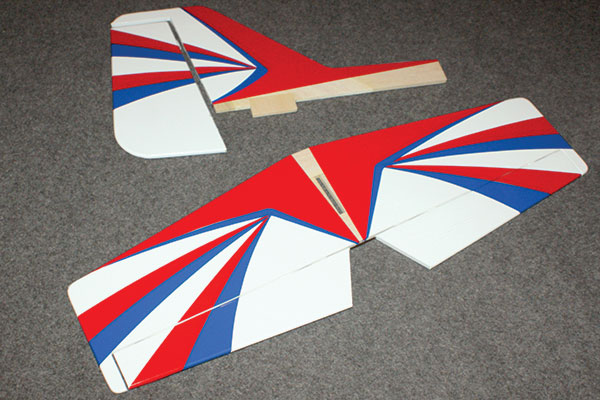
The surfaces are hinged using CA hinges, the elevators are hinged at the factory, and the covering is already removed from the gluing areas. A cotton ball wetted with MonoKote Trim Solvent was applied to all of the stripes and points to seal the edges.
Whether you’re installing an electric or glow setup, the parts that you need are included. A set of laser-cut 3mm plywood parts comprises the motor box for an electric installation. A glass-filled, two-piece universal motor mount that fits any appropriate glow engine is provided. No matter what your choice of powerplant is, the firewall is laser etched with the mounting locations. A knockout is included for routing wires if you choose electric power. After the engine was secured, I installed the tank. It features color-coded fuel lines for those of us who always seem to mix them up and wonder why the engine won’t start. The tank uses a three-line system with a separate fill line that gets routed out of the bottom. A plywood servo mount is provided to install the throttle servo. The throttle servo mounts in the fuselage behind the fuel tank and the pushrods are constructed in identical fashion. The last major step is to mount the fiberglass cowl. There is a paper template on the last page of the manual that worked perfectly for the O.S. engine. I used a high-speed rotary tool and a sanding drum to make the opening for the muffler and cylinder head in the cowl, which required much test fitting and sanding until the cutout was perfect. With the cowl mounted, the radio was programmed and the surface throws set per the manual. I added 25° exponential on the ailerons and elevator and 15° on the rudder. The Ultra Sport weighed within the specifications and was balanced per the instructions. I found the airplane slightly nose-heavy but I wanted to check the center of gravity (CG) in flight before adding any dead weight.
Flying
The Ultra Sport assembles quickly at the field by connecting the aileron and retract servo extensions and installing the two wing bolts. I fueled up the airplane with Byron Fuels 30% Rotor Rage Helicopter Fuel. I have flown several glow fuel-powered helicopters, and I quit needing to replace bearings twice a year when I switched to Byron Fuels. Now I use it in all of my glow engines. The engine was tuned on the ground to maximum rpm minus two clicks to the rich side. The main landing gear’s wide stance gives the Ultra Sport excellent ground handing. When it was lined up and pointed into the wind, I slowly advanced the throttle and the Ultra Sport was on the roll. The tail wheel came up quickly and although some right rudder was needed to keep it straight, tracking under power was excellent. Takeoff occurred with a small amount of up-elevator in approximately 50 feet. I flipped the retract switch and the landing gear retracted into the wing. I noticed two things before I completed my first lap. The Ultra Sport was extremely smooth and precise, and it was fast—much faster than I expected! The ailerons were right on, but the elevator required several clicks of up-trim. I backed off the throttle to check the stall speed. With the Ultra Sport pointed into the wind, it kept flying until the ailerons stopped working. When it finally stalled, the aircraft dropped its nose and resumed flying when power was added and the elevator was relaxed.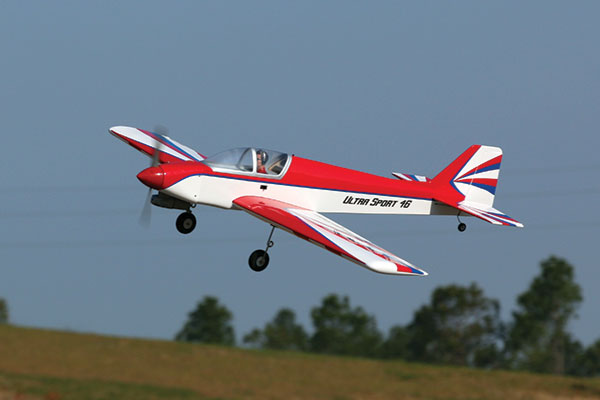
With the landing gear down, the Ultra Sport slows nicely for landing. The included pilot figure is a great touch, and the color scheme is highly visible in a variety of weather conditions.
The Ultra Sport is a sport aerobatic design, so I put it through a basic regime of aerobatics including stall turns, rolls, point rolls, and various sizes of loops. Inverted flight required a fair amount of down-elevator and combined with the elevator trim, I suspected I was flying more nose-heavy than needed. The roll rate was good and point rolls stopped crisply. Spins stopped when the controls were released and snap rolls were snappy. With the gear down, I tried my first landing. The Ultra Sport is slippery and it took me a couple of approach attempts to find a speed where it would settle on the runway. It’s not that it lands fast—it just doesn’t want to stop flying at even the slowest speeds. If you try to add elevator before it’s nearly stopped, it will just jump back into the air. I added an ounce of weight under the tail and tried again. This removed almost all of the elevator trim, and inverted flight became almost neutral with a touch of down-elevator to hold nice inverted lines. Landings improved as well, and it settled nicely into a three-point landing. The only thing I noticed was that knife-edge flight had a fair amount of opposite roll coupling and pulled toward the landing gear. It was manageable and could be mixed out easily enough, but it took a little getting used to. I also observed that the Ultra Sport was comfortable flying in a wide speed range. Partial throttle made the Ultra Sport docile and enjoyable, but I pushed the left stick forward and it moved out. Curiosity got the best of me, so I broke out the radar. Level upwind and downwind passes averaged in the 106 to 110 mph range with the O.S. 55AX!
Conclusion
Modern construction techniques and radio equipment breathed a new level of excitement into a classic design and I was impressed with the result! Based on my previous experience, I expected the Ultra Sport to be precise, fun, and aerobatic, and it was each of these things. The clean lines and retractable landing gear made it faster than I expected, so this was a pleasant surprise. Overall, the Ultra Sport is a keeper. Its wide speed range and impressive aerobatic envelope will keep the enthusiasm level high for the foreseeable future. —Andrew Griffith [email protected]Manufacturer/Distributor:
Hobbico (217) 398-8970 www.towerhobbies.comSources:
O.S. Engines (217) 398-8970 www.osengines.com RTL Fasteners (800) 239-6010 www.rtlfasteners.com Tactic (217) 398-8970 www.tacticrc.com Byron Originals (712) 364-3165 www.byronfuels.com Zap (863) 607-6611 www.franktiano.comThis Month's Issue

Join the AMA
![]()


Add new comment