Written by Jack Cutrone
One drone locates two lost model aircraft
As seen in the March 2020 issue of Model Aviation.
Bonus Video
Other Remote Video URL
Image
01. The DroneDeploy dashboard of the first mapping flight plan.Glen Learnahan’s heart stopped. He was flying the maiden flight on a 1/4-scale TR 260 that he had been building from an old Brown Box Models kit for two years. The preflight check had gone well and the DLE-55 engine was running smoothly.
After taxiing out and giving a last glance at the windsock, he advanced the throttle, eased the aircraft off the runway, and began flying circuits. He hadn’t noticed that he was getting farther from the runway and was well over an adjacent cornfield. Without warning, the airplane made an uncommanded roll to the left.
Glen, an experienced RC and full-scale pilot, with his heart now pounding, struggled to maintain control. The airplane seemed to have a mind of its own, losing altitude with each twist and turn it made before disappearing entirely from view.
Glen concentrated on getting a visual line to where it went down. After his nerves settled, he walked that line across the runway and into the cornfield. Deceptive from the flight stations, the corn was much higher than it had appeared, roughly two or three feet over his head. Despite the corn, Glen was confident that he would be able to locate the model without too much difficulty, given its size.
Four hours later, Glen came out of the corn without the airplane. The corn had been brutal, and to make matters worse, thick weeds filled in the space between the rows of corn. The walking cast on Glen’s foot increased the difficulty. All he had to show for his efforts were cuts and scratches from the corn.
Word about the lost airplane spread throughout our club, the Lake County Radio Control Club. During the next eight days, Glen returned to the field and put in 4-hour days searching for his airplane before he had to go to work. He reluctantly reached the conclusion that the TR 260 was lost forever.
Image
02. This shows the map that was produced after the first flight.
Image
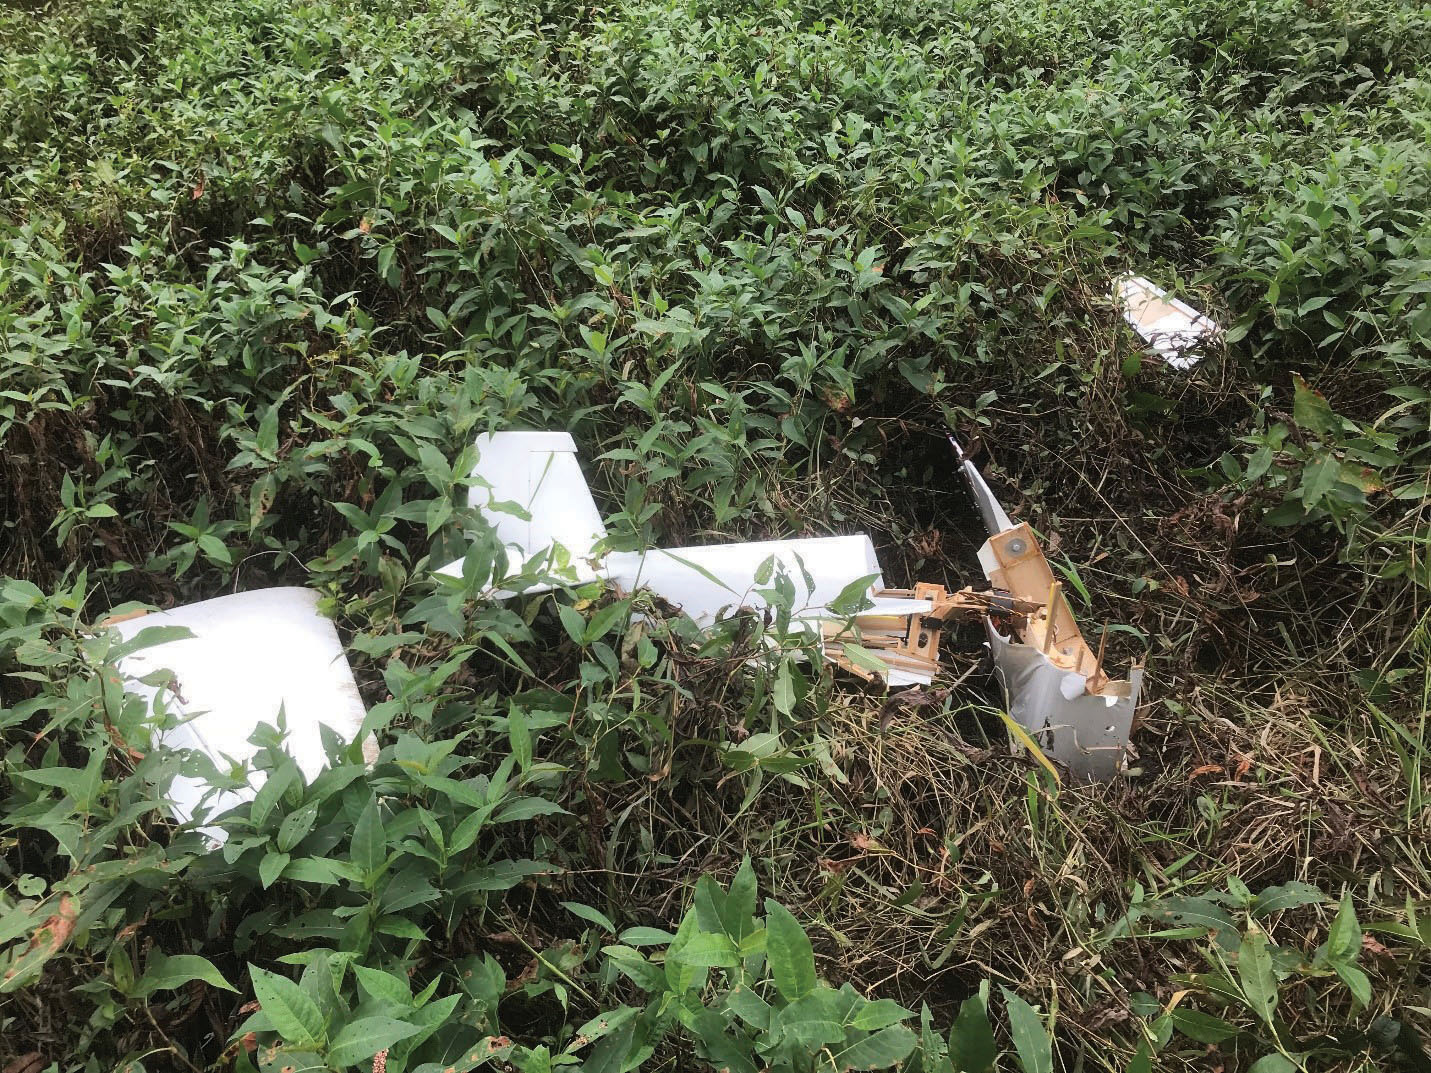
03. This photo from the third mapping flight shows the airplane on the riverbank.
Enter the Drone
After years of flying RC airplanes and helicopters, I had recently purchased my first drone, a DJI Mavic Pro. I was still learning about its features and was interested in using it for mapping. I had already downloaded the previously free version of DroneDeploy’s mapping software.
Glen’s lost airplane was a perfect opportunity to put this new app to practical use.
The DroneDeploy software could hardly be easier to use. After downloading and installing the app, I went to the DroneDeploy website and registered, which gave me access to my DroneDeploy dashboard.
At the dashboard, when I clicked on the option to create a new mapping plan, the software showed a satellite view of the immediate area. Within that satellite view was an outline of a default 5-acre rectangular area to be mapped. The dashboard also shows default flight parameters: a flight altitude of 246 feet, calling for a 3-minute, 24-second mapping flight during the course of which 31 photos would be taken using one flight battery.
The default parameters can be changed in the app. By clicking and dragging on dots shown on the perimeter of the area to be mapped, the shape and size of the area to be mapped can be set. Other options include setting a higher or lower altitude for the flight.
Lower altitudes will increase flight time because more passes are required to cover the same area. Doing so will increase the number of photos taken during the flight and might result in having to use more than one flight battery to complete the mission.
The advantage of a lower flight altitude is that the resolution improves. At the default 246 feet, the resolution is 0.9 inches per pixel, while at 100 feet, the resolution is .4 inches per pixel. The high-definition photos that the Mavic Pro takes contain great detail. There are options to turn the drone’s obstacle-avoidance system on or off, as well as to set the software for terrain or structure mapping.
Other options under the advanced tab are to set the direction of flight, which can be helpful in avoiding obstacles, to set the maximum flight speed, and to set the starting waypoint. Another advanced setting is for the amount of frontlap and sidelap, which is the overlap from photo to photo that will be used later in creating the map.
Glen was sure that the model had come down in the cornfield and thought it was close to a tree line adjacent to the Des Plaines River, east of the flying field. I set my first mapping effort to cover most of the cornfield, concentrating between the flying field and the tree line and all but a small portion of the cornfield.
The screenshot of my DroneDeploy dashboard shows the area I set to be mapped, with the flight path showing as green lines. As indicated, the flight was at 250 feet, lasting 12:29 minutes, covering 28 acres, and resulting in 200 images. It was flown the day after the airplane went down.
After the flight, I uploaded all of the images to the DroneDeploy website. The company’s proprietary software "stitched" the photos together into one map using the geocoding tags on the photos, as well as the frontlap and sidelap portions of the photos themselves. The resulting map was then overlaid onto a Google map of the surrounding area and accessible from the dashboard.
I spent more than an hour examining the resulting map at the highest possible magnification, but I found the resolution to be somewhat disappointing. However, even with the resolution limitations, I was all but certain that the airplane was not in the area I had mapped. In further discussions, Glen repeated that he was sure that the airplane had gone down in the cornfield and had not flown past the tree line. He continued his search in that area for the next week.
I returned a week later to do more mapping at a lower altitude to increase the resolution. I also learned in the interval that the previously free version of the app produced lower resolution maps than the paid version, but that it is possible to view the individual photos that were taken, and maintain the high resolution of the camera.
Image
04. This is the model before it was lost.
Image
05. This is how the airplane looked after it was located on the riverbank.
Image
06. A screenshot of the photos uploading to the DroneDeploy website.
In deference to Glen, I performed two searches. One was a lower-level search of the cornfield, concentrating on the area that he had described. The other was a search where I thought it was more likely that the model had come down and included the trees to the north and east of the cornfield, as well as a small area farther east, across the Des Plaines River.
Before starting the second set of DroneDeploy mapping flights, I made an exploratory flight using the DJI GO 4 application for flying the Mavic. During that flight, I saw a suspicious object on the far side of the Des Plaines River, but I continued a search of the trees, and later returned to the object for closer inspection.
Because of the trees, I was cautious about altitude and obstructions. A video of the flight appears on YouTube (in the "Sources" listing).
After the exploratory flight, I made two DroneDeploy mapping flights. Because of the lower altitude, the flights lasted longer, past the flight capacity of a single battery. The software flies the first part of the flight and when the battery becomes low, it returns the drone to land at the point from which it took off. After a fresh battery is installed, the software returns it to where it left off, finishes the mapping flight, and then returns home.
After the two flights, I uploaded all of the photos to the DroneDeploy website. Several hours later, I was notified that the maps were finished. At the lower flight altitude, the map resolution was better and the suspicious object looked even more like a crashed airplane.
The next day (nine days after the crash), I went to the area and walked a quarter mile through the underbrush toward the spot I had seen. When I got there, I found the airplane! It had crashed nose-down at high speed into the muck of the riverbank. The spinner was buried 15 inches in the mud. The fuselage had broken in two aft of the wing, leaving one wing half still attached. The other was adjacent, and the canopy was nearby.
I carried all of the parts back to my car and called Glen. He was thrilled that I had found the airplane, although he had a hard time believing that it came down so far from where he thought. There was surprisingly little damage to the model, apart from the broken fuselage. Glen plans to rebuild the airplane and fly it closer in.
The timing was good. Within a short time after the aircraft was recovered, severe rainstorms hit the area. The Des Plaines River rose, and the area where the airplane came down was underwater. Without the drone mapping, the airplane would have been lost.
Since writing this article, I’ve used my drone to locate another model airplane on the same day it was lost and guided the owner directly to it.
By Rolland Mast From the September 1999 issue of Model Aviation. Father and son, Rolland and Ryan Mast, displaying their Cub .60 by the family cottage at Indian Lake MI. It was one of their first
Written by Patrick Sherman Advanced Flight Technologies Column As seen in the November 2018 issue of Model Aviation. “It’s about the data, not the drone,” is a sentiment heard frequently among serious
Written by Matthew Ruddick I want to bring modelers together Column As seen in the February 2018 issue of Model Aviation. Please allow me to introduce myself. My name is Matt Ruddick and I am the new


Comments
Add new comment