


Tower Hobbies DHC-2 Beaver 1.5M PNP

Tower Hobbies DHC-2 Beaver 1.5M PNP
A popular model returns to the lineup
By | [email protected]
As seen in the April 2024 issue of Model Aviation.
I HAVE FOND MEMORIES of seeing Beavers and Otters when I was flying in Alaska many years ago. They’re distinctive, proven, solid workhorses. The Lady Esther is a real, working bush airplane in Ketchikan, Alaska, and this model represents it beautifully. For more information about the airplane that you’re about to build and fly, visit the Island Wings Air Service website that is listed in "Sources."
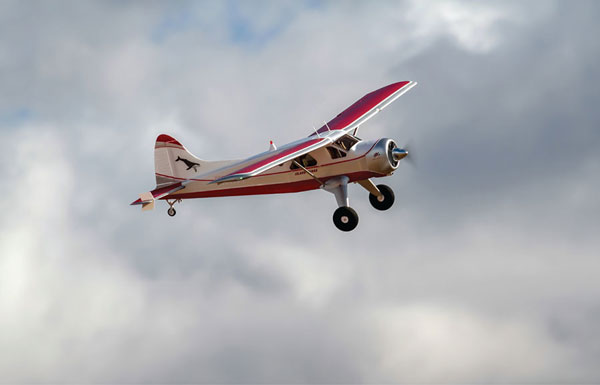
A flight shot of the DHC-2 Beaver.
As I was laying out the pieces and unwrapping them, my wife came into the shop and exclaimed, "That’s a beautiful plane." I guess that pretty much says it all. It was also obvious that the only tool required for assembly would be a Phillips screwdriver.
 At a Glance
 Specifications
Model type: EPO foam sport scale
Skill level: Intermediate to expert
Wingspan: 59.45 inches
Wing area: 439 sq. in.
Airfoil: Flat bottom
Length: 38.5 inches
Weight: 49.4 ounces
Motor: 4011-850 Kv brushless
Radio: Six-channel
Construction: EPO foam
Price: $249.99
Components required: Six-channel
Test-Model Details
Motor used: 4011-850 Kv brushless outrunner (included)
ESC used: Tower 40-amp (included)
Battery: 3S 2,200 mAh LiPo (required)
Propeller: 12 × 6 (included)
Radio system: Spektrum iX14 transmitter, Spektrum AR637T receiver, 9-gram submicro servos on all flight controls
Ready-to-fly weight: 45 ounces (1,286 grams) with 3S, 2200 E-flite Smart battery
Wing loading: 15 ounces per sq. ft.
Flight duration: 6 to 7 minutes

Pluses
- Two-piece wing with carbon-fiber spars and functional flaps.
- Comes ready for your receiver.
- Tundra-style tires and a steerable tail wheel.
- Floats with water rudders included.
- Styled after a full-scale Alaskan bush airplane, Lady Esther.

Minuses
- Missing hardware.
- Discrepancies between manual and some supplied screw sizes.
- Center float braces didn’t align with the mounting holes.
- Some instruction manual steps could be reordered for clarity.

Manufacturer/Distributor
Tower Hobbies
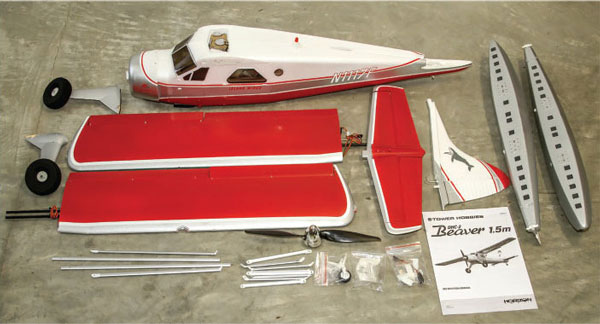
The Beaver’s parts are all laid out for inspection.
Assembly
Tower Hobbies claims that assembly should only take 2 to 3 hours, and I’d say that’s pretty accurate. The first step is to decide whether you’ll put it on floats or wheels. I knew I’d be flying it both ways, so I began with the float installation. The struts and mounting holes all have either labels or molded identifying numbers on them, so it’s a quick process to locate the proper place for everything.
Although my parts were all labeled, I had a problem with the center struts for the floats. I suspect that they were miscut because four of the eight did not match up to the labeled mounting holes. I set the floats up with four of the eight struts, and then I removed them to install the wheels.
A note of caution here as you follow the manual while installing the wheels. Do not install the tail wheel assembly until you’ve completed the step where you attach the tail surfaces. If you do, you will not be able to insert the M3×22 screw that locks them all together. There is an access hole in the wheel assembly so that you can get a screwdriver through it, but you won’t be able to slip the screw through it because the head is larger than the hole. Lock all of this together, and then install the tail wheel assembly.
The elevator pushrod is in the recessed area below the horizontal stabilizer mounting area. It isn’t attached to the servo yet, so you can slide it back and insert the Z-bend into the control horn. As you slide all of this forward into position, guide the pushrod into the easy connector on the installed elevator servo. It’s easier to get that in place now than after you have it all locked together. There is minimal room to get hands into the cockpit if you have to remove the servo horn to insert the wire later.
After the horizontal stabilizer is in place, you can insert the vertical stabilizer and slide it all forward into position. The rudder control rod is prebent and slides down into a slot that provides its control. When everything fits in place and pushed forward, it’s locked down with the single M2×22 screw from the bottom.
The two-piece wing slides into place, locking itself on four tabs attached to the sides of the fuselage. As you slide each side into place, be careful to guide the servo and lighting wires through the corresponding slots in the fuselage.
Note: This is one area that I would hold off on until you check the tail surface control throws and lock the easy connectors down. After the three carbon-fiber rods are in place with the wing panels, that area is extremely difficult to access. Doing it before installing the wing will make that job much easier, should it require adjustment.
There are four tabs on the sides of the fuselage that will lock the wing into place after it is fully inserted. Go carefully here and ensure that all of the wires are clear and the pushrods for the flaps are both in the connector on the premounted flap servo at the top of the fuselage. If you rotate the servo arm all the way to the left (counterclockwise), it will make final adjustments easier. After the wing solidly snaps into place, you can install the wing struts.
There is access to the battery/radio compartment on the bottom of the fuselage. Rotate the plastic latch to the side and the hatch will drop out. There is a shelf on the side of the fuselage where your receiver of choice will mount. I opted for a Spektrum AR637T, which fit nicely and allowed me to set up for SAFE, AS3X, or no stabilization at all. There are a lot of wires to connect and each is clearly labeled. When your receiver is connected and secured to the shelf, be sure to tuck all of the wires away back into the cockpit area so that they are clear of the battery slot. Routing your antenna can be tedious, but take your time and secure it away from all wires, the ESC, etc.
The battery slides almost vertically down into the inverted fuselage through the access hatch. I put a bit of hook-andloop fastener on the edge of the slot to help secure it, but the hatch will pretty much hold everything in place. I found that there is a small, triangular piece at the back of the battery hatch that I needed to trim so that it wouldn’t interfere with the batteries. Much of that will depend on your battery size. My 3S 2,200 Smart Gen 2 LiPo pack was slightly too long to allow the hatch to close. A bit of trimming had it fitting nicely and helped to secure the battery.
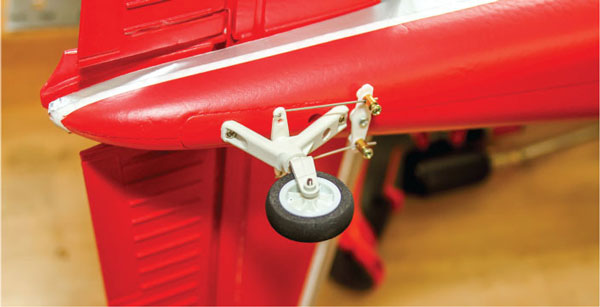
The tail wheel has an access hole for the tail surface’s retaining screw. Be sure to install that before installing the tail wheel assembly.
Everything slides into locking position, the wires are routed, and the flap rods are inserted into the servo connector. It’s best to check the elevator and rudder throws before this step for easier access.
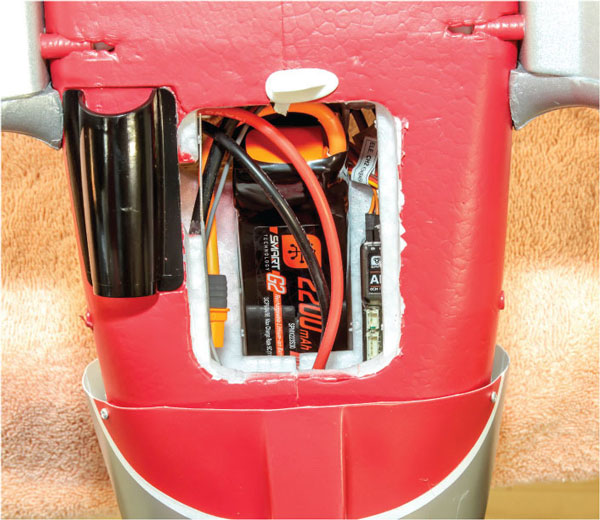
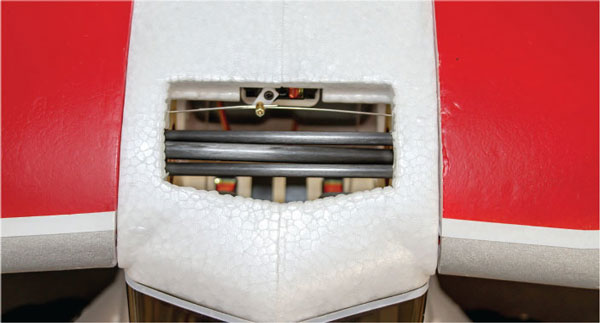
The battery slides down vertically into the slot.
Control Throws and CG
I programmed my receiver for high, mid, and low rates because I had a three-position switch for the elevator and ailerons. At 100%, my throws were exactly as recommended, and at 60%, the low-rate settings also matched the manual.
I set up a mid-rate position for 80% that gave me a nice option right in the middle. The elevator and ailerons both worked out this way and no mechanical adjustments were needed.
My flap settings worked out perfectly with the switch setup being -100, 0, and +100. After you have them properly adjusted, be sure to secure the screw in the easy connector at the top of the fuselage.
My center of gravity (CG) worked out to be right in the middle of the recommended range without requiring any weight or adjustments.
AS3X and SAFE
The Spektrum AR637T gave me the option to use SAFE, AS3X, or nothing at all. I used the forward programming in the iX14 to set them up. Test flights were done with no stabilization active. I used the default settings for SAFE and AS3X and adjusted them during initial test flights before capturing the final settings. Having all three flight modes allows me to let people try the airplane with the assurance that there is a recovery mode available to them.
Flying
With a sunny, winter sky, a "balmy" 52°, and wind at 10 mph gusting up to 21 mph, it wasn’t a perfect day for test-flying, but it was certainly a good test.
The Beaver tracks nicely on the takeoff roll and the tail comes up quickly. Rudder control was more than adequate, and a nice, long two-wheel takeoff run was almost mesmerizing. The airplane rose gently, and it immediately felt nice and stable.
A couple of easy trips around the pattern proved that there was nothing to be concerned about. The balance, along with the control throws, all felt good. I took it up to altitude and tested out my SAFE and AS3X settings. They proved to be sufficient for what I wanted. A couple of tweaks and capturing the settings on the ground left me feeling good about everything. I was comfortable leaving everything on high rates, only making one small mechanical adjustment on the elevator to have it perfect.
Now that the "work" was done, it was time to explore the envelope. I won’t go so far as to say it’s a true short-takeoff-andlanding airplane yet, but, with a bit more adjustment on the flaps, I think I’ll get close. With gusts of wind exceeding 20 mph and full flaps, the airplane pretty much stopped a couple of times.
Climbs are spirited, and a full range of sport aerobatics are available to you. Inverted flight required a slight bit of elevator, as did the slow roll, but nothing more than expected. Stall turns, spins, loops, and slow flight will have you thinking that you’re watching the real deal.
Landings are easy and controllable, whether you choose to employ the flaps or not. I didn’t mix any elevator to the flaps and simply adjusted as required with the stick. There is a slight pitch up as they are deployed, and some flap-speed adjustments helped make it smooth and realistic. Touching down on the main landing gear or doing a three-point landing is up to you. With the conditions for my test flights, it worked best to accomplish a planted, threepoint landing.
Calmer flight conditions are a lot more fun than on a gusty day, but it proved that this airplane can handle those conditions, and choosing to use AS3X helped a lot. At less than 3 pounds and using economical 3S packs, this makes for a great Scale entry for anyone who wants the next airplane after a basic trainer.
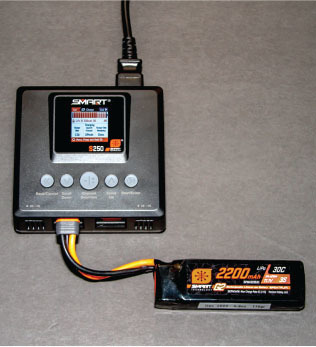
When charging Gen 2 packs, there is no balance tap required and operation is automatic.
Spektrum S250 G2 AC Smart Charger
Because I needed some new 3S LiPo packs for the Beaver, I decided that I’d go ahead and update to Gen 2 packs and get a new charger to support them. The Smart technology is kind of amazing and takes a lot of the worry of battery maintenance away because it does so much of it on its own.
The Gen 2 series does away with the balancing wire and does it all through the Smart circuitry in the pack and charger. With the S250 charger and new Gen 2 packs, I simply plug them in and everything is automatic.
You can go into the menu and see the history of the pack, but more importantly, you can adjust the default settings of the pack. I’m happy with the defaults, but, for example, if you don’t want your packs to begin auto storage mode in 72 hours, you can change that timeframe to whatever you want.
This charger doesn’t lock you into using just Smart packs. It’s fully capable of charging any 1S to 4S pack by manually setting the parameters. There is a balance port to support non-Smart packs or the older Gen 1 packs. It can also charge a variety of chemistries to take care of all of your other types. It supports LiHV, LiPo, Li-Ion, LiFe, and Pb batteries. Here are the highlights of this little powerhouse:
- 2 × 50 watts of charging power. Charge two batteries simultaneously or use a single channel for up to 80 watts of power.
- Selectable IC3 and IC5 charging ports—no separate adapters required.
- Charges 1S to 4S LiPo/LiFe/Li-Ion/LiHV, 1S to 12S NiCd, and 1S to 12S Smart NiMH batteries.
- Color LCD screen interface features intuitive menus, icons, and navigation tools.
- Auto Charge recognizes Smart battery charging parameters and starts charging automatically when connected.
- USB-C input for updating firmware.
- Efficient, low-noise cooling fan.
I’m super happy with my choice of the S250 Smart Charger because it is compact and supports everything that I have from 4S down. At a price of $119.99, it feels like a bargain.
Conclusion
This is a great-flying airplane, and it looks fantastic in the air as well. Flight characteristics didn’t disappoint, and it’s quickly becoming one of my first choices to load for the field. I still fantasize about being back in Alaska and seeing Beavers fly by whenever I have it out.
The 3S pack offers great performance and flight times at a reasonable cost. The power setup is well matched to provide scalelike performance and even a bit more, if desired. Those gusty conditions really tested its mettle and, like its full-scale counterpart, it passed with flying colors.
SOURCES:
Island Wings Air Service
Spektrum RC
This Month's Issue

Join the AMA
![]()


1 comments
Really nice write-up. I agree
Add new comment