
Written by Tom Sandor
Electric Free Flight “push-pull” model
Free plans and build photos
Photos by the author and Dough Harvey
Read the full tutorial in the October 2015 issue of Model Aviation.
Download Free Plans
Document
Document
Image

Order Plans from AMA Plans Service
Image
Image

Specifications
Type: Semiscale Wingspan: 23 inches Length: 16 inches Wing area: 70 square inches Flying weight: 2 ounces Motor: ParkZone with gearbox Battery: 1S 70 mAh LiPo Receiver: ParkZone 2.4 GHz three-channelBackground
I am a dreamer. I have been as far back as I can recall. I also loved drawing things. When neighborhood kids were playing touch football in the street, or punch baseball, I could be found up in my attic building or drawing model airplanes. Yes that is right, the dreamer artist and I was good at it—still am, with a fine arts degree from Newark School of Fine and Industrial Arts in New Jersey. Well, it’s time now to snap out of my memory scrapbook and get to the Cessna writing. I took a short rest from model building after 14 of my designs were published in Flying Models magazine, but inspiration came again. Funny how that happens, often when you least expect it. The television was on and I was having a late breakfast and my wife was thumbing through the channels when I said, “Hey, hold that channel.” There it was, flashing across the screen, my next model aircraft subject, the Cessna Skymaster. In the cabin, at the controls, was the actor Danny Glover with the intercom to home base. It was quite a striking scene. The aircraft was white and royal blue, flying in crisp contrast against a majestic, dark mountain backdrop. “That’s it! I just have to model that one.” The Cessna Skymaster is a twin-engine civil utility aircraft built in a push-pull configuration with one engine mounted in the nose and the other behind its pod-style fuselage. This model is fashioned after the Cessna 337F Skymaster with two continental 10-360 GB-210 hp piston engines. The wingspan is 38.2 feet and length is 29.8 feet.Construction
Start with the airframe using medium grain 1/16-inch balsa or 1/20-inch basswood. Cover the plans with protective waxed paper and make both fuselage sides as indicated. Box these together with crosspieces followed with curved upper and lower crosspieces. When everything is correctly aligned, apply all of the fuselage stringers except the two single side stringers as indicated on the plans. At this point, the micro servos and mini motor should be installed. For proper placement of these, see the note on plan A. The mini motor will need a nose block made from light balsa and carved to shape internally to fit the motor. The servo tray is mounted as shown on the plans. The rear motor shaft is a simple hat pin mounted inside the small, lightweight, balsa engine block. This arrangement is made to create the illusion of rear-engine pusher power and will actually spin from the nose propeller wash. Yes, it actually works. Drawing B is for making and installing removable rear wheel gear on the model. Everything else is straightforward for experienced modelers, or even talented beginners. After you select the wood, lay out the main wing arrangement according to the plans, paying careful attention to the root center sections. Two 1/8-inch ribs (R-1) must be placed at the proper angle (front view C), to create the proper dihedral for the wing. Next finish the twin tailbooms and rudders as indicated on the plans. Install everything after you select the color scheme for the tissue covering. Complete the stabilizer with the provision for lifting ability. I surfed the Internet for color scheme choices. I was amazed at the variety of beautiful color schemes, slight design modifications, etc., that were made on the full-scale Cessna Skymaster. The plans don’t show a rear engine air intake. I omitted this to allow the nose propeller airstream to have a better flow into the rear propellers. To complete the project, apply the finest wet-strength tissue available to the model’s framework. My suggested color scheme is shown in the photos that were supplied by my friend, Dough Harvey. If you’re an experienced park flyer, there’s nothing more I can say except I wish you success and happy landings. There is nothing stopping you from altering this simple Free Flight model to an RC aircraft by adding a working rudder and elevator. I hope you enjoy flying this Cessna Skymaster.Image

The Cessna Skymaster was designed as a Free Flight model and uses plug-in landing gear.
Image
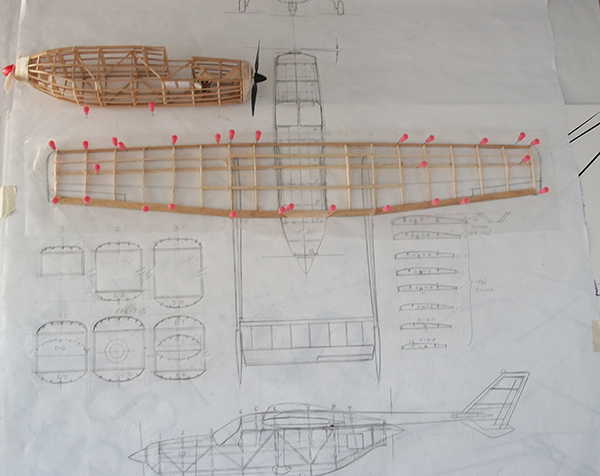
The model can be built on top of the plans. Use medium-grain 1/16-inch balsa or 1/20-inch basswood for the fuselage.
Image

The 1/32-inch balsa wing sheeting reinforces the area from the fuselage to the tailboom. Battery access is on the bottom of the fuselage.
Image

The author chose white and royal blue to match the Cessna Skymaster he saw on TV, but many color schemes were used on the full-scale aircraft.
Image


Comments
Print programs for PDF files
This set of plans came with tiled print as an option. Used to be able to do this with Adobe and would like to again yet no one in Adobe tech support(?) can ID what or which software is required. Have at least 5 sources for plans and plan sharing but snail mail is slow and expensive, not something recommended on a retired income. Do not have an objection to paying for software, just paying for no improvement. Was able to do so until mid 2014 and then the ability to change printer setting was blocked to just paper size! Any hints?
Print Program for PDF Files
Open the pdf files in Acrobat Reader and then choose the Print document function and be sure the print is set to print full-sized with no scaling turned on (Not FIT but ACTUAL SIZE). I print the Document and Markup to get the lines for cutting shown to line up the pages properly.
Adobe to print in tile format
In Adobe Acobat Reader, when you go to print a plan that is much larger than your availabke paper size, there is an option to tile the plan.
In Adobe Reader select | File | Print | All Pages | More options | Poster.
Then make sure your available paper size is correct.. Set Tile Scale to 100%. Set the overlap option. This helps line up the sheets as you tape them together. You may or may not wish to select the Cut Marks option. It adds a little set of cross hairs at the boundary of the printed area.
It will show the layout of the print when you have all the selections made. When you are ready select Print.
Print programs for PDF files
I have wondered about this myself so I did a little research on your behalf (and mine!). I found that Adobe's Acrobat Reader has this ability. Choose print, then choose 'poster.'
I downloaded a fresh copy of Adobe Acrobat Reader for free from Adobe's website and tested on Windows7 to make sure this is still a viable option for everyone. Here is the download link: https://get.adobe.com/reader/
Another option would be to use an Open Source solution like this one https://pythonhosted.org/pdftools.pdfposter/ I tried it on my Mac and it works, I expect it works on Linux. I don't know about Windows.
Of course for most people reading this article and only concerned about the Skymaster plans, the authors have done the work for you. just click the link to the tiled plans instead of the full plans.
Skymaster
Tom,
I have been looking for plans for the Cessna Skymaster for many years now. Thank you for publishing these plans! I intend to build a rubber powered model from your plans(if you don't mind.) I will build both a tractor only and a tractor-pusher both. I work in a print shop and can enlarge the plans as well as print them full size. I want to duplicate the paint job from the movie, Always, with John Goodman and Richard Dreyfuss. Thank you again, so much! Now if you know where I can get some plans for the V-173, Flying Pancake....
Max
Add new comment