
Written by Al Clark
Build this fun-to-fly electric sport model Construction
As seen in the January 2018 issue of Model Aviation.Editor’s note: In 1982, author Al Clark designed his original glow-powered Terrier. He published it in 1984. Al recently redesigned the popular aircraft as an electric sport model and has provided an extensive feature detailing its construction and complete materials list. The plans are available as a free download or can be purchased through the AMA Plans Service. The following highlights some of the changes in the Terrier ES, its features, and its flight characteristics. —Jay Smith
Download free plans!
Full-size plansDocument
Tiled plans
Document
Three-view
Document
Order Plans from AMA Plans Service
Image
Image

Extended Editorial
Document
Materials list:
Document
Specifications
Wingspan: 58 inches Wing area: 550 square inches Weight: 68 ounces Wing loading: 17.8 ounces per square foot Power system: .25-size electric motor; 50-amp ESC; 4S 4,500 mAh LiPo battery Radio system: Four-channel radio and receiver; three servosConstruction
The Terrier ES is a redesign of the glow-powered Terrier model I designed in 1982. The original model was the size of most .40 glow-powered airplanes, but it was lightweight and powered by an O.S. .25 engine. It proved to be an excellent performer. The Terrier was published in Radio Control Modeler magazine in March 1984, and the plans were a best-seller. At the time, I received many letters and photos from modelers in the US and abroad. I recently discovered that the original Terrier plans have made their way onto the Outerzone Plans website and was pleased to find encouraging comments from modelers who are still building and flying it. Having designed more than 50 RC models throughout the last 45 years, I can honestly say that the Terrier was the best all-around sport model I ever designed. The new electric-powered Terrier ES (ES for electric sport) is even better!Image

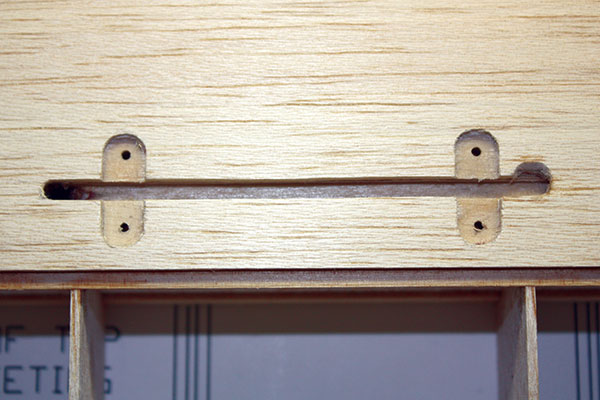
This shows the tail surfaces with the edges sanded, a bevel sanded into the hinge lines, and CA hinges temporarily installed.
I have built and flown many glow-powered models, but these days, my glow-powered aircraft have been replaced with electric-powered ones. As have many other modelers, I have been won over by the convenience, low noise, and reliability—and the best part is not having to clean the oil off of an airplane after a flying session! In the past 15 years, I have often thought that an electric-powered Terrier would make a great model, but other projects had priority. After a recent discussion and some encouragement from my brother, Rod, I finally created CAD plans for the Terrier ES. The Terrier ES’s fuselage was redesigned to accommodate the electric motor, ESC, and LiPo battery pack. This resulted in a change in the firewall location; the addition of a battery mounting shelf; adding a removable hatch on top of the fuselage for battery access; adding air-cooling intake and exit holes in the firewall and fuselage; and a different location for the rudder and elevator servos. Not having an upright-mounted glow engine and muffler meant that I could close off the front of the fuselage and essentially make it into a full cowling for a more scalelike appearance.
Image

The spar webs, LE, and top trailing edge (TE) sheet have been installed. Landing gear mounts will be installed next.
The Terrier ES retains the aerodynamics and overall configuration of the original model. I did not want to make any changes that would upset its excellent flying characteristics. The motor thrustline, wing, and tail are all set at 0°, which helps ensure that its inverted flying characteristics are similar to upright flight. As did the original, the Terrier ES uses a modified NACA 2415 airfoil, which is the primary reason for its excellent performance. The modified airfoil reduced the leading edge (LE) radius by 40% then recontour the first 15% of the top and bottom surfaces. This modification resulted in providing cleaner snap rolls and spins. Entries are relaxed and the maneuvers are easily stopped when the transmitter sticks are released. Even with this modification, the airfoil still exhibits outstanding low-speed stall characteristics. This airfoil has a smooth lift-to-drag curve, which provides predictable handling. Combining the modified NACA 2415 airfoil with a relatively high aspect ratio 6:1 wing results in excellent climb and glide performance. Only a little down-elevator is required to fly inverted, and outside maneuvers are easily accomplished.
Image
The lower D-tube sheeting has been removed above the slot in the landing gear mount. A little extra sheeting was removed at the outer end of the slot to accommodate the forward sweep and torsional movement of the landing gear. The 1/16-inch diameter screw holes have been drilled for the landing gear strap.
In addition to the airfoil selection, the wing’s strip ailerons do not extend all the way to the wingtips, so when an aileron is deflected downward, the outer portion of the wing stays at neutral. It has a washout effect, helping avoid tip stall. The E-flite Power 25 870 Kv outrunner motor I am using has slightly more power than the old O.S. .25 glow engine did, and with the APC 11 x 5.5 propeller, it makes the Terrier ES an even better performer. If desired, the model is now capable of a vertical climb. Takeoff runs can be extremely short and triple snap rolls are accomplished with no problem. The instant response and acceleration of the electric motor is a pleasant improvement over the old glow motor. Using a 4S 4,500 mAh 35C LiPo battery provides 8- to 10-minute flights, and the battery is barely warm at the end of a flight.
Image

The inboard TE stock with the installed aileron torque rod has been glued to the wing. Make sure that the TE stock is aligned with the airfoil shape when gluing. The slot allows torque rod movement. Refer to the plans and pay particular attention to the angles and position of the ends of the torque rod wire when bending, and don’t forget to slide the brass tube bearing on before completing the bending!
The Terrier ES is an easy model to fly and has no bad habits. If you can fly a trainer you will be right at home flying the Terrier ES. However, unlike the trainer you learned on, the Terrier ES is fully aerobatic and has plenty of power. If you get tired of full-bore aerobatics, you can throttle back and have a great time slowly flying around at half throttle. With its wide landing gear, the ground handling is better than most tail-draggers, as well as most tricycle gear models. Both wheel landings and three-point landings are easily accomplished. Touch-and-gos are easy to do and great fun. On takeoff, simply use gentle rudder input to steer, and on steep climbout, remember to use a bit of right rudder. The Terrier ES can perform the usual loops, rolls, spins, snap rolls, and Hammerheads with ease. With a little practice on your piloting technique, you will be doing four-point rolls, tailslides, double and triple snap rolls, snaps on top of loops, square loops, and other fun maneuvers.
Image
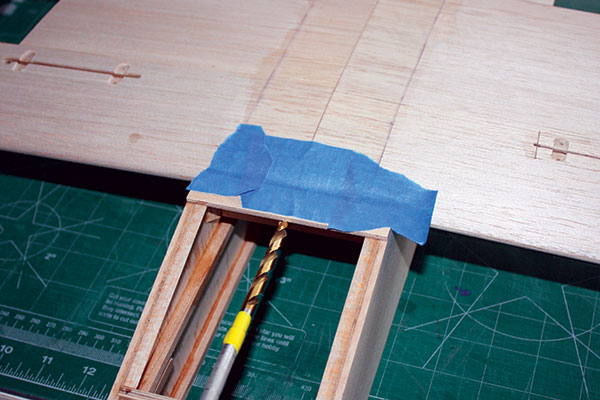
The wing is centered on the fuselage and squared using a string to measure from the wingtips to the back end of the fuselage. The wing is then taped down at the front. Use the hole in former F2A as a guide to drill a 1/4-inch hole into the wing for the hold-down dowel.
Because of the Terrier ES’s relatively low flying speed, you will be able to do all of these maneuvers in front of yourself! You will also be pleased to discover that the Terrier ES is equally adept at outside maneuvers such as outside loops, outside snap rolls, and inverted spins. A slip is a difficult maneuver for many models to perform, but is easily done by applying full rudder and the appropriate amount of opposite aileron. If you are high on final approach, extra altitude can quickly be lost doing this fun maneuver. The lightweight Terrier ES is extremely robust. It is simple and easy to build, doesn’t require much wood, and needs no composites. It uses standard film coverings such as UltraCote (what I used on mine), and because it’s electric, no fuelproofing is required in the firewall area or anywhere else. It is an economical model to build because it uses a simple radio system—only three analog servos and a four-channel receiver, and a relatively inexpensive E-flite Power 25 motor and Hitec Energy Sport 50-amp ESC. It is easy to transport fully assembled in most cars. It goes into my little Honda Fit with no trouble, but the wing is easy to remove, if needed, to fit into any size vehicle.
Image

This shows a front view of the fuselage before the 1/8-inch balsa front and 1/8-inch balsa top sheeting have been installed. The upper curved piece of 3/8-inch balsa has the back sanded off so that its cross-section is triangular (refer to the side view on the plans). Also visible are the lower 3/4-inch triangular piece and the 3/8-inch triangular pieces on the left and right sides.
Flight Characteristics
Choose a day with light wind, preferably down the runway, for your first flight. Taxi out, get pointed straight, and smoothly advance the throttle to full throttle. Use the rudder as needed to maintain runway heading. You will find that the Terrier ES gets into the air quickly at full throttle. Climb to roughly 200 feet and set the trims for straight-and-level flight. Throttle back if you feel you are flying too fast. After you get a feel for the model, you will find it is easy to control while still being quite responsive.Image

This is a top view of the fuselage before turtledeck formers T6 and T7 and the stringers have been added. Crosspieces at the T6 and T7 positions, turtledeck former T8, diagonal braces, and the stabilizer doublers are shown. Barely visible are the edges of the two cooling-air exit holes in the bottom fuselage sheeting.
Go to half throttle and perform a few stalls. You will find the stall recovery to be quick and easy with the addition of a bit of power. If you feel like doing some relaxed flying, you will find that the Terrier ES flies well at reduced throttle settings. You will also discover that scalelike takeoffs can be made at less than full throttle, and these are fun to do. Landings are easy, but on your first landing approach, you will probably be surprised at how well the Terrier ES glides. You might have to do a couple of go-arounds and start your approach farther out than you are used to with other models. After you get some experience with the model, you will find that it slips well, and you can easily bleed off excess altitude with a slip if you are high on final approach.
Image

The radio installation shows the rudder and elevator servos on spruce rails. The receiver is held in place to the left fuselage side with Velcro, and a soda straw is installed as an antenna holder.
The Terrier ES lands at a relatively slow speed—probably lower than you are used to. If you try to force it onto the ground, it will just take off again! Wheel landings are easy and work perfectly for touch-and-gos. Slow it slightly more and it makes perfect three-point landings. As with any tail-dragger, always hold full up-elevator while taxiing (unless you are taxiing downwind on a windy day, in which case you would use down-elevator). With the wide-spaced landing gear, the Terrier ES is nearly impossible to tip up on a wingtip while taxiing. Snap rolls are best performed using ailerons, rudder, and elevator, although they can be done using just rudder and elevator. At full throttle, you will be able to do triple snap rolls. Outside snap rolls are as easy to do as inside snap rolls. Spins look best using low throttle, rudder, and elevator only. Consecutive inside and outside loops are easy.
Image

The battery hatch has been removed, showing the 4S 4,500 mAh 35C LiPo battery with a Velcro strap. This size battery is good for 8 to 10 minutes of spirited flying. It can be moved fore and aft as needed to attain the correct balance. The hatch is held down using magnets and a dowel pin.
Inverted flight requires only a little down-elevator, and the Terrier ES flies well inverted at lower throttle settings. Just remember that the inverted stall speed is slightly higher than the upright stall speed. As already mentioned at the start of this article, many other maneuvers can be done and will add to the fun of flying the Terrier ES. The Terrier ES is economical to build, easy to transport, easy to fly, and extremely aerobatic. After 46 years of flying nearly 200 RC models, the Terrier is my all-time favorite all-around model. I’m confident you will enjoy yours as much as I do mine!
Image

The author on a cool spring day with the Terrier ES, which is ready to fly.
—Al Clark [email protected]


Comments
Purpose of this 'Comment'
Purpose of this 'Comment' space not apparent.
Nice looking AC. Sounds like
Nice looking AC. Sounds like it handles even better
Nice looking AC Sounds
Nice looking AC Sounds like it handles even better!
At the beginning of the
At the beginning of the article in the magazine you state that a complete material list is detailed. I found the electronics that are needed but nothing about the materials to purchase to build this plane. Is there a material list available?
Terrier ES short kit
For those builders who would like to build the Terrier ES from a kit, an authorized short kit is available from Marcs Laser Shop https://www.scalesailplanekits.com/#!/Al-Clarks-Terrier-ES-Short-Kit/p/…
Al Clark
Terrier ES Designer
For those builders of the
For those builders of the Terrier ES who would like to build from a kit, an authorized short kit is available from Marcs Laser Shop. https://www.scalesailplanekits.com/ Just click on Power Plane Short Kits.
Terrier es
Ordered plans two weeks ago. Not received
I like the plane flys well
I like the plane flys well
same as last
same as last
Add new comment