
Written by Otto Dieffenbach
The dream of flying unconventional aircraft
Feature
As seen in the December 2015 issue of Model Aviation.
Shortly before New Year’s Day, my family decided we should go to a movie. I was settling into my seat with popcorn and a soft drink when the trailer for the new 3-D The Peanuts Movie flashed on the screen. There he was, 3-D Snoopy flying across the screen in pursuit of the Red Baron.
I flashed back to 1968 when my dad and I attended the Weak Signals’ annual RC trade show in Toledo, Ohio. That was the first time I saw a radio-controlled Snoopy Doghouse fly. I was mesmerized and I had to have one. The seed was planted...
After a 30-year absence from RC models, I returned to this crazy addiction five years ago. I was amazed by all of the advances. It was as though I had been teleported in time. There were reliable radios, high-performance electric-powered airplanes, models made out of foam, controllable helicopters, and micro RTF four-channel airplanes costing less than $100. I was hooked again! With these new technologies and materials, the impossible was now possible, and first on my list was the pursuit of the Red Baron.
My first Snoopy Doghouse build was in 2011 and it was not very rewarding. With a single electric motor, it was a handful to fly. Torque created yaw, aggravating the poor aerodynamic qualities of the roof’s large negative dihedral. The roll coupling was horrendous. I put this project on ice and moved on to my next project: Flyguy.

Snoopy makes a strafing run behind enemy lines. The author likens him to an electric kite because of his outstanding slow-flight characteristics.
Flyguy, my simple flying human figure, became a media sensation and opened the door to using flying figures—Identifiable Flying Objects (IFOs)—for corporate branding and general advertising. I needed additional shapes in my portfolio, so with my flying buddy, Ed Hanley, I experimented with flying billboards, animals, balls, cans, boxes, a Christmas tree, and even a flying Elvis. I learned from my first flying Doghouse that strange flying shapes and torque do not mix, so my first generation of cans and boxes had dual motors with internal contra-rotating propellers to eliminate torque. They proved to be remarkably stable and flew surprisingly well. In parallel, I began to experiment with quadcopters, hoping to incorporate quad capabilities into my various IFOs. I imagined being able to add vertical takeoff, hovering, and landing. To better understand quadcopter construction and flight characteristics, I scratch-built a couple of frames and learned to tune the flight controllers. It was time well spent and provided the foundation for my next step: integrating an IFO with a quadcopter.
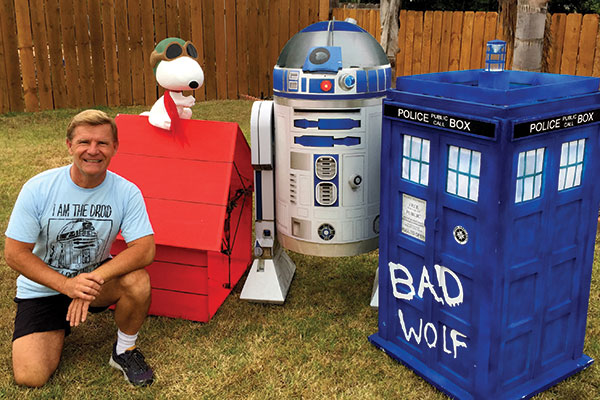
The author and his three stars, Snoopy, R2-D2, and the TARDIS, gather for a photo before ComicCon International. Flights were flown over the water behind the San Diego Convention Center.
Integrating a quad into my Flyguy design did not go well. My Flyguy could hover, but the flights mostly ended in head plants. I was on a steep learning curve, developing an understanding of thrust control, flight control surface effects, center of gravity (CG), transmitter setup, and flight controller tuning. Various motors, propellers, ESCs, and BECs were also thrown into the experiment to optimize performance and reliability. After much trial and error, my work began to converge on a useable and reliable electronics configuration. The Monster Can became my next test platform and continues to be a tremendous performer. The Monster Can stands 4 feet tall, is 2 feet in diameter, and is wrapped in black MonoKote with the Monster Energy logo.
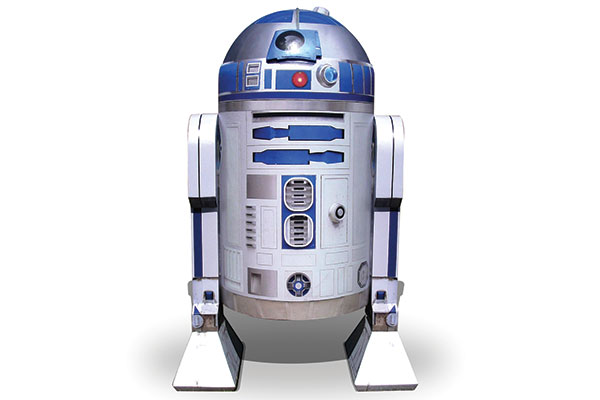
R2-D2 poses before ComicCon. The IFO weighs 6 pounds and has 15 pounds of thrust. John Boisvert allowed the author to take detailed pictures of his fully functioning R2-D2 to produce these graphics.
I built the quad frame as a plus (+) quadcopter with four flight control surfaces in a + configuration in the can’s bottom. I needed an eight-output flight controller with servo-mixing flexibility and selected the HobbyKing KK 2.1.5 flight controller flashed with Stephen Amor’s firmware (his ID on RCGroups is Steveis). Stephen, of Cornwall, England, was kind enough to add changes to his baseline firmware to support my efforts. This second generation aircraft remains a blast to fly and a show stopper. As a test bed, I used the Monster Can to experiment with various transmitter setups. One configuration I tried allowed me to switch the transmitter from helicopter to airplane mode when I went from hover to horizontal flight. My brain could not handle the transition and I later discovered other pilots couldn’t handle it either. The bottom line is that if you’re an airplane pilot, the flight controls and quadcopter controls should be set up like an airplane so that the IFO reacts to control inputs the way an airplane hanging on the propeller does in a 3-D hover. This is easily done by swapping the aileron and rudder inputs from your receiver to the flight controller and reversing the aileron direction on your transmitter.
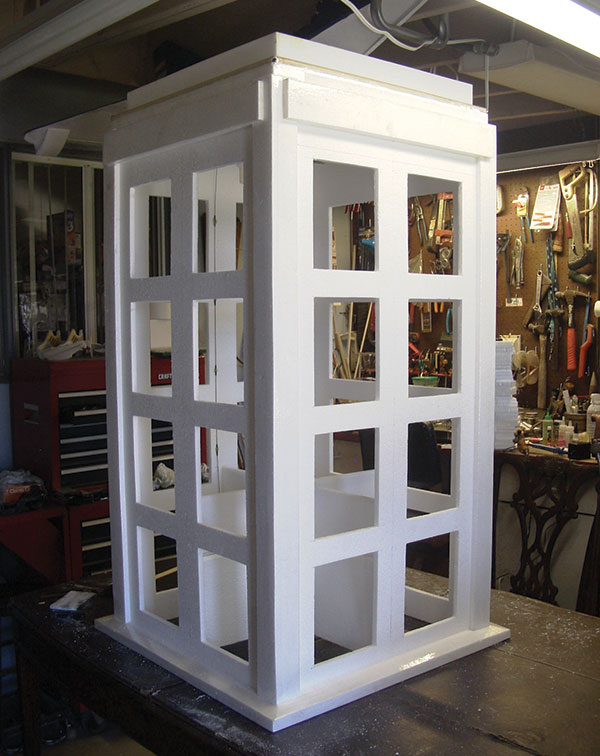
Initial flight testing completed, the half-size TARDIS awaits 1/4-inch inner foam sheeting to complete 3-D door effects. Basic construction is 1/2-inch polystyrene foam sheet.
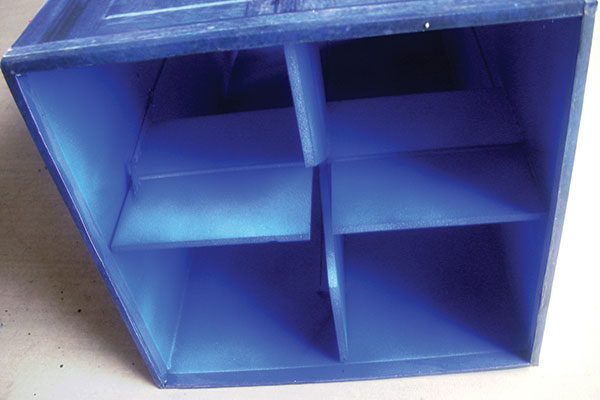
I use the controller’s mixing capabilities to set up each of the four control surface servos—two as rudders, two as elevators, and all as ailerons. If you are more of a helicopter pilot then you should configure the quadcopter controller with standard helicopter receiver inputs. The servo-mixing setup should result with two ailerons, two elevators, and all servos as rudders. With more confidence, I next tackled a second-generation flying box and finished it out as a half-size TARDIS from Doctor Who. TARDIS stands for “Time And Relative Dimension In Space” and is a flying blue police phone booth in Doctor Who, a long-running British television science fiction show. It transports the doctor through space and time. Most Americans look at my TARDIS and think it is a flying outhouse.

The Mini TARDIS hovers and to stay in position, it is tilted into the light wind. The angle of tilt increases with wind velocity.
The 4-foot-tall half-size TARDIS uses the + configuration for the flight control surfaces, but employs an x quadcopter configuration for the thrust. This configuration also works well and it seems both are effective for performance and controllability. The selection of a + or an x quad configuration is really driven by which configuration fits best within the IFO’s design. Designing an IFO is fun and challenging. When I begin conceptualizing a new design, the big questions are where to locate the CG and how stable is the IFO. I usually build a small gliding model and use it to determine a starting CG location, evaluate stability issues, and experiment with flight control surface locations and sizes. Because most of my designs are flown in front of large crowds, safety is of utmost importance. As a rule, my air show designs have the propellers shrouded within the IFO, making human contact difficult. My designs tend to be lightweight, weighing 2 to 4 pounds, and are capable slow-flying aircraft that fly at maximum speeds of 30 to 40 mph. Some people refer to them as flying kites.
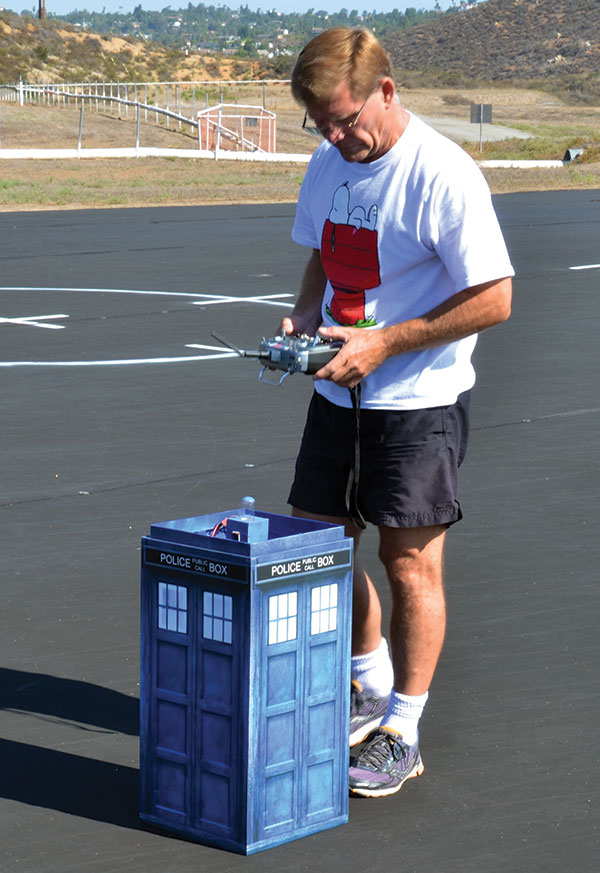
The author runs through the checklist as the Mini TARDIS prepares for flight. After arming, he visually verifies control-surface and motor functionality.
Polystyrene or Depron foam are the primary building materials in all of my designs. The foam shell is usually reinforced with an internal carbon-fiber and/or dowel skeleton. For unique shapes such as the Monster Can or R2-D2, I go to a local foam-cutting company, FoamCo. It cuts beautiful, large crown moldings and pillars out of polystyrene for high-end homes and has a computer-controlled hot wire setup that can carve 8 x 4 x 1-foot foam billets into any shape. The company’s lightest foam is 1 pound per cubic foot and is what I use for all of my modeling applications. Most cities have a foam company with similar capabilities. So let’s get back to Snoopy. As I sat in the theater, all I could think about was a workable, quad-powered Doghouse. To this day, I can’t recall the movie we watched!
Flight surfaces of the 2-foot-tall Mini TARDIS provide stability and control in horizontal flight mode. These surfaces are in the + orientation.
With the roof’s sharp peak, the Doghouse lent itself to a + copter configuration and a + configuration for the flight control surfaces. I reasoned that the Doghouse could stand on end for vertical takeoffs and landings and fly in horizontal, level flight using the control surfaces for stability. When I returned home, I went straight to YouTube to watch the trailer for The Peanuts Movie over and over. I wanted my Doghouse to be a perfect match to 3-D Snoopy’s. I figured the Doghouse would weigh approximately 4 pounds ready to fly, and ordered the necessary electronics for the build. In the 4-pound all-up weight regime, I have had great success with Hitec HS-225 servos, Cobra C-2213/12 motors, 40-amp ZTW Spider Series ESCs, 5-amp HobbyKing BECs, and 7 x 4 APC propellers. This electronics combination can easily lift 4 pounds and complements the HobbyKing flight controller well. Battery power is provided by two 3S 2,200 mAh 40C LiPo battery packs. The remaining electronic requirements are a standard six-channel receiver and transmitter. To construct the Doghouse, I had FoamCo cut a 4 x 8-foot sheet of 1/2-inch thick, 1-pound foam and made the Doghouse the largest size I could from the sheet. This turned out to be slightly too large for easy storage and transport. I also purchased a block of 1-pound foam that I shaped into a Snoopy figure. Knowing that Snoopy would sit on top of the Doghouse, I designed the internal + quadcopter so that the overall balance point of the house, on its end, would be at the quad’s center. From my previous Doghouse experience, I knew that the balance point of the house in horizontal flight needed to be roughly 17% of the roof and bottom area combined.

Snoopy and his Doghouse are going through some checks. Snoopy is rough carved and supervising the quad-frame-to-Doghouse mating. Note that beneath the clock are the 2011 silhouettes of Snoopy and Woodstock from the first Doghouse.
With foam in hand, I cut all of the Doghouse parts and designed the structural skeleton required for strength and rigidity. The skeleton also serves to support the battery tie-down points and ties the whole structure to the quadcopter frame. To keep the cost of this build reasonable, I use 1/2-inch wood dowels for the Doghouse skeleton. I get many strange looks sitting on the floor at Home Depot, going through handfuls of dowels and trying to find the straight ones. The quadcopter cross frame takes some woodworking skill. The frame is made of two square carbon-fiber tubes with a four-layer plywood sandwich at the center intersection for controller mounting and three layers of plywood sandwiched around the carbon tubes at each motor-mount location. For added rigidity, carbon tubes run from motor mount to motor mount around the quadcopter frame. The quadcopter frame is epoxied with the plywood gussets to the dowel skeleton at the front edge of the Doghouse. Snoopy’s 17-inch figure is hollow and carved from the 1-pound foam block. From the trailer, I took tracings of Snoopy from the front and side and cut the block of foam to conform to the two silhouettes. I had to conjure my inner artist and remove any foam that was not a part of Snoopy.
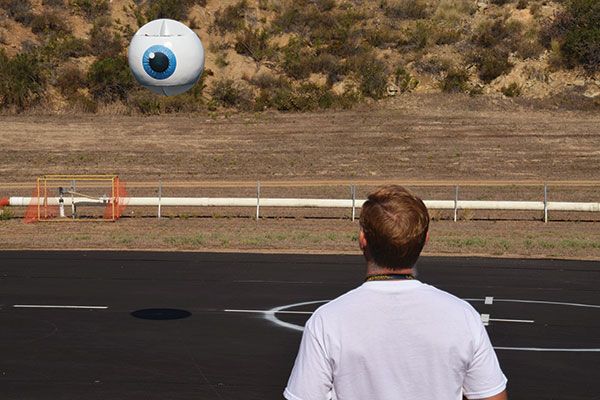
Test flights of the 2-foot-diameter Eyeball included various maneuvers to refine control-loop tuning. The Eyeball flies well and created a media stir with many believing this was a political statement. Nope, the author was just having fun.
After hollowing, my Snoopy weighed in at 3.5 ounces. To help him search for the Red Baron, I animated his head to turn left and right during flight. Carving a 3-D Snoopy is the hardest task of this build, but in 3-D he really looks great on top of the Doghouse. If you try this, go slowly and have a second block standing by just in case. When mistakes are made, unlike stone, you can glue foam back in place. Flying an IFO is where all the hours pay off. When I pull an IFO from my car, the amazement and questions of curiosity begin and are quickly followed by screams of joy at liftoff and conclude at landing with infectious smiles from both kids and adults. This seems to occur no matter how many times I bring the same IFO to the field. Most children want to touch and adults want selfies. Snoopy, the Monster Can, R2-D2, the TARDIS, the Eyeball, the Quadrocket, and the Christmas Tree are all gentle fliers. I set mine up to fly as airplanes and the hover is similar to a 3-D aircraft hover, but much easier. Transition to horizontal flight is intuitive—add throttle and push over. Cruise speed is generally at less than half throttle with turns performed primarily with the rudder and some cross controlling with the opposite aileron. Landings require a spotter to keep the top-heavy IFO from falling over at touchdown or a catcher to pluck the IFO from the air while it is hovering. With IFOs, transport and storage are a challenge. Snoopy, in particular, takes up much room and requires special transportation. To transport him, I have to remove the seats in my van.
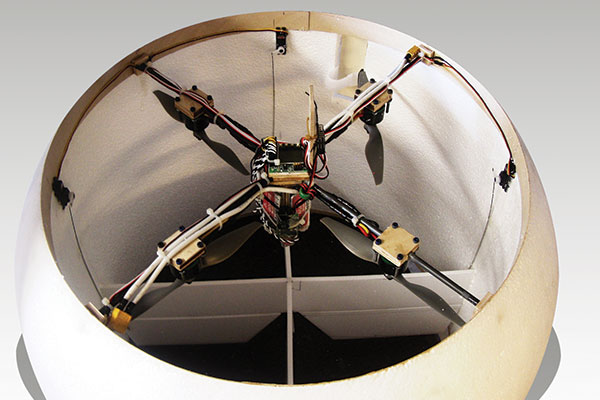
This shows the nearly completed Eyeball ready for its first flight. Note that the upper and lower silhouettes have not been attached for its initial flight testing.
To make transporting and storing Snoopy and his Doghouse easier, I’ve designed a slightly smaller version made from Depron foam. This smaller version, The Flying Depron Doghouse, is described in detail with a build log and instructions on RCGroups. Additionally, the The Flying Depron Doghouse parts are available from Hoosier Cutout Service. Although the Depron shapes are easy to cut, the routing for the carbon skeleton is difficult and time consuming. As a bonus, Hoosier Cutout Service provides interlocking parts. If you are interested in seeing videos and learning more about my IFOs, go to my YouTube channel (search for Otto Dieffenbach) or any of my build logs on RCGroups. You can also contact me through my website: Flyguy Promotions. I want to thank the many photographers and fellow modelers who provided photos for this article: Walter Wallenborn for his Snoopy, Eyeball, and Mini TARDIS pictures; and Ed Hanley and Bill Paul for all of the others. Now go out and shoot down the Red Baron, but you better hurry. I may find him first! —Otto Dieffenbach [email protected] (Editor’s note: We intend no infringement on any license or copyright, and simply look to highlight what multirotor aircraft and the technology behind them has made possible.)


Comments
Very nice, I'm interesting
Very nice, I'm interesting creating "nonflyable" things to fly. This was encouraging, thanks, steve
Semi-Conventional Models
He didn't mention his galloping ghost nostalgia models using Tobe actuators.
Add new comment