Written by Dave Scott.
As featured on page 27 in the July 2013 issue of Model Aviation.
As featured in the July 2013 app.
Rather than rehashing an ideal takeoff scenario, my goal is to explain the reasons why certain pilots routinely perform perfect takeoffs regardless of the type of airplane they fly, and at the same time, provide fliers with the simple solutions to avoid several common takeoff mistakes.
The takeoff procedures outlined in this article are standard and apply to all aircraft, whether high or low performance, tricycle gear or tail-dragger. Anyone who has made the mistake of using different takeoff techniques with different airplanes will find that takeoffs are easier when using standard procedures.
Laying the Groundwork
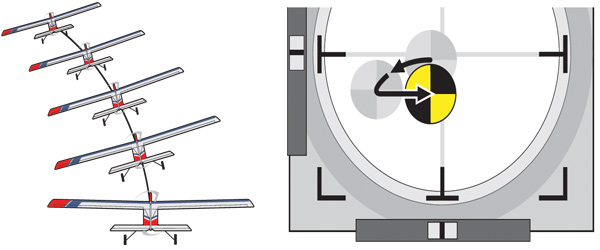
Good pilots control where the airplane is going instead of letting it go wherever it wants. You need to determine a ground reference on the horizon in line with your runway centerline. The goal is to climb out toward that reference to maintain the centerline and facilitate an easy entry into a familiar pattern right away (see Figure 1 below).
Reduce power before turning. Climb toward the extended centerline ground reference. Smoothly neutralize the elevator after liftoff and keep the wings level. Gently tap the rudder to maintain the centerline. Advance the throttle to full. Hold in slight up-elevator.Those who don’t maintain the runway centerline during the climbout will not only set a sloppy precedent for the flight, but their workload will tend to be higher when they have to bring the airplane back from where they didn’t intend it to go.
Takeoffs are typically performed into the wind. What many pilots neglect is the importance of holding in slight up-elevator throughout the takeoff ground roll. This prevents a tail-dragger from becoming top heavy and tipping onto its nose/propeller.
Unloading (taking weight off) the nose gear can reduce an aircraft’s sensitivity and the possibility of overcontrolling. The elevator will also help pull the airplane off the ground when it reaches flying speed.
Smoothly advancing the throttle to full power at the beginning of the takeoff roll is another key to easier, straighter takeoffs. Immediately accelerating to full throttle gets more air traveling over the tail sooner, which holds the airplane straighter and provides better rudder control.
Those who slowly advance the throttle will have difficulty keeping the airplane straight because of the lack of air over the tail and poor rudder authority. If your airplane is overpowered and needs half throttle or less to take off, you should still smoothly advance the throttle to the takeoff setting.
There’s no set technique for maintaining the runway centerline during the takeoff ground roll. This is when the pilot needs to react to the airplane. However, as a rule, larger-sustained ground corrections are typically needed at the beginning of the ground roll, and then as the airplane picks up speed and control improves, small rudder bumps or taps work best (see Figure 2 below).
Larger rudder corrections are typically required at the start of the ground roll and then, as the speed increases and control improves, briefly bumping the rudder works best.In calmer wind conditions, tail-draggers are not more difficult to get airborne than nose-gear airplanes, but they tend to be less forgiving if overcontrolled. Because overcontrolling is unlikely unless the rudder is held in too long, limit yourself to briefly tapping the rudder during the takeoff roll. It is okay to make large rudder inputs as long as they are not held in.
Liftoff and Climbout
A concern that many new pilots have is avoiding a stall after takeoff caused by climbing too steeply and losing flying speed. The amount of up-elevator used to take off does not cause an airplane to climb too steeply and stall, but it is the length of time that the elevator is held in (i.e., too long).
You must be prepared to start smoothly—taking out the elevator as soon as the airplane leaves the ground—to maintain a more shallow climb and plenty of flying speed (see Figure 3 below). Small amounts of elevator can then be used to fine-tune the climb angle.
The most important aspect of the takeoff is keeping the wings level after liftoff and avoiding turns until a safe height is reached. Smoothly reducing the amount of elevator as soon as the airplane lifts off is crucial to maintaining a shallow climb and plenty of flying speed.Without question, the most important aspect of taking off at the novice stage is keeping the wings level to avoid entering a low turn. It only takes a couple of seconds for a wingtip to strike the ground when a pilot neglects to level the wings.
A pilot could also forget to relax the elevator after liftoff and put the airplane into a stall. If he or she had kept the wings level, there would be several seconds to neutralize the elevator and lower the nose to recover.
Entering the Pattern
A novice pilot should avoid making any turns until he or she achieves a safe height and should reduce power to at least half before the first turn, setting the stage for a forgiving first turn. After completing the turn, set the power and trim for straight-and-level flight at a comfortable speed. This will be difficult to do if a pilot fails to hold the centerline during the climbout and is working to position the airplane into view.
Trimming when you’re a novice is easier if you raise the transmitter to see if the throttle is close to the speed at which you’re comfortable flying. This eliminates distraction of the throttle while you maintain the pattern and trim (see Figure 5 below).
Raising the transmitter makes it easier to establish the correct throttle position and trimming.The most important aspect of launching an airplane that requires trim is to keep it flying until you have enough altitude to consider trimming. Despite what you may hear, airplanes rarely crash because they are out of trim. Instead, they crash because their pilots are so preoccupied with trimming that they fail to make the necessary control inputs to keep them in the air!
Takeoff Summary
The standard takeoff procedure used for high- and low-performance airplanes is:
• Point the airplane into the wind.
• Hold in a small amount of up-elevator and steadily advance the throttle to full (do not hesitate).
• Smoothly tap the rudder to steer until the airplane lifts off.
• Reduce the amount of elevator when the airplane leaves the ground, and keep the wings level with the ailerons.
Pilots flying high-performance airplanes should also hold in slight right rudder after liftoff to counter the left-turning tendency (yaw) caused by propwash, then gradually remove the right rudder as the airplane gains speed and begins flying straight.
You don’t have to be a veteran flier to take off like one when you understand the mechanics involved. If you’ve been reacting to the airplane and using the trial-and-error method to take off, be prepared to feel as though something is missing when your takeoffs seem easier (and improved) the next time you fly. Remember to keep the wings level!
Happy flying.
—Dave Scott
[email protected]
SOURCES:
1st U.S. R/C Flight School
www.rcflightschool.com
Similar Articles
Mastering Straight Lines & Course Adjustments
Written by Dave Scott
As featured on page 45 in the December 2011 issue.
Mastering The Loop
Written by Dave Scott
As featured on page 33 in the September 2013 issue.
Mastering the Landing Approach
Written by Dave Scott.
As featured on page 31 in the April 2013 issue
As featured with bonus content in the app.


Comments
Dave Scott
Dave Scott is the best RC instructor. I attended his class back in 1993 and I have never forgotten his lessons. Great instructor, great person, great friend.
Landing Article
Once again, great article
excellent info
This site provides excellent information, thanks dave.
Add new comment