


Good enough to purchase three!
Written by James Wang Align T-Rex 470L Dominator Helicopter As seen in the November 2020 issue of Model Aviation. Review
At a Glance

Specifications
Model type: Helicopter kit
Skill level: Beginner to advanced pilots
Minimum flying area: Small field
Main rotor diameter: 33.5 inches
Length: 29.7 inches
Flying weight: 38 ounces
Radio: Spektrum DX6 G3; Microbeast flybarless gyro; Spektrum satellite DSM2 receiver
Power system: Align 1,800 Kv brushless motor; 6S 1,800 to 2,200 mAh LiPo battery; 50-amp ESC
Components needed to complete: Kit version includes motor and ESC. Super Combo version includes motor, ESC, Microbeast gyro, and four servos. (Flight battery, charger, and transmitter required.)
Flight duration: 4 to 6 minutes
Price: $204.29 for 470LP kit; $392.39 for 470LP Super Combo; $511.19 for 470LM Super Combo

Pluses
- Easy to assemble.
- Excellent parts quality.
- Superb handling characteristics.
- Broad flight capabilities.
- Easy-to-change battery.
- Beautiful, painted canopy.
- Includes carbon-fiber main blades.

Minuses
- Includes 69 mm stock plastic tail blades, but there is better yaw control with Align optional 74 mm plastic tail blades.

Manufacturer/Distributor
Align Helicopters
HeliDirect (US distributor)
(877) 439-4354

INSTEAD OF A TRADITIONAL TYPE of product review, I am reviewing the Align T-Rex 470L Dominator and will share some setup tips. The setup procedure is applicable to other helicopter models. I liked the first 470L heli I bought so much that I purchased a second and a third from HeliDirect when the retailer had its holiday sale. Now I fly them regularly.
What I love the best about the 470L is that it has the stability and predicable handling quality of a big 550- to 700-size helicopter, yet it is small, nimble, rugged, and less expensive to buy and repair. During the COVID-19 lockdown period, the compact 470L allowed me to continue flying indoors.
Traditional 450-size electric helicopters use 325 mm long main rotor blades and 3S 2,200 mAh LiPo batteries. The 450-size helicopters are affordable to buy and operate, and their compact size allows hovering and flying at small fields; however, they do not have enough rotor inertia to decently autorotate. Free play also tends to develop on the tiny mechanical parts, and the handling quality is inconsistent.
The T-Rex 470L uses 380 mm blades and the parts are beefier. The main rotor shaft has been increased from 5 mm to 6 mm and the blade spindle from 4 mm to 5 mm. It has bigger ball bearings. Nevertheless, it uses the same size micro servos, flybarless gyro, and receiver as a 450 heli.
With a 6S 1,800 mAh battery, the T-Rex 470L weighs 2.5 pounds, ready to fly. With a 6S 1,400 mAh battery, it weighs 2.1 pounds. The helicopter is only 19% heavier, but it has roughly 35% more rotor disk area than a 450-size heli. Consequently, the 470L can fly more efficiently and can autorotate. You are not just relying on raw power to keep the model in the air.
The 470L feels lighter and gentler in the air. At the same time, it has an 890-watt motor that yields a specific power of 356 watts per pound. Most 450 helis only have a 500-watt motor. Even the T-Rex 450L, with its 650-watt motor, only yields 310 watts per pound; therefore, the larger rotor disk and more powerful motor make the 470 much more fun to fly. The best part is that the 470L only costs slightly more than an Align 450.
By the way, typical 700-class electric helicopters have a specific power of approximately 360 to 400 watts per pound, so the 470L is right up with the big boys in power-to-weight ratio.
Kit Review
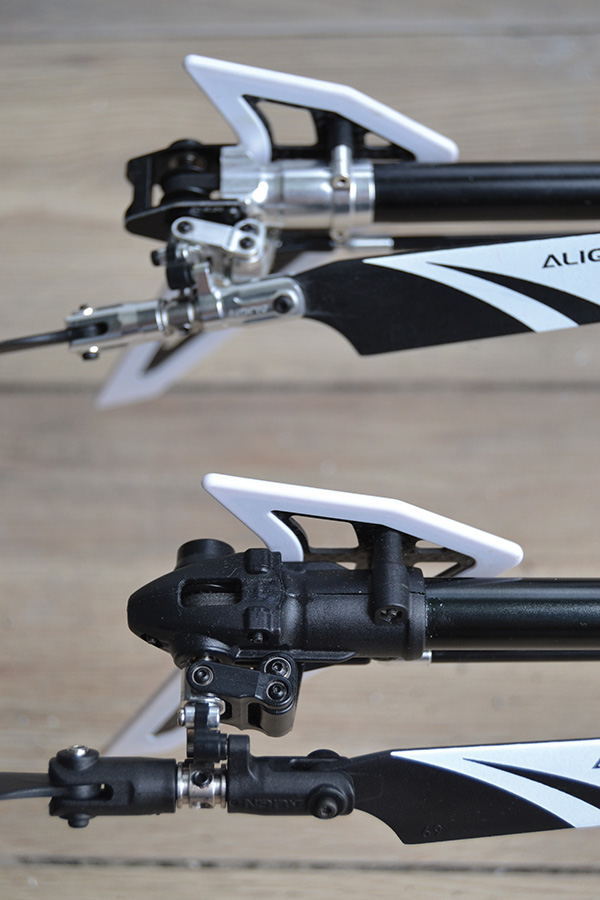
There are three versions of the 470L Dominator. The least expensive is the 470LP, with the main rotor and tail rotor parts molded from plastic. The 470LM has a metal main rotor head and tail rotor parts. The P stands for plastic and M stands for metal. Both of these models utilize a toothed belt for tail rotor power transfer. The LT version has a metal rotor head and a torque-tube drive. A torque-tube drive usually has less friction and is preferred by professional pilots.
For small helicopters, I like the belt drive because it is more forgiving in a crash, while an accident with a torque-tube-driven version will usually damage the bevel gears and the torque-tube system.
The following table compares the equipment used in my three 470L helicopters.

Despite the servos all being different and the rotor heads and tail rotor parts materials being different, all three 470Ls’ flight characteristics are nearly identical. This is because with any helicopter, the main rotor design, its flapping stiffness, control geometry, overall helicopter dimension, mass distribution, and the flybarless controller determine most of the flying characteristics of a helicopter.
The 470LP and 470LM have identical physical dimensions and designs and are nearly identical in weight. I used the same electric motor and Microbeast flybarless controller for all three models, so the control "feel" is nearly identical.
Purchasing the LP version that is $100 less will provide the same wonderful flying pleasure as the LM version, but the metal parts on the LM and LT versions are rugged and pretty. For aggressive 3D flying with the 470LP, I recommend buying an optional aluminum main rotor hub housing (part number H47H006XXW; $13.95).

I have built a few Align helicopters. The packaging is always excellent. The parts are separated into bags according to the assembly steps. The kits even come with some spare nuts and bolts. The printed instruction book with isometric drawings is easy to follow. Follow the assembly steps in the instructions.
I am impressed with the Align plastic links and steel balls. They are almost perfectly matched, and the plastic links move around the balls smoothly and usually with minimal slop. A few plastic links fit tightly but are still acceptable. A perfectly smooth—not loose and not tight—fit is one of the secrets to any good flying helicopter.
Years ago, I would spend hours squeezing and tweaking each plastic ball link until they fit perfectly, so check the plastic links on all of your helicopters. Replace and tweak them if required.
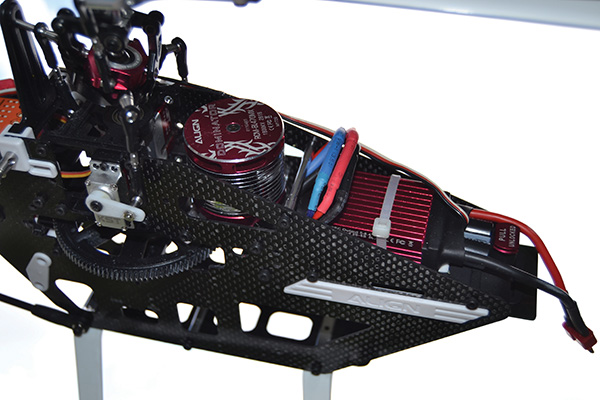
The carbon-fiber side frames and fins are well finished, but still take 250- to 300-grit sandpaper over the edges and corners to eliminate sharpness. The sliding battery tray feature is brilliant. The tray slides in, clicks, and locks. It gets an A-plus for ease in changing the battery.
This kit is easy to assemble because there are not many parts, and the rotors are preassembled at the factory; however, the assembled main rotor head and tail rotor group must be disassembled so that you can add Loctite. If you do not take them apart and add Loctite, it is guaranteed that the pieces will come apart on the first flight. I like how Align has done this preassembly because it illustrates how the pieces are put together and that nothing is missing.
It took me 10 hours to put the mechanics together and install the servos, and a third evening to program the radio and gyro and do a final complete inspection.
Mechanical Setup Tips
The kit includes a bottle of threadlocking compound. A tiny drop of blue Loctite on each metal bolt is enough; otherwise, they will be impossible to unscrew later. Loctite is only used between the metal bolts, metal nuts, or metal parts. There is no need to use Loctite if the screw goes into a plastic part. The Loctite cures overnight.
If it is necessary to later unscrew the bolt, but you discover that the Loctite is holding the bolt too tight, do not use brute force to turn the Allen wrench. That will round off the edges inside the hex socket bolt or break the bolt. Instead, use a 60-watt pen-type soldering iron and rest the soldering tip on the socket bolt’s head for 1 minute. The heat will melt the Loctite and make it easy to unscrew the bolt.
Inside the main rotor and tail rotor blade grips, there are thrust bearings. While taking the grips apart for reassembly, smear a lot of Teflon grease onto the balls of the thrust bearings. The two steel plates for the thrust bearing have different inner hole diameters, so look at the Align instruction manual. Do not mix up the position of the two thrust bearing plates.
I recommend Tri-Flow brand Teflon grease that is sold at bicycle shops. I also recommend using Tri-Flow liquid Teflon lubrication on the swashplate, tail rotor pitch-control slider, and all ball bearings. Add two to three drops onto each bearing surface and it will seep in.
The 470L utilizes slanted teeth for the plastic main gear and for the motor pinion. This provides more surface contact area between the gears than the straight-tooth type. I recommend brushing some Germanmade DryFluid Extreme Gear Fluid on the main gear and pinion gear. This lubricant leaves a waxlike film upon drying on the gear teeth to reduce gear friction. It is approximately $20 for a tiny 10-millileter bottle and is good for 50 applications.
The Align carbon-fiber graphite main rotor blades are extremely well made and come factory balanced. They are stiff, have the right inertia, yield excellent flight characteristics, and a replacement pair is less than $20. This is another reason to fly the 470L.
The trailing edge at the blade tip is extremely sharp. Gently round off that sharp cusp so that it does not accidentally poke someone.
The helicopter flies fine with the stock 69 mm-long tail rotor blades, but I prefer and recommend trying the optional 74 mm Align plastic tail rotor blades. They are approximately $7.50 for two pairs and give slightly more of a positive tail control authority, helping to eliminate tail hunting. Sometimes tail oscillation (or hunting) happens in a hover—not because the gyro gain is too high but because the tail rotor servo speed rating could be slightly slow or the tail rotor diameter is too small, and the tail rotor correction can’t catch up with the oscillation to dampen it.
The manual recommends that the three cyclic servos mount the steel ball at 12.5 mm from the servo shaft. The menu also recommends using the second hole on the Align servo arm for the tail rotor servo. Those recommendations will give perfectly balanced control that is not too sensitive or too dead.
Electronic Setup Tips
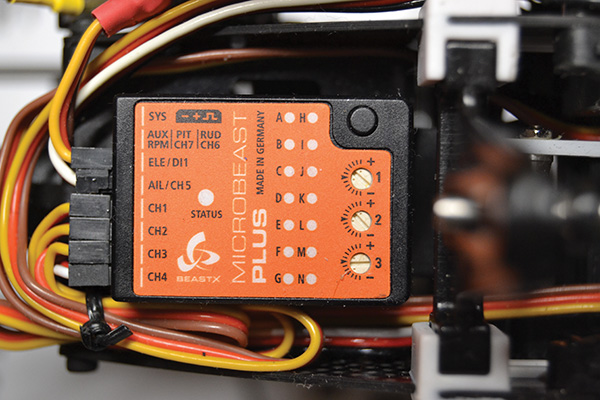
I recommend the Microbeast flybarless controller that comes with the helicopter’s Super Combo package because it is simple to program without requiring a laptop computer. This allows you to make changes at the field. The Microbeast holds the model extremely steady and gives excellent agility.

The Microbeast combo package comes with a pigtail wire to allow the connection of one Spektrum DSM2 or DSMX satellite receiver directly to the flybarless controller. This is what I use and there is no loss of signal, even when it is flown at a great distance. Using a regular receiver will require more wiring and adds weight.
Most of the 470 combo kits come with Microbeast version V4.2 firmware. Download this version’s instruction manual in PDF format that can be found by an internet search. If it is your first time using a Microbeast flybarless controller, it will take an hour to understand the instructions while playing with it.
With all three of my Microbeast controllers and 470L, the best hover stability is reached by increasing the cyclic gain trimpot by 10° to 20° from the stock horizontal position. If the cyclic gain trimpot setting is increased too much, the helicopter will nod fore/aft during a hover. If the gain is too high, the nodding or fore/aft oscillation could become violent. The gain trimpot is not too sensitive, so there is no need to worry when adjusting it. Try the factory setting first.
For more spirited 3D flying, I also dial up the feed forward cyclic control trimpot (trimpot 2) by 10° to 20°. Trimpot 3 is for the tail rotor and that can be left untouched.
Before adjusting the Microbeast menu settings, it is critical to make the blade pitch angle 0° when the throttle/collective stick is at the center position in normal, idle-up, or throttle-hold mode. To do this, first go into your transmitter and set all travel endpoints to 100% for throttle, aileron, elevator, rudder, gear, and auxiliary 1, and set the subtrim for all channels to 0 then program the following five-point values for your throttle and pitch curves in the transmitter.
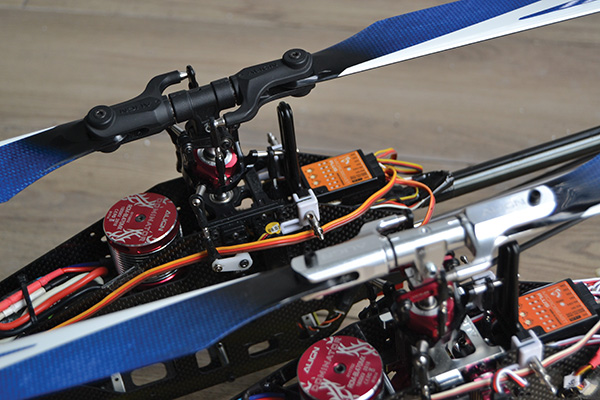
After programming the transmitter, you are ready to set up the pushrods. With the motor disconnected, turn on the transmitter and receiver power. I suggest using a separate 4.8-volt, four-cell NiCd battery to power the receiver during setup. Move the throttle/collective stick to the mid-stick position. Remove and remount the servo arms so that the three arms are exactly horizontal, as shown in the photo. Adjust the length of the pushrods from the three servo arms to the swashplate so that the swashplate is sitting level when looking from all directions, and the two swashplate anti-rotation arms on the rotor hub are also level.


Next, adjust the pushrods from the swashplate to the main rotor blade grip until the blade pitch angle is 0° for both blades. With experience, you will be able to do all of these steps just by eyeballing them. But in the beginning, use a blade pitch gauge.
Now you can go through and adjust the Microbeast setup menus A through N. Menu K is where you will set the total collective travel range for the 470L. In menu K, I adjusted it so that I can have +14° to -14° of collective travel. Later on, if you want to reduce to +12° to -12° of collective travel, you can do so by reducing the travel endpoints from 100% to 90% for the pitch channel; however, you would not be able to increase to +15° to -15° from the transmitter by changing the travel endpoints from 100% to 110%.
Menu J in the Microbeast setup is very important. It is necessary to use a pitch gauge to set the blade cyclic tilt to exactly 6°. This will influence how the cyclic control feels later on during flight.
The following table shows my collective-pitch angles for different flight modes. This is the style that I have been using for the last 15 years, and the collective travel is symmetrical about the center stick, which is ideal for aerobatics and 3D flying. This prevents the model from jumping when switching from normal mode to idle-up mode during a hover.
Before that, I used a method that is similar to what Align has shown on page 24 of its instruction manual. I used +12° at the top, 5° at center stick, -2° for low stick in normal mode, and jumped to +12°, 0°, and -12° in idle-up mode.
Although the instructions say to use +12° and -12° at the extremes, with a 6S battery and the stock motor and the main rotor turning at 2,400 to 2,800 rpm, there is plenty of torque to handle 14° of pitch. This gives the 470L a fantastic climb rate whether upright or inverted.
Set the Align ESC governor then check with a tachometer that the rotor rpm is 2,200 to 2,300 rpm in normal mode, 2,400 to 2,500 rpm in Idle-Up 1, and 2,600 to 2,800 rpm in Idle-Up 2. I get 6 minutes of 3D flying with this setup.
When using the stock Align ESC, I recommend using the Helicopter 2 option for controlling the motor speed. Align’s Helicopter 2 option is what we commonly refer to as the governor mode. The governor mode is a desirable feature in any ESC. It lets the ESC govern the motor to maintain a constant rpm regardless of the load.
The table shows my five-point throttle curve values for normal mode, idle-up modes, and throttle hold. When the throttle value is 45%, the 470L’s motor will yield approximately 2,200 rotor rpm. In Idle-Up 1, with a 60% throttle value, it will yield 2,400 to 2,500 rpm, and 68% will yield roughly 2,600 to 2,800 rpm. The exact rpm depends on the transmitter that is used and the battery condition.
After you have trimmed the helicopter in a hover, it is easy to play around with the throttle percentage values in the transmitter while at the field, until you find a nice-sounding rotor speed and it provides a balanced control feel for you. I used a Castle Creations Talon 60-amp ESC on one of the 470Ls. The Talon has a good governor mode that is easy to program from a computer, has a built-in 8-amp continuous BEC, and does not get hot during 3D flight.
The manual states that the 470L can operate at up to 3,200 rpm. For most sport flying, there is no need for more than 3,000 rpm because it significantly increases the stress on components and shortens the flight time by 20% to 40%. Even at 2,600 to 2,800 rpm, the 470L is super aerobatic and it sounds happy. The right rotor speed is what makes you feel comfortable and suits your ears and flying style.
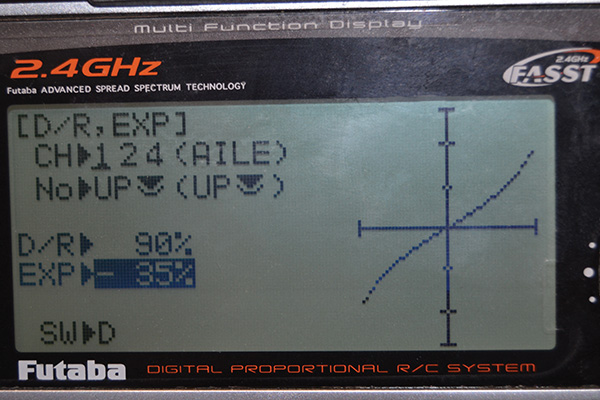
I always use the dual-rate feature on my transmitter. The high rate is for 3D flying. The low rate is for precision hovering, general circuit flying, and high-speed passes. I set the low rate to 90% for aileron, elevator, and rudder. For speed flying, it is beneficial to use the low rate to reduce elevator input sensitivity so that the model does not suddenly balloon upward. Using the low rate in a hover helps eliminate pilot-induced oscillation.
I also recommend adding some exponential to the aileron and elevator channels in the transmitter. I use 40% exponential for elevator and 35% for aileron for both high and low rates on most models. I do not use exponential for rudder. (Note: Futaba uses different nomenclature; set Futaba to -40% exponential.)
I am very pleased with how the T-Rex 470L Dominator flies. The controls feel locked in. There is a big difference in handling and performance between a 450-size heli and the 470L heli. The 470L is not tall; the main rotor disk (tip-path plane) is close to the model’s center of gravity.
The helicopter rolls as though it’s on a rail. It has 890 watts of power (746 watts equals 1 hp) to carry it through 100-foot diameter loops or while doing nonstop Tic-Tocs. The Align motor and ESC do get hot after a hard 3D flight. The stock Align digital, metal-gear servos are excellent, and I run them at 6.5 volts and not 8.4 volts, just to be conservative.
I like the Align DS455 tail servo. I run it at 165 Hz because I noticed that it does get hot above 270 Hz. The KST DS215MG HV cyclic servos are excellent and highly recommended. I run the Align and KST servos at 6.5 volts and 200 Hz. Amazingly, the older-generation Hitec HS65MG analog servos work at 65 Hz with 6 volts from the Castle Creations Talon 60-amp ESC. Because the price is similar for all of these servos, I recommend using modern digital micro servos with metal gears. Plastic gears could not take the direct load that feeds back from a flybarless rotor head.
The Align T-Rex 470L Dominator is light on the pocketbook and big on performance.

SOURCES:
Castle Creations
(913) 390-6939
https://home.castlecreations.com
BEASTX (Microbeast)
KST Digital Technology Limited
Hitec RCD
(858) 748-6948
Loctite
(800) 624-7767
Tri-Flow
(877) 487-4356
DryFluid Heli
This Month's Issue

Join the AMA
![]()


1 comments
Good enough to purchase three! 470LM
Add new comment