


ReadyMade RC Strix Screech Multirotor Frame
Written by Dillon Carpenter The RMRC Screech Multirotor Frame is Worth a Closer Look Product Review As seen in the July 2018 issue of Model Aviation.
Bonus Video
Ready Made Rc Strix Screech Multirotor Frame
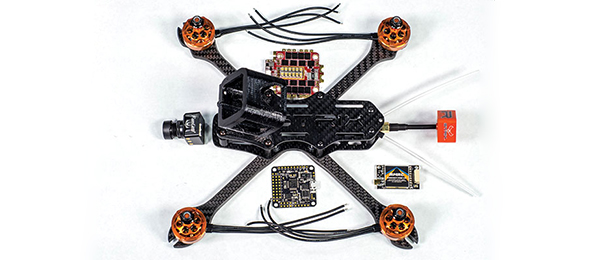
I’m a big fan of low-deck bus-style multirotor frames such as the Chameleon frame from Armattan and any other number of other similarly styled frames. I have been itching to fly the STRIX Screech frame since I got a sneak peek of it last year at FPV Fest in Willard, Ohio. This style of frame is inherently tricky to build because of the limited amount of vertical space available in the frame. With that stated, the payoff after the build was completed was definitely worth it. The frame flies better than I expected, even though I had high expectations coming into the build. I can safely say that this build has secured itself in the top three that I own when considering flight characteristics. Ready Made RC graciously provided most of the electronics for this build, including its new STRIX Six-Shooter 2207 2450 Kv motors, Seriously Dodo Flight Controller, Cricket Pro v2 VTx, STRIX Talon 5 x 4 x 3 v2 propellers, and STRIX Hoot-R 5.8GHz RHCP antenna. For the rest of the components, I went with a RunCam Swift Mini FPV camera, an FrSky R-XSR receiver, and a RaceFlight Bolt 4-in-1 30-amp ESC. It took me a minute of searching YouTube for videos to find a how-to video to build the frame because it didn’t include instructions. I put it together after finding a video from one of the Ready Made RC pilots. It was straightforward, but it took me a moment to figure out how the 3D-printed HD camera mount was assembled. The two-piece assembly has a base that attaches with the front four screws of the top plate. The actual camera mount attaches by pressure-fitting two metal standoffs up into the base and then screwing the HD mount into the standoffs in the base. This is the first time I’ve seen such an assembly, and I’m sure it helps with the mount’s structural integrity. Another positive note to this type of assembly is the fact that you don’t have to take off the base (and half of the top plate) to remove the camera mount if you want to race with the frame alone to save some weight. While assembling the frame, I noticed that the flight stack screws are actually part of the structural integrity of the arm assembly. This would remove the option to use plastic hardware to mount the flight controller and ESC, but the way the arms interconnect might mitigate the stress point of the assembly. For the most part, this build requires a four-in-one ESC or extremely small individual ESCs if you’re looking to arm mount them because the arms are thin, widthwise. They are 1 mm thicker, height-wise, than average arms at 5 mm, but during my testing, it wasn’t enough to save an arm from breaking. The break occurred at the arm’s outer hardware mounting hole. The slots in the back of the frame are a welcome addition to its design. Components can be zip-tied in the back of the frame, where there is sufficient real estate for a VTx and receiver. The included 3D-printed VTx antenna and receiver antenna mount works perfectly with this configuration and allows you to mount your antennae safely out the back of the multirotor.
It is worth noting that the HD camera’s angle and positioning allow the propellers to be in view of the HD footage, which is a consideration some pilots might have when selecting a frame. From what I gather, some pilots prefer a clean HD view and some enjoy seeing the propellers in the footage. I prefer a clean view, but it doesn’t bother me enough to mark it as a detractor. The propellers are also in view of the FPV camera, which is standard. The way the HD camera is positioned makes it difficult to get the camera into and out of the mount. It is accessed from the rear of the mount, and takes careful, but forceful, positioning. I would rather it fit tightly in the event of a possible ejection scenario and keep the camera safe. What really stands out about this frame is that it comes with all of the elements needed for the HD and FPV camera included in the form of 3D-printed parts. I appreciate when a designer takes into consideration what the frame will be used for and goes the extra mile to make sure that there are no additional expenses or time spent trying to source an HD camera mount and FPV camera-mounting solution. I tend to avoid frames that don’t include a clear way to mount an HD or FPV camera. The Screech frame comes with these elements out of the box, and that is a big positive. The flying part is always subjective and relies heavily on the components selected, so it’s difficult to narrow down specific characteristics that are heavily influenced by the frame’s design. The flight characteristics one would expect from this style of frame are present in this build. As I mentioned, I am impressed with how well this flies and can lend some of that to the Six-Shooter motors. As far as the “pep” and response of this build goes, the frame’s center of gravity comes out in the way it flies. That has some to do with the True X configuration of the arms, which means that the arms all meet at a 90° angle. Other similar frames that I have flown have been Relaxed X or faux H designs, where the distance between the front arms and the back arms are wider at the front and closer together at the sides, which is a popular configuration in freestyle frames. This is in contrast to the Stretched X design found on most racing frames where the front and rear arms are closer together than the sides, which are wider or stretched. This design provides better roll response than the Relaxed X design, but is less stable. The True X design is a good compromise to both of these, and its inclusion in this design makes the frame feel as though it’s on a pivot in the center of the frame and makes for a smooth flight. The Ready Made RC STRIX Screech Multirotor Frame is definitely worth a closer look and is available for $39.99 through Ready Made RC. Ready Made RC: 7719 Graphics Way, Ste. F, Lewis Center OH 43035; website: www.readymaderc.com
This Month's Issue

Join the AMA
![]()


Add new comment