
Written by Jay Smith
As featured on page 46 the December 2012 issue of Model Aviation.
As featured in the Model Aviation tablet app.
Specifications
Model type: Hexacopter ARF Skill level: Intermediate builder; intermediate pilot Diagonal wheelbase: 550mm Weight: 42.3 to 84.6 ounces Power system: Six 2212/920 Kv brushless outrunner (included), six 30-amp ESC (included) Radio: Four channel minimum; six-channel recommended Street price: ARF $ 318.00, DJI NAZA controller with GPS/compass $399Test-Model Details
Motor used: Six DJI 2212/920 Kv Battery: Thunder Power 4S 5000 mAh 45C Propeller: DJI 8 x 4.5 Radio system: Futaba 8FG radio, Futaba R6008HS receiver Ready-to-fly weight: 3 pounds, 11 ounces Flight duration: 10 to12 minutes Amps: 20.65 Watts: 322.3Pluses
• Everything is included to assemble the ARF • Power system is a good match • Quality hardware provided • LED provides status at all times • Integrated safety featuresMinus
• Manuals not included and must be downloadedAssembly
The DJI Flame Wheel F550 ARF kit includes one complete frame, six motors, six ESCs, and 16 propellers. The propellers you will use depend on whether you use a three-cell or four-cell battery. The 10-inch ones are for 3S batteries and the 8-inch ones are for 4S. M3x8 screws for mounting the motors and M2.5x5 screws for attaching the arms, hook-and-loop material, a battery strap, and a set of power leads are included. DJI generously provides additional screws and two additional propellers of each size to ensure a broken propeller or a missing screw won’t postpone your enjoyment of their product.Image

This is what is included with the Flame Wheel F550 ARF. Extra screws and propellers are provided.
Assembly requires much soldering, so be sure you have a fine-tip soldering iron, solder, and flux on hand. The bottom frame uses integrated printed circuit board (PCB) wiring so the power is distributed to all six speed controllers from one power connection. The board is well marked and the instructions make it clear where the connections are made. It is important that all the solder connections provide a solid joint so be sure to test each one before continuing with the assembly process. If using the NAZA controller, 12 solder joints connect the six ESCs, two more are for power, and two more for the Versatile Unit (VU), at the power connections. When the soldering is complete, it’s time to mount the motors to the legs of the Flame Wheel. I used medium-strength threadlock from Bob Smith Industries to ensure the screws stay put. The legs can then be attached the bottom board where all the solder connections were made using the included screws. The motors can then be plugged into the ESCs and the NAZA controller is mounted in the center of the bottom board. Placement should be as close to center as possible and pointing in the proper direction, receiver inputs facing the rear. Your receiver of choice can then be mounted next to the NAZA controller. Included with the NAZA are eight three-pin servo connectors to connect the NAZA and the receiver. Futaba S-Bus is also supported. I mounted the NAZA and receiver using double-sided tape. The GPS compass and VU was also connected to the NAZA and then it was time to connect it to the PC using the included USB cable plugged into the VU. I downloaded the latest software from the DJI website and was prompted to update the firmware to version 2.01. When I confirmed that everything was working properly, it was time to attach the top board so that the GPS and battery can be mounted. Check that the motors are turning in the proper direction. The diagram in the instructions shows the alternating directions of the motors. Setting up the NAZA controller and GPS using the software is not difficult, but requires the use of the 41-page user manual, which can be downloaded from the DJI website. When you mount the GPS on the bracket and attach it to the top board, it is important to remember that you must measure the distance from the center point, in centimeters, of all three axes and input them as either positive or negative as instructed on the diagram.
Image

The Assistant Software can be downloaded from the DJI website and allows all of the functions of the NAZA controller and GPS to be programmed.
Once all your settings are complete, and before the first flight, calibrate the digital compass. This is done after powering the model and quickly flipping the position switch that was assigned for Control Mode six to 10 times. The LED indicator will be yellow. Rotate the Flame Wheel horizontally until the LED changes to green, and then calibrate the vertical by rotating the Flame Wheel vertically until the LED goes off, confirming the calibration was successful.
Image

Shown are the NAZA controller and VU, which has a mini USB plug to connect it to a PC for programming.
Flying
When your flight battery is connected, the LED located on the VU will provide you a status on the GPS connection as well as the battery status. It takes approximately 5 seconds for the GPS to initialize. During flight, I programmed the LED to go yellow when the battery is getting low and then red when it is time to land. The NAZA start sequence requires both transmitter sticks to be pushed to the bottom corners of the transmitter. The motors will start for 3 seconds, awaiting throttle input from the pilot. If no input is given, the motors will stop. This excellent safety feature ensures that accidentally bumping the throttle will not start the motors.Image

A close-up of one of the motors and ESC that are included. Two sizes of propellers are also provided.
The NAZA-controlled DJI Flame Wheel F550 has three flight control modes: GPS Atti., Atti., and Manual Mode. In any of the flight modes, user input overrides the self-correction. T he GPS Atti. Mode locks the position of the Flame Wheel and will provide self-correction to maintain its current location and attitude. This is the best setting if you are using the Flame Wheel for photography or videography. Atti. Mode will only provide attitude stabilization and is best used when you want to “sport fly” the model. Manual Mode provides no attitude-angle limitation or position locking. After one quick flight to confirm that everything was working, I strapped my Watt’s Up wattmeter to the Flame Wheel to get some idea of what kind of draw the power system pulls in flight. The wattmeter displays the highest readings until the battery is disconnected.
Image

The bottom frame uses integrated PCB wiring so the power is distributed to all six speed controllers from a single power connection.
Image

My completed Flame Wheel weighs 3 pounds, 11 ounces ready to fly. The round white disk mounted above the battery is the GPS Compass Module. With a short 3-minute flight, including hovering and basic flight, I eagerly checked the wattmeter to find that the peak draw was only 322.3 watts and 20.65 amps. All of my flying has been in either GPS Atti. or Atti. Mode, allowing me to become more comfortable with the flying capability of the Flame Wheel. In Atti. Mode, the model scoots around well and it’s fun to perform sweeping turns and Figure 8s. The NAZA controller also supports Intelligent Orientation Control, which allows the Flame Wheel to be flown in Course Lock or Home Lock. When flying in Course Lock, inputs of forward, back, left, and right will not be affected by the direction the Flame Wheel is pointing. So left is left no matter if the front is pointed towards you or away from you. In home lock, all controls correspond as if the Flame Wheel was connected to the home location on a tether. So if backward flight is input, the Flame Wheel will fly backward toward the home point. Although the hexacopter is capable of looping, I have yet to try it. Those who have were successful, but the maneuver requires Manual Mode and a lot of altitude. Another excellent feature of the NAZA controller with GPS is the Fail-Safe mode. This mode can be set up so that the Flame Wheel either lands at its current location or will return to its home point and land. The Fail-Safe Mode can be triggered by a loss of signal from the transmitter, if one of the controls is no longer responding, a low battery, or if activated by the pilot. Mine is set to return to the home point and, when activated, the Flame Wheel will hover in its current position for three seconds and then fly toward home at its current altitude if higher than 20 meters. If below 20 meters, it will climb to 20 meters and return. >Once at the home point, the NAZA controller will instruct the Flame Wheel to hover for 15 seconds at 20 meters and then slowly descend to land! It would be impossible to describe all the features and settings the NAZA controller with GPS provides within this review. Its user manual spans 41 pages with good information. If you would like to find out more about this robust controller’s capabilities, download the manual from the DJI website listed in the “Sources” section.
Image
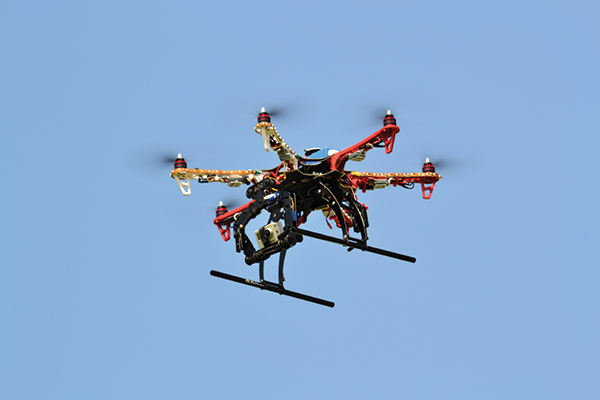
This DJI Flame Wheel F550 with LED lights, landing skids, and camera mount with GoPro camera attached belongs to Clint Akins of Castle. Photo by Jennifer Orebaugh.
Conclusion
The DJI Flame Wheel F550 combined with the NAZA controller with GPS provides an intuitive, stable platform for pilots looking for a multirotor helicopter capable of flying within a small area. It also provides a great platform for recreational, aerial photography, and videography. I was impressed with the safety features incorporated in the NAZA controller such as the startup procedure and the return to home fail-safe. These features, combined with the ability to program the controller via a computer and the completeness of the hardware and components included with the ARF, should help ensure success in assembling and piloting this exciting multirotor offering. —Jay Smith
[email protected]
Manufacturer/Distributor
DJI Innovations www.dji-innovations.com Empire Hobby LLC (480) 982-0909 www.empirerc.comSources
Futaba (800) 682-8948 www.futaba-rc.com Thunder Power RC (702) 228-8883 www.thunderpowerrc.com Bob Smith Industries (805) 466-1717 www.bsi-inc.comSimilar Articles
Image

Rise of the Multicopter
Written by Andrew Griffith. Find the entire feature on page 31 in the June 2012 issue.Over 300 online exclusive photos.
Image

Written by Jennifer Orebaugh As featured on page 39 the December 2012 issue of Model Aviation. As featured in the Model Aviation tablet app.
 RC Helicopters Debut at 1978 Nats
Written by Dave Chesney Model Aviation Archives, November 1978


Comments
flame wheel
I fly both nitro and electric helis but this article and the others in the new December issue of Model Aviation has me all fired up about multicopters. Thanks
DJI / Flame Wheel stock prop failures
I build and fly the DJI F450, and along with my fellow local flyers have found the stock DJI props to be substandard, frequently failing in mid flight without warning. We use APC and Graupner props instead. Other than the props, the DJI parts and kit are a great value and result in a versatile, fun to fly multi rotor heli. Thanks for the multi rotor heli coverage; it's exciting to see a new aircraft type become a part of the hobby.
Where to buy f550 hexacopter in New York City.
Please help me suggest a store in new york where ca i buy a f550 hexacopter drone. I need a store because i need it asap before i go home to philippines
done not flyin g
done not flyin g
Add new comment