
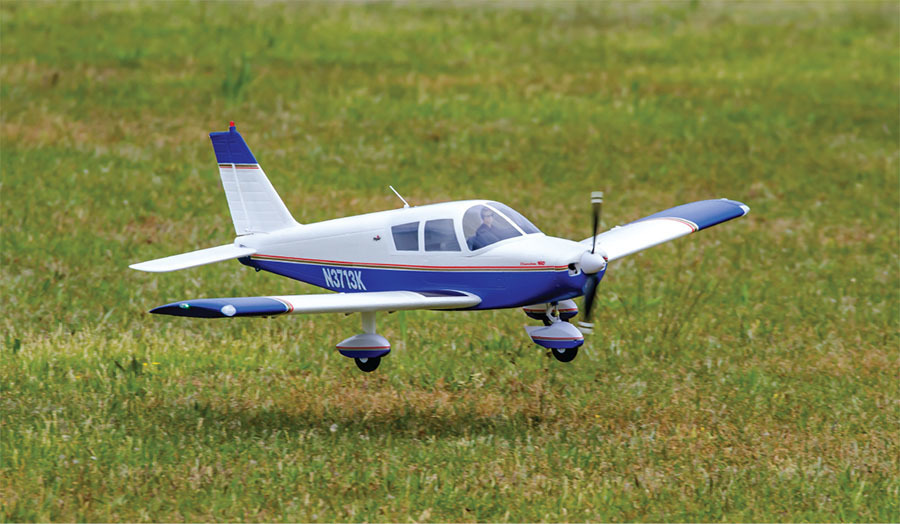
A fun foam-composition staple of general aviation By Greg Gimlick | [email protected] Photos provided by the author THIS IS AS CLOSE to instant satisfaction as I could hope to get. As I unpacked the box, it was clear that the assembly would only require the use of 11 screws and no glue. The parts bag held those and a little antenna that mounts on top of the fuselage. That’s it! The details molded into the airplane are impressive, and the size of the canopy access to the fuselage innards was massive. I’m always happy when I can get my large hands inside of a model to do whatever eventual maintenance that might arise, so I could see that we were off to a good start. The full-scale PA-28 Cherokee came off of the assembly line in the early 1960s, and more than 32,000 Cherokees and variants have been produced since then. According to Wikipedia, it’s the fourth most produced airplane in history. This model represents the most popular version with the "Hershey bar wing," which is constant-chord opposed to some later tapered variants.
Assembly
If you’re looking for a build project, you’re going to be sorely disappointed. This airplane should take about 20 minutes to assemble, and that’s assuming you take time to read the manual. Please, as always, thoroughly read the manual and any addendums. In my case, there was one addendum that addressed a correction to the manual on flap values. In usual E-flite fashion, the company provides charts with settings for each of its radios, and I found the sequence easy to follow for my iX14. There is also a QR code in the manual that takes you to a video of a DX6e transmitter being programmed for the Cherokee. It doesn’t get much easier than that. After you’ve programmed the transmitter, you can begin assembling the Cherokee, which starts with installing the full-flying horizontal stabilizer. There is a tail cover that requires you to remove the three screws to detach it and expose the nifty mechanism that will control the stabilizer. The stabilizer will go in right-side-up or upside down, but it will only fully seat in the mounting bracket if you have it right-side-up. Be sure to check that it’s fully seated. If the airplane is upside down, the carbon-fiber rod in the stabilizer will be down into the bracket. Secure it with two screws and replace the tail cover. The nose gear is preinstalled, but you need to attach the main gear to the wing. It will only go in one way, so that’s easy, and it is retained with a cover and two screws each. The wing panels are then attached to the fuselage by inserting the wing tube through the fuselage and sliding each panel fully onto it.


Control Throws and CG
There are no control throws listed, but the setup guide lists settings for high and low rates, plus exponential. I used these and they are fine with whatever the factory settings gives you. They use 10% exponential, and you can increase that after the initial flights. Because my radio allows for three rate settings, I programmed one between the high and low rates for a midrate setting. The center of gravity (CG) is listed as 120mm from the leading edge at the fuselage, plus or minus 6mm. I have mine set right at the 120mm point, and it’s easily adjusted by moving the battery. Pay attention to where they say "at the fuselage" because the shape of the wing changes a couple of inches out from there, and you’ll measure incorrectly if you don’t. I measured it at the fuselage and extended a line out from there to make it easy to find and hold for checks. The airplane is best balanced with it upside down.AS3X and SAFE
The receiver is set up at the factory to enable or disable SAFE Select. Because this is an airplane for intermediate to expert fliers, this allows you to decide whether you want SAFE as an option or not. Some people don’t like it, but when I am offered the option of SAFE Select, I opt to enable it. This allows me to either use it or turn it off and just have active AS3X by programming it to a switch. You can make this decision when you first bind the airplane, but you can always rebind it and later choose the mode that you prefer if you change your mind. On that topic, you can access Forward Programming in your transmitter to adjust the AS3X settings, but the receiver is locked and will not let you adjust the SAFE settings. The stock settings for AS3X gains of 35 for roll, 60 for pitch, and 70 for yaw felt fine, so I did not adjust those.Flying
Flyable weather finally arrived after a very long week of waiting, but it was worth the wait. Temperatures were in the low 80s and wind reached gusts of 15 mph, but it was mostly steady around 8 or 9 mph, according to my anemometer. Club President Mike Everett double-checked all of the controls before the photo runs and handled the controls for those shots. Mike and Wayne Parish, a longtime flying buddy, are always good second opinions when I do these test flights. The takeoff roll was easy despite some weeds cropping up, and the climbout was uneventful. The first flight was done in SAFE mode, and we all agreed that it was a bit more docile than we preferred, but it did what it was designed to do admirably. A flip of the switch disabled SAFE and we were flying comfortably in AS3X mode, which seemed to be nicely dialed in. All of the initial flights were completed with the suggested Spektrum Smart Gen 2 4S 2,200 mAh LiPo battery packs. Power is more than adequate and, except for some aerobatic maneuvers, we seldom used more than half throttle. Loops, rolls, and inverted flight were about what you’d expect from a Cherokee and much more than any passenger could hope for. Stalls were gentle and easily recovered from without a tendency to snap or fall off to one side. The factory-suggested settings provided more than enough throws for comfortable flying in sport or aerobatic regimes.
Image
 At a Glance
Test-Model Details (Measured)
Motor used: 3536-1000 Kv 14-pole brushless motor (included) ESC used: Avian 70-amp Smart Lite Brushless ESC; 3S to 6S (included) Servos: Six A330 9-gram submicro (included) Battery: 3S or 4S 2,200 to 4,000 mAh LiPo (required) Propeller: 10 × 7E (included) Radio system: Spektrum iX14 transmitter Empty weight: 48 ounces Ready-to-fly weight: 55.8 ounces with 4S 2,200 mAh LiPo battery Maximum current: Full-throttle vertical climb with 4S pack was 47 amps Wing loading: 16.66 ounces per sq. ft. (4S 2,200 mAh battery pack); 18.15 ounces per sq. ft. (4S 4,000 mAh pack) Flight duration: 5 to 6 minutes Requires: Six-plus-channel transmitter; 3S or 4S battery- Molded, scalelike details; LED navigation lights; strobes; beacon; and landing lights.
- Large top hatch for easy access to the battery area and electronics.
- AS3X and SAFE Select.
- Flyby telemetry.
- Smart Avian 70-amp ESC allows plenty of headroom on current.
- Full-flying horizontal stabilizer/elevator.
- Plug-in wing panels with hands-free servo connection system.
- Easy assembly.
- Solid flight performance.
- Antenna attached to hatch latch is easily broken.
- Because the airplane targets advanced pilots, it would be nice if Forward Programming could be unlocked for SAFE adjustments.


Comments
Add new comment