A model deserving of the word "fun"
By Tony Stillman | [email protected]
Photos by the author and Matt Ruddick
As seen in the August 2023 issue of Model Aviation.
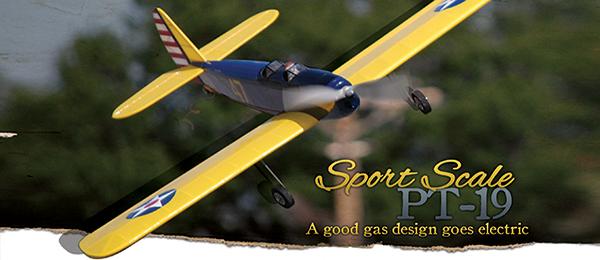
The PT-19’s color scheme is easy to see in the air, and the model is capable of flying in a scalelike manner and/or is happy performing aerobatics.
I AM A WARBIRD FAN and have always loved the looks of the PT-19 trainer. I remember seeing a PT-19 model flown at my local flying club field in 1971 when I got started in the hobby. I always had a desire to own one of these models since then because they were so nice, stable, and easy to fly. Well, now I have one, so let’s jump in and get this thing built!
Everything was well packed, wrapped in plastic bags, and taped in place to keep things from shifting in transport. When I removed all of the parts, there were no items damaged or scuffed other than the hatch latch that had been knocked off of the top hatch on the fuselage. This was easily repaired with a little Bob Smith Industries (bSi) thick CA glue.
I laid out all of the pieces on my dining room table. I was told that this was a very easy build, so I thought I would enlist my wife, Terri, to assist—and I needed her permission to use the table!
In reviewing the manual (you do read the manual prior to building any model, right?), it would seem that what I heard was indeed true. It appeared to be a very simple build. In fact, so much is already done that there really is not much left for you to do. This model would prove to be the easiest balsa and plywood ARF that I have ever assembled!
The radio gear and battery are easily accessible in the PT-19.
The PT-19 comes out of the box with a high degree of completion. It only took a couple of hours to be flight ready.
The required tool list tells the story. Six total items were needed: a balance stand, flat-blade screwdriver, 1/4-inch nut driver, #1 and #2 Phillips screwdrivers, and a square. In addition, you only need some silicone adhesive and thin CA glue. I grabbed the tools and glue, and then got an old towel to set on the table to protect the model from scratches and protect the table from any stray glue.
I bound my Spektrum DX8 transmitter to the Spektrum AR637T receiver that was supplied for the review. I was also supplied with an APC 12 × 6E electric propeller and a 6S 4,000 mAh 30C Smart battery. The model can be flown with a 4S battery using the 14 × 8.5 electric wooden propeller that comes with the model, or you can go to the 6S with a smaller propeller. Because I was supplied with the 6S 4,000, that’s what I used.
I first examined the airplane parts to see what wrinkles needed to be removed, but there were none, so I moved right into the build. Starting with the wing, all I needed to do was check the mounting of the servos and pushrods, and then grab the main landing gear and install them, making sure they were oriented so that the struts were angled forward toward the wing’s leading edge. I secured them in place with the landing gear straps and screws.
Next came the wheels. They are easy—just slip them on and install the wheel collars. All that was left was to assemble the wheel fairing around each main landing gear using the silicone adhesive. I slipped the wing tube in place, slid the wing halves together, and the wing was done!
I removed the top hatch from the fuselage and set it aside to keep it from being damaged while I was installing the tail section. At the tail of the fuselage on the bottom, there is a small hatch that is held on with two magnets. Pop that off and it will reveal two holes where two bolts that are mounted in the base of the fin will come through. First, slip the stabilizer with the elevator in place, making sure that you flex the elevator a few times to free the elevator hinges before assembly.
At this time, it helps to hook up the pushrod to the preinstalled elevator horn because this will help hold the stabilizer in place while you carefully slip the fin in from the top, down through the stabilizer, and through the holes in the bottom of the fuselage.
Using the supplied washers and nuts, I carefully tightened down the fin using the nut driver. I used a tiny bit of silicone glue over the nuts and threads to keep them from coming loose in the future. I then put the lower back hatch back in place and hooked up the rudder pushrod.
The rudder already had a tail-wheel bracket and tail wheel installed, so all that was left to do was to screw it in place. When I started to do this, I realized that the angle of the back of the fuselage was not 90° to the rudder hinge line, so the tail wheel bracket was not flush on the fuselage.
I quickly went to my workshop, created a small wedge out of a piece of pine from a wooden ruler, and cut it to shape to match the footprint of the bracket with my hobby knife. I used a black Magic Marker to color the edges and slipped it in place. Using my Magic Marker, I marked the three holes in the bracket onto the wood and drilled them out.
I slipped it back into place and screwed down the bracket using the supplied screws. An easy fix! I checked the tightness of the wheel collars on the tailwheel and the tail was complete.
Moving to the front of the model, the motor and ESC are already installed, so all I had to do was attach the cowling. This was easy because the cowling mounting holes were predrilled, as were the locations for the screws in the fuselage. Just slip the cowling in place and secure it with screws.
Velcro is supplied to attach the bottom of the battery to the battery tray, as were two straps to restrain the battery. There is room to move the battery around, depending on the battery selection and whether you use a 4S or 6S pack.
The PT-19 is an attractive model that balances a semiscale rendition of its full-scale counterpart while providing a nice sport flier experience.
The tail wheel bracket didn’t sit flush on the fuselage, so the author made a small wedge out of pine.
Next, I installed the receiver and verified that I had created a new model. I had already taken the propeller off of the motor when I installed the cowling. It is important to leave it off when you are going to be operating the servos so that you don’t accidentally have a spinning propeller!
I oriented the receiver antennae as recommended, turned on the transmitter, and plugged in the battery pack. I started connecting the servos and verifying that I had each one in the proper channel of the receiver. After that was done, I attached the wing and slipped the 6S battery into place to check the center of gravity (CG). I was able to slide the pack around to achieve the recommended CG. Don’t forget to put the propeller in place when checking the CG. The spinner’s weight will help with the CG balance.
My time at this point was roughly 2 hours. This thing really went together quickly and without any real issues. Great job, Hangar 9! I applied the included decals to finish the look of this World War II trainer.
I spent a little time programming the model properly and set up the travels as noted in the manual. I was eager to get it out to the field for a test flight, so I took it out to AMA’s International Aeromodeling Center in Muncie, Indiana, and set up the flight at Site 1. Matt Ruddick was kind enough to assist me with the flight photos.
Flying
After doing a range test and some ground photos, we buttoned up the model and prepped it for the test flight. The little PT-19 taxied well. It was easy to turn without any tendency to tip up on the nose. With Matt in place for the pictures, I slowly added power and the model rolled roughly 100 feet. I lifted it off of the runway with just a little back pressure on the stick.
The model needed a little left aileron trim and some down-elevator trim, but after a few clicks of each, it flew in a nice, level manner. The 6S battery pack pulled the model around with a good bit of speed, so I throttled it back to 2/3 power, where it seemed to groove nicely.
The PT-19 performed loops and rolls quite easily, much like a good sport model. Inverted flight was easy with just a touch of down-elevator, so I felt the CG was pretty close.
It was time to do a few touch-and-gos. I set it up with a gentle turn from the downwind leg to final, reducing the throttle as I went. I found that it likes a little throttle on final approach and landing. it was pretty easy to perform smooth wheel landings.
Successive flights proved the PT-19’s aerobatic ability with Immelmanns, Cuban 8s, and four-point rolls. This model is a blast to fly and is a great way to get you into a wooden Fun-Scale model! Scale models can scare pilots because they normally carry a stigma of being difficult to fly. That’s just not the case with this one!
Conclusion
At a Glance
Specifications
Type: Semiscale electric
Wingspan: 56-1/2 inches
Wing area: 537 sq. in.
Length: 46.18 inches
Radio: Five-channel required; Spektrum DX8 AR637T receiver utilized in test
Components needed to complete: Transmitter and receiver; 5,000 mAh 4S 30C LiPo battery; and charger
Power system: Avian 60-amp Smart ESC; 4250-600 Kv motor (installed); and 14 × 8.5 propeller
Flying weight: 73.4 ounces without battery; 92.8 ounces with recommended battery
Wing loading: 25.75 ounces per sq. ft. with recommended battery
Flight time: 6 to 7 minutes
Price: $449.99
Pluses
- Easy to assemble.
- Wood model is more durable than foam.
- Flies well and is a great first Scale model.
Minuses
- It needed some adjustment to make the tailwheel bracket fit properly.
Manufacturer/Distributor
Horizon Hobby/Hangar 9
www.horizonhobby.com/hangar-9/


Comments
Add new comment