By John Glezellis | [email protected]
As seen in the December 2022 issue of Model Aviation.
On a control surface featuring two servos, having a servo become disconnected will feel sluggish, resulting in poor centering and inconsistent control. Ensure that this doesn’t occur and secure the servo leads with offerings such as these from SECRAFT.
IN MY LAST COLUMN, I touched upon the initial steps pertaining to the tuning process of a competition model and, specifically, how you can find the right center of gravity, how to balance the model laterally, and how certain adjustments can be made to cater the behavior of the aircraft to the liking of the pilot and sequence being flown.
However, proper aircraft setup is a rather extensive topic and is best when broken down. This month, I will examine a few key items pertaining to the trimming process by looking at certain features found in most computer radio systems today, as well as a few mechanical items to ensure that that your aircraft has a locked-in feel at all times.
Without further delay, let’s get started!
Electronic Trim Ponderings
It is important to explore the full capability of your transmitter system. Because the topic revolves around the trimming process, let’s start with the trims found on the transmitter.
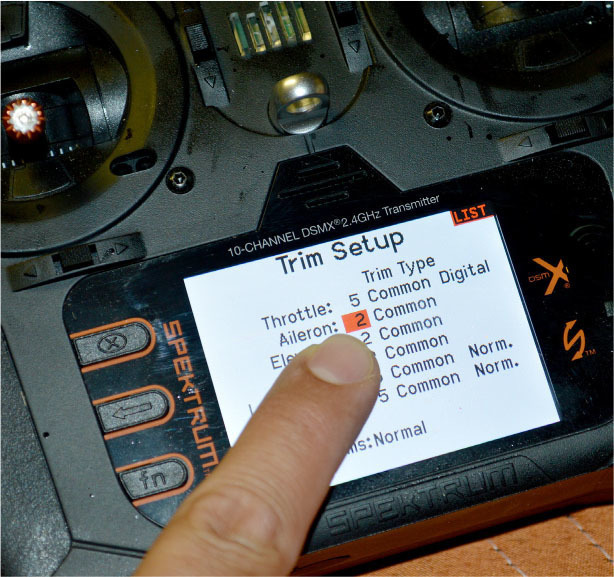
It is important to understand the full potential that a radio system has to offer. One neat feature that some pilots overlook is the trim setup, shown here on a Spektrum NX10, where the trim steps amount can be decreased to fine-tune the aircraft.
The basic trim steps can be adjusted for radios that feature electronic trims. As an example of two radio brands, the default trim step rate for Spektrum is 5 and for Futaba, it’s 4; however, you can decrease or increase these values to make each trim step either more or less responsive.
On some radio systems, holding the trim button down will move the trim position/step at a quicker rate. I prefer to leave the trim rate at the default setting for the first flight because many unknowns exist. After the model is trimmed relatively well, I will land, and then decrease the trim rate amount to a value of 1, with the exception of the throttle.
Depending on the system, you can also adjust the trim rate in percentages, which essentially corresponds to the amount of deflection that can be available for trim. For example, if you have 45° of control-surface deflection, with a trim rate of 30%, you should have 13.5° or so of maximum trim on that surface in both travel directions.
Normal and cross-trim options are available. Normal trims align with the control stick. In other words, the throttle trim is next to the throttle stick, the elevator trim is beside the elevator stick, etc. Cross trims swap the position of the trims so that the throttle trim is next to the elevator stick, the elevator trim is beside the throttle stick, etc.
This feature might feel more natural for some pilots because they might not like to let go of the elevator stick when applying elevator trim. Using a cross-trim configuration will allow them to hold onto the elevator stick while they easily reach the elevator trim, which is now found next to the throttle stick. It is personal preference, but consider each and what caters to your needs.
For a Spektrum system, you can change the trim type to where it is either "common," which simply means that it is active for all flight modes, or to "f-mode," which means that you can save different trim values for each individual flight mode. This feature is more popular in glider and Scale models, where you might be changing the wing camber settings.
On the PowerBox CORE radio system, the same core functionality exists with different terminology, where "global" refers to the trim values that are to be the same in all flight modes and "single" applies to different amounts of trim controlled separately within each flight mode.
Regardless of what brand you use, familiarize yourself with the instruction manual and the terminology that is used. In some instances, each trim step amount can be impacted by a change to the adjustable travel volume (ATV) setting for that particular model. For example, if you leave the ATV settings at the default 100% amounts, trim the model, and then make a change to the ATV settings on a given surface, the trim will also change. It is important to be procedural and obtain the desired deflection on the highest rate before taking to the sky.
Mechanical Woes
When flying a model, you might notice that the trims can change in flight, which can be because of a number of reasons, including binding found within the hinge line, poor servo selection throughout, and a lack of general maintenance.
Looking at the hinge line, natural binding might exist when a surface is deflected. Start by detaching the linkage from the surface so that it can move freely throughout the entire range of travel without being attached to the servo. If this is not the case, examine the hinge line. All hinges should be secure with a proper hinge line bevel between the trailing and leading edges of the hinged components, and all hinges should be at the correct placement and orientation. In some instances, a single hinge not being aligned with the others can be problematic.
The most common issue that I have seen is poor servo selection. Servos being used that are not precise in their ability to center and travel to the same deflection amount repeatedly will never yield beneficial results. It is important to always select high-quality servos for your aircraft in order to obtain consistent results, flight after flight. You should use an angle meter and/or a ruler to verify centering and the maximum travel amounts on certain control surfaces.
On the topic of servos, it is recommended that servo extension leads be secured with a servo keeper so that they will not become disconnected in flight. Accessories, such as servo installation brackets, ensure that the servo leads remain secure in critical areas. Having a servo become disconnected can be fatal for an aircraft, but should it happen on a single surface that features multiple servos, the model will feel sluggish on that particular surface with poor centering and holding power.
Assuming that these first two items are acceptable, examine the installation of the control horn and linkage of the problematic surface. All items must be properly secured. A lack of preflight maintenance could result in a servo arm becoming loose. On some models, I prefer to use 2-inch servo arms from Hangar 9. Accurate attachment to the spline guarantees no-slop surface movement, and the Spline-Loc system ensures that the servo arm will be secure.
Always make certain that servo linkages, control horns, arms, and the servos themselves are secure before every flight. Should you notice any odd behavior in how the aircraft feels in flight or that the trim is constantly changing, land immediately and inspect the aircraft.
I have seen pilots use smaller aluminum servo arms as a base, and then attach a larger carbon-fiber servo arm set, which is acceptable. These allow you to use the carbon-fiber arm because it fits any servo, but all of the bolts used to secure the carbon-fiber servo arm to the standard aluminum arm must be secured with either locknuts or threadlocker. Should the carbon-fiber arm loosen slightly or the turnbuckle attachment point (ball link) loosen, the trim on that control surface can change.
Listen to any cues given by an aircraft in flight. If anything changes from one flight to the next and the aircraft feels odd, chances are that something is incorrect and should be addressed immediately.
Final Thoughts
As you have seen, it is important to understand the many features that radio systems offer and cater the aircraft and the setup of the model to the liking of the pilot. Additionally, component selection is critical in the performance of the airplane, and a strong attention to detail must exist to troubleshoot and locate the source of a problem, should one exist. The key to competition success is not only hinged on flying ability but also on the setup, build, and constant maintenance and preflight checks that are performed to guarantee consistent, safe operation of the aircraft to the maximum extent possible.
Until next time, fly hard!


Comments
Add new comment