
Written by Dave Scott
Optimum setup rules-of-thumb for the way you fly
As seen in the August 2013 issue of Model Aviation.
Note: The following information might upset a career aerodynamicist, because it does not include explanations of mean aerodynamic center, decalage, neutral point, etc. when describing optimum CG location and wing incidence.
The objective of this article is not to teach in-depth aerodynamics, but to condense flight dynamics into simple, foolproof rules of thumb that the average pilot can wrap his or her head around and thereby achieve an optimized airplane setup that ensures the greatest opportunity for success.
For those who wish to study in more detail the formulas that are the stock and trade of professional aerodynamicists, there are plenty of sites online, such as Wikipedia. See the link in “Sources.” There is probably no other subject with more varied opinions than how to best set up an airplane. Yet, if you could rank all of the different setup methodologies based on the results obtained within four or five days, you would quickly discover that certain setups promote faster rates of learning and better results than others.
This article features the setup rules of thumb that have proven to produce the best overall results in the shortest amount of time during 1st U.S. R/C Flight School’s solo and aerobatics courses.
RC pilots are regularly trying new setups that promise to improve their flying, but if they could objectively evaluate their performances, they would realize that in some cases they actually flew better before the new setup. However, instead of returning to what worked best, they hope to overcome the new challenges with more practice.
The tricky part of airplane setup is knowing what really helps, what sounds good in theory but isn’t, and what may be applicable to some forms of extreme flying, but would be detrimental to most or all of your flying.
Balance
Where you chose to balance your model will have a huge impact on how it handles in the air and how well you fly it. When an airplane pitches up or down, it pivots around a point on or near the wing’s thickest point (Figure 1a). When the CG is located at this pivot point, the airplane tends to be “neutral,” or prone to doing only what you tell it to do.
Figure 1a. As a rule, airplanes in flight pivot around a point on or near the wing’s thickest point.
When the CG is aft of the pivot point (tail-heavy), the airplane will tend to be unstable (Figure 1b). Similar to shooting an arrow backward, a tail-heavy airplane would be inclined to swap ends in flight if it were not for the tail and the pilot’s corrective inputs.

Figure 1b. When the CG is aft of the wing's thickest point, the airplane will be unstable at all speeds and require more effort to fly.
A tail-heavy condition does increase maneuverability at the extreme ends of the flight envelope, but as a consequence the airplane requires much more effort to fly the rest of the time, especially at slower speeds when the tail forces are less firm. A tail-heavy airplane tends to be less stable and less maneuverable, and will behave differently depending on the speed. A neutral CG location at the wing’s thickest point provides the best overall handling without restricting maneuverability (Figure 1c).

Figure 1c. When the CG is neither forward nor aft of the wing’s thickest point, the airplane neither resists nor exaggerates what it is told to do and behaves basically the same at any speed.
Engine Thrust
Setting up your airplane with engine right- and downthrust will cause it to fly more true. As the propeller turns, it produces a spiraling slipstream or propwash that strikes the left side of the vertical tail and tries to yaw the airplane to the left. Propwash is generally held in check at higher speeds by the faster airflow over the tail. However, at lower airspeeds with high power, such as during takeoff or approaching the top of a loop, the pilot has to correct the propwash. Building in a couple of degrees of engine right-thrust helps to counter the effects of propwash, therefore reducing the demands on the pilot (Figure 2).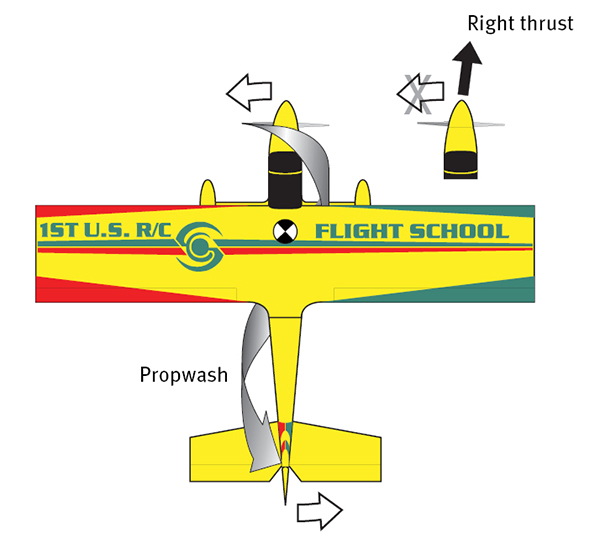
Figure 2. Building in a couple of degrees of right thrust helps to reduce the left-turning tendency caused by the propeller slipstream/propwash.
P-Factor is a left-turning tendency that occurs when the airplane is at a positive angle of attack, because the propeller blade on the right side of the airplane is biting more air and producing more thrust than the blade on the left (Figure 3).

Figure 3. At positive angles of attack, the propeller blade on the right side of the airplane bites more air and produces more thrust than the blade on the left. Building in a couple of degrees of downthrust places the propeller at slightly less of an angle to the relative wind to achieve more equal bite on both blades during inside maneuvers.
Building in a couple of degrees of downthrust places the propeller at slightly less of an angle to the relative wind to achieve a more equal bite on both blades during inside (up-elevator) maneuvers, reducing P-factor and demands on the pilot. Another benefit of downthrust is providing a down force to counter excess wing lift when an airplane is flying at higher speeds. This is especially important with flat-bottom-wing airplanes.
Control Surface Travel Rules of Thumb
As a rule, how an airplane responds to control inputs is a function of how fast and how far the control surfaces deflect, regardless of the airplane’s size or strength of performance. Seldom can you go wrong by initially setting up your control surface deflections/travels according to the manufacturers’ recommendations. However, don’t make the mistake of thinking that those recommendations are what the manufacturer intends you to stay with. To fly your best, you must adjust the control surface travels to suit your immediate skill level. Perfectly good airplanes are often faulted or retired because the pilot did not like how it handled, tried unsuccessfully to become accustomed to it, and finally went looking for another airplane. By simply changing the travels to suit your comfort level, you’ll immediately start flying with more confidence and begin building on that success, instead of continuing to try to get used to the airplane. When setting travels using a computer radio, it is vital that you triple-check the physical deflections of all the control surfaces in all directions. For a variety of reasons, it is often necessary to program different percentages to achieve the same physical travel of a surface in both directions. Thousands of airplanes are faulted because their owners make certain assumptions based on the “numbers” they read off of the transmitter, but leave out the step of confirming all of the physical deflections. They either end up unhappy with the way their airplanes handle, or assume that having to make numerous and/or large adjustments later is an indication of a poor design when, other than more left aileron than right for example, the airplane is fine. Transmitter settings should be based on actual deflections and your comfort level, not the numbers read off the radio. To minimize the need for adjustments and the potential for error, strive to set the neutral position and travel of each surface mechanically and use the radio only as a last resort to fine-tune things.“Balanced” Controls
Another vital component of good flying is achieving balanced control responses. “Balanced controls” describes the ideal condition in which all of the controls are equally sensitive. Other than a lack of control-stick tension, possibly nothing inhibits progress more than when one of the controls is noticeably more or less sensitive than the others, forcing the pilot to remember to use two different control pressures depending on the input. Even a novice pilot can tell when the ailerons are more sensitive than the elevator, for example, so why would you accept one control that is more or less sensitive that the others when a simple control surface travel adjustment is all that’s needed to start feeling more comfortable?Aileron Rudder Mixing Adverse Yaw
Adverse yaw is an inherent opposite yaw or skid that occurs with aileron deflections. A positive angle of attack is generally required to produce the wing lift needed to keep an airplane in the air. When the ailerons are deflected at a positive angle of attack, the down aileron presents a wider frontal cross-section, thus creating more drag and causing the airplane to yaw in the opposite direction in which the ailerons are applied (Figure 4).
Figure 4. In flight, the down aileron presents a wider cross-section, increasing drag and causing adverse yaw (a yaw in the opposite direction that the ailerons are applied).
When two aileron servos and the flaperon function are used, adverse yaw can be lessened by programming a small amount of differential aileron travel (for example, approximately 5° less down aileron than up), consequently improving control and producing cleaner axial rolls. The exception is when the airplane has a flat-bottom wing. Drag on the side of the down aileron and adverse yaw is so much more pronounced with a flat-bottom wing that differential aileron travel has little effect. To eliminate adverse yaw, rudder must be coordinated or mixed in the same direction as the aileron. As a rule, a symmetrical-wing airplane may require only a 3% to 5% rudder mix with the aileron to eliminate adverse yaw, whereas a flat-bottom-wing airplane requires nearly as much rudder deflection (in degrees) as aileron (Figure 5).

Figure 5. You must coordinate or mix rudder with the aileron in the same direction to eliminate adverse yaw when flying a flat-bottom-wing airplane.
Not only does eliminating adverse yaw improve control, pilots who initially learn to fly with aileron/rudder mixing are also able to more easily transition into higher-performance, symmetrical-wing airplanes because they are already accustomed to flying with minimal adverse yaw. Contrast that to those who learn to fly with adverse yaw then have to retrain their flying habits when they switch to a symmetrical-wing airplane with little adverse yaw.
Advanced Dual Rate and Exponential Rules of Thumb
Expert pilots are often asked about their favorite aerobatic airplane. After a person graduates to flying Edges, Extras, Sukhois, and similar models, he or she will find that these aircraft are equally capable. Any differences that are not setup related are barely noticeable to all but the most expert of fliers. The real question is whether your airplane will be set up to promote maximum success. Although not necessary for Precision Aerobatic flying, a computer radio with dual rates and exponential is required for 3-D flying. That’s because the large control-surface deflections required for 3-D maneuvers would cause an airplane to be too responsive during normal flight. Dual rates allow a pilot to achieve optimal control response for different modes of flight. For example, “high” rates allow maximum travels for 3-D flying, whereas “low” (normal) rates provide optimal control for Precision Aerobatic flying, takeoff, and landing (Figure 6).
Figure 6.
To help you stay focused on flying and not on flipping switches, it’s recommended that you put all of your dual rate and exponential settings on one switch. On high 3-D rates, an airplane will be too sensitive and hard to control between maneuvers, so 30% to 50% exponential is used to reduce control sensitivity through the first third or half of stick deflection. Exponential will allow you to fly with the “feel” of normal rates when the stick inputs are less than half, but then rapidly ramp up beyond that. Because of the current dominance of extreme 3-D flying, airplane manufacturers more frequently recommend low rates that are low relative to high 3-D rates, but are still too much for Precision Aerobatics flying, takeoff, and landing. That is why manufacturers recommend exponential even on low rates. To develop the precise timing required to fly aerobatics well, it’s important to maintain a close correlation between your inputs and the response of the airplane. The ideal low/normal rate settings should provide a comfortable control response with minimal use of exponential (Figure 7). If the airplane is touchy on low rates, before you start adding exponential, first try reducing the low-rate percentages.

Figure 7.
Mixing Rules of Thumb
For many reasons, every airplane exhibits some unwanted tendencies while maneuvering. When a large amount of rudder is applied to sustain knife-edge flight, most airplanes tend to gently roll in the direction that the rudder is being held. Many fliers will mix a small amount of opposite aileron with the rudder to cancel out the rolling tendency during knife-edge. If you’re thinking about using computerized mixing to minimize certain unwanted tendencies, you need to first understand that everything in aviation is a tradeoff. A mix that a pilot puts in may help the maneuver for which it is intended, but it may also turn out to be contrary to what’s needed during another maneuver or cause a deviation somewhere else that otherwise would not have existed. You must mix prudently. The process of mixing typically unfolds when a pilot detects some negative tendencies during certain maneuvers. He or she then attempts to eliminate them with different mixes. As more maneuvers are introduced, the pilot starts running into situations where the deviation that he or she wants to remove is actually caused by an earlier mix. What follows are hours of experimenting to determine which mixes stay, which need to be reduced, which need to be removed or reversed, and when it is time to take the initiative to correct yourself (Figure 8).
Figure 8. Exhibit A: Holding in left rudder during knife-edge flight results in the airplane also gently rolling left. Mixing a small amount of right aileron with left rudder cancels the roll tendency during knife-edge.
Unless you intend to only fly a few maneuvers, the most efficient and effective use of programmable mixes is to mix no more than 5% to 10% (15% maximum). Limiting your mixes to these percentages will hopefully make your flying easier without having too much impact on other maneuvers or causing you to backtrack as your repertoire increases.
Mixing Summary
Many unwanted tendencies are held in check at higher speeds, and only show up when the airplane is flying slower. Some tendencies show up at higher throttle settings, but not when the throttle is low. Many mixes are only appropriate at certain airspeeds and throttle settings. This partly explains why pilots who look to mixing to take the place of developing better flying skills experience little or no long-term improvement.
Figure 9.
A person could spend a lifetime flipping switches and trying to program complex mixing curves in an attempt to eliminate unwanted tendencies, but at a certain point the returns for all of that effort are negligible. At some point you will have to settle for being close on your setup and focus on improving your flying skills.


Comments
Great tips
Great tips
Great info
I'm not new at RC flying but love to refresh on great thoughts. Good job Dave
Great article for new pilots
Great article for new pilots and those who would like a review.
"Airplane Setup Methodologies"
Excellent information, was very easy to understand. Very well written, I learned some things or should I say they where written in a way....it turned a light on I guess lol.
Thanks
good......
good......
Great article. It explains
Great article. It explains the subject in a way that the average modeler can understand.
Great article, explanation
Great article, explanation and graphics right on.
Great article. Thanks
Great article. Thanks
Good article and help to
Good article and help to improve flying rc p lanes.
Please do more of it especially on landing planes.
Thank you
the most clear and concise
the most clear and concise explanation I've heard in 15 yrs. Well done!
Dear Mr.Scott , This is the
Dear Mr.Scott , This is the best explanation of the basic settings for the RC modeler I've seen so far.
All the best
That was an excellent read, I
That was an excellent read, I'm new/old stock , building, then attempt to fly. Since I had built drag cars much of this is easy for me to pick up, but this article really eases the understanding- thank you!
Good job!
What a great job you did. This is indepth and well documented. I am a pilot and i think that's great work. Well done!
Nose-heavy
"A nose-heavy airplane tends to be less stable and less maneuverable, and will behave differently depending on the speed."
Don't you mean that a nose-heavy airplane is MORE stable?
Nose-heavy
Greats article. I have 48
Greats article. I have 48 years experience with RC airplanes and I still found helpful hints in the article.
Great article Dave. I really
Great article Dave. I really appreciate these tips and keep rereading them so that I can remember what you were trying to enlighten us about. Looking forward to implementing them. I've already taken some of the steps that you point out and am just waiting for the weather to get a little more favorable here in the Northeast to try out your suggestions. Thanks for your help.
Error ?
In the chapter on Balance:
"A nose-heavy airplane tends to be less stable" seems incorrect.
I always found a nose heavy aircraft to be more stable
Adverse yaw on flat-bottomed wings..
The best way to eliminate adverse yaw on a flat-bottomed wing is to offset the servo arm (and/or perhaps the control horn) so that the aileron deflection in the up position is about twice what it is in the down position. While it's true that the plane will turn better with an aileron to rudder mix, you haven't really fixed the problem. You're just covering it up. Also, my "rule of thumb" for expo is to set the value to 1/4 or 1/3 of the rate value for the initial setting. In other words, if the rate is set to 100%, I'll set the expo to 25% or perhaps 33%. If I find that the plane is too touchy around neutral, I'll increase the expo. And if I feel like I'm having to move the stick too much around neutral, I'll reduce the expo.
This article was
This article was exceptionally helpful to me. It answered many questions I have and gives me greater courage to tackle many of my home-built planes I have subsequently put back into garage shelves because I thought them to be un-flyable.
permission to repost
This is a very good article. I would like permission to re-post this on our website.
Absolutely, as long as you
Add new comment