Written by Terry Dunn
Rubber-Powered FF Model For Hands-On Learning
As seen in the May 2021 issue of Model Aviation.
Review
Bonus Video
Other Remote Video URL
Image
The AMA BETA flies nicely and responds well to trim adjustment.WATCH A VIDEO ONLINE!
Access additional content by visiting www.ModelAviation.com/bonuscontent.
I HAVE ALWAYS BEEN a big advocate (and beneficiary) of hands-on learning. Books and lectures are fine teaching tools, but I prefer to dive in and get my hands dirty whenever I can. It is even better when those hands-on lessons are also fun. My own curiosity leads me down avenues that invariably result in a broader and deeper understanding of whatever the topic might be.
That’s the idea behind the AMA BETA. This rubber-powered Free Flight (FF) model is intended to provide a simple, easily understood introduction to the world of aeromodeling, as well as the science behind it. Yes, the BETA is designed for kids, but I am proof that you do not have to be a kid to enjoy this aircraft—or learn from it.
About the BETA
I’ve been involved with Control Line and RC models for most of my life, yet, before the BETA, I had almost no experience with either rubber power or FF. In fact, my last rubber-powered model was a Guillow’s Sky Streak that my parents bought for me as a kid. I am sure that many of you also got your first taste of aeromodeling with that legendary collection of balsa, plastic, and rubber.
Although the BETA has a passing similarity to the Sky Streak, it is a more highly refined aircraft. This is a hobby-grade flying machine. The BETA’s 21-inch wingspan foam wings have polyhedral and an undercambered airfoil. This model also includes two rubber motors (one that is 1/8 inch wide and one that is 3/16 inch wide) and a 20:1 winder.
Image
The AMA BETA is a simple model that assembles quickly.The author used a straightened paper clip to slightly open the slots of the wing joiner and prevent damaging the foam wing panels.
Although I lack any personal knowledge or skill with rubber-powered airplanes, I am lucky to have friends who are active rubber power modelers. They provided me with helpful advice that filled in the blanks and eased my transition into this aspect of the hobby (a special thanks to Thayer Syme). I will pass along those gems of wisdom here for your benefit as well.
Building the BETA
Assembly begins by sliding the foam wing halves into the plastic wing joiner. Make sure that the the wing joiner is correctly oriented. Look closely and you will see a small arrow molded into the surface of the joiner. This arrow points forward.
The wing panels are a tight fit into the slots of the wing joiner. Getting them in place without damaging them is tricky. I had better luck when I created a simple tool to slightly pry open the slots. The tool is simply a medium-size paper clip that I straightened, leaving roughly 1 inch at a 90° angle.
Image
The horizontal stabilizer clips into place while the vertical stabilizer rests in a slot.
Image
The author balanced his propeller by adding small pieces of tape to the lightweight blade.
I pushed the straight section of the paper clip into a slot on the wing joiner. This pried the slot open just enough to allow the wing to be easily inserted without damage. I then removed the paper clip by grasping the end and pulling it straight ahead. After gently working the panel into its final position, I repeated the process with the other wing half.
The horizontal stabilizer has an integrated plastic mount, which provides a solid friction fit onto the balsa fuselage. You have two options for mounting the vertical stabilizer. The first option (which is outlined in the instructions) is to use the attached strip of two-sided tape to stick the stabilizer to the outside of the fuselage.
There is also a vertical slot in the fuselage. I simply slid the vertical stabilizer into this slot (after removing the tape strip). Whichever mounting method you use, make sure that the trim tab on the stabilizer is completely above the top of the fuselage and free to move.
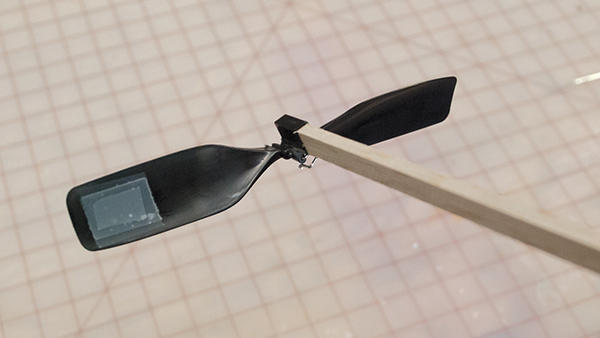
I lightly sanded the front of the fuselage with 200-grit sandpaper to help fit the plastic nose bearing into place. One propeller blade consistently rotated downward on its own, indicating that the propeller was unbalanced. I corrected this by adding small squares of Scotch tape to the back side of the lighter blade until the propeller remained horizontal when it was released.
Rubber Power
The 1/8-inch rubber motor is intended for indoor flying with the BETA. Outdoor flying is better suited to the extra power of the 3/16-inch motor. The instruction manual offers guidance on sizing a 1/8-inch motor for the BETA (a 12-inch loop), but it does not address the 3/16-inch rubber.
There are many viable options when sizing your motor, so consider my example as a suggested starting point. I made a 13.5-inch loop of 3/16-inch rubber for my BETA. This required 27 inches of rubber strip for the loop plus a couple more inches to tie a knot.
A good lubricant is necessary to allow these rubber motors to perform reliably and efficiently. Armor All tire dressing is a popular choice. The lubricant suggested to me was Sil-Glyde. It is a thick, silicone-based brake lubricant found at auto parts stores.
Before applying Sil-Glyde to my motor, I made sure that the knot in the rubber was tight and secure. Otherwise, the lubricant could cause the knot to unravel. I then squeezed a small bead of the lubricant into a small Ziploc bag. I next dropped the motor in the bag and sealed the top. I kneaded the bag until the rubber motor was fully coated with lubricant. As a final step, I removed the motor, using the lip of the bag to squeegee excess Sil-Glyde from the rubber.
Winding the motor is another topic where there is much latitude. I started out with 66 turns per inch of rubber loop. This conservative value provided good flights on a soccer field-size area and did not overstress the rubber. With my 13.5-inch loop, this equals 891 total turns (13.5-inch loop x 66 turns per inch = 891 turns). I like round numbers, so I’ll call it 900 turns.
Image
The motor for the AMA BETA is a 13.5-inch loop of 3/16-inch rubber.
Image
Rubber motors require lubrication. This silicone brake lubricant works well.
Image
The included 20:1 winder greatly speeds up the process of winding the BETA’s rubber motor.
It should be obvious why the BETA includes a 20:1 winder! This little gem will keep you from spending your entire day winding the propeller and counting to 900. Just 45 turns of the winder’s crank will load the rubber motor perfectly.
These rubber motors perform best if they are stretched out as you begin to wind them. Once again, there are no strict guidelines on how much to stretch the motor. (Are you sensing a theme yet?) I typically stretch my motor to roughly 40 inches (three times its relaxed length) to begin winding.
As I wind, I gradually move the winder closer to the rear motor hook on the fuselage. My goal is to have the winder above the rear hook just as I reach the 45th turn on the winder. I then pinch the motor near the winder and allow a few turns to unwind. This loosens the back of the motor sufficiently for me to transition it from the winder to the rear hook on the airplane.
Image
The AMA BETA is a hobby-grade FF model that provides a great learning platform for kids and adults.
Flying the BETA
I do not have access to an indoor facility, so all of my flights with the BETA have been in a local schoolyard. My 12-year-old daughter and I have had a lot of fun tuning the BETA and observing the results.
One of the first things we noticed is that the airplane flies much better with the center of gravity (CG) more rearward than the location noted in the instructions. That is because the BETA has a lifting horizontal stabilizer. We like how the BETA flies with the CG near the fourth hole back on the wing joiner. Make sure that the rubber motor is in place when you balance your model.
I don’t want to cover any more about tuning the flight performance of the BETA. The instructions offer basic tuning tips, and that should be enough. Remember that the whole point of the BETA is to experiment for yourself and observe the effects of each adjustment.
The cost of a poor flight is usually nothing more than a short walk to retrieve the model, but the reward of a good flight is a joy that is difficult to describe. Part of it is the simple beauty of watching the BETA float along in a complex agreement with the air. There is also an inescapable sense of pride in knowing that you brokered the deal.
SOURCES:Paul K. Guillow Inc.
(781) 245-5255
www.guillow.comAGS Automotive Solutions/SilGlyde
(800) 253-0403
www.agscompany.com
Free Flight Scale By Tom Hallman | [email protected] As seen in the March 2023 issue of Model Aviation. WHEN I FIRST started flying rubber-powered Free Flight (FF) in 1987, I had no idea
Written by Fitz Walker Moustache Model Works 20cc DHC-2 Beaver As seen in the FEBRUARY 2020 issue of Model Aviation. Bonus Video At A Glance Specifications Model type: Semiscale electric/gas Skill
A friend of mine, Bill Jung, bought an AMA Beta several weeks ago and we decided that the black propeller was not very efficient, so we replaced it with the Peck silver 7” propeller. The result was amazing, with the model’s altitude more than tripling with the same rubber motor. We wrote an article about it and it can be read at the following website:
AMA’s New Beta Model Airplane — Improve Its Performance by Making a Few Modifications – KC FREE FLIGHT
Other than the prop, the Beta is a great beginner outdoor free flight model airplane. Bill has now added a simple dethermalizer to his Beta, to help keep it from flying away in a thermal.


Comments
AMA Beta model airplane performance improvement.
A friend of mine, Bill Jung, bought an AMA Beta several weeks ago and we decided that the black propeller was not very efficient, so we replaced it with the Peck silver 7” propeller. The result was amazing, with the model’s altitude more than tripling with the same rubber motor. We wrote an article about it and it can be read at the following website:
AMA’s New Beta Model Airplane — Improve Its Performance by Making a Few Modifications – KC FREE FLIGHT
Other than the prop, the Beta is a great beginner outdoor free flight model airplane. Bill has now added a simple dethermalizer to his Beta, to help keep it from flying away in a thermal.
Add new comment