
Simple steps to get you started
By Pete Bauer [email protected]
Photos provided by the author and Fred Cronenwett

Have you been thinking about flying Control Line (CL) Scale, but you don’t know where to start? Although some Scale events can be intimidating, with complex scratch-built or plans-built models, this article will guide you through some simple steps to start flying in the CL Fun Scale event. Here are some highlights of the AMA CL Fun Scale (526) event from the latest Competition Regulations:
- Fun Scale is intended to provide a Scale event which, while requiring a realistic scalelike flight, minimizes the scale research and model construction efforts.
- There is an exception to the "Builder of the Model" rule, so ARF models are allowed, along with models built by someone else.
- Static-judging requirements are minimal. The model only needs to be recognizable as a Scale model, and only minimal outline and color documentation is needed (four pages at the most). Most merely use a three-view and a couple of color photos. Maximum static scoring is 10 points (proof of scale: 0-5 points; color and markings: 0-5 points).
- Flight judging is the same as other Scale events, with a maximum of 100 points.
- There are no penalties for the absence of operating retractable landing gear, flaps, and/or the absence of a visible pilot figure. Also, there is no penalty for a profile model.
- Although the control lines must be used to manipulate the model’s elevator (to provide aerodynamic control of the model’s pitch during flight), the use of 2.4 GHz radio control signals through the air are allowed other than for pitch control (throttle/ESC, retracts, flaps, etc.).
The Fun Scale event focuses on the flying portion instead of the static portion. As a reference, the "Sources" section contains a link to the complete AMA CL Scale Competition Regulations 2024-2025.
Getting Started
A simple and quick way to get started in Fun Scale is to convert an RC Scale ARF to CL. There is a wide variety of ARFs from which to choose, and most of them come prepainted in a recognizable, scalelike scheme. With a couple of simple modifications, you will be flying the ARF via control lines in no time.
The following are some suggestions for choosing an ARF to convert:
- A suggested aircraft size is a 40- to 60-inch wingspan (or larger if it will fit in your vehicle).
- Most ARFs come with electric power and the ESC preinstalled.
- ARFs come with servos for retracts, flaps, and/or a bomb drop preinstalled. These can be used as options during the flight portion by using a 2.4 GHz radio to operate them.
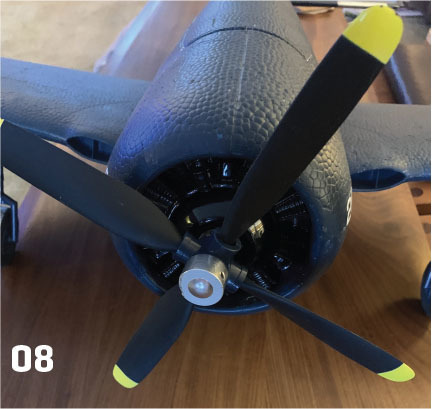
Pete Mazur completed an ARF conversion a couple of years ago using an Eleven Hobby Bearcat. I will use his model and photos to describe the steps in the conversion. The model has a 44-inch wingspan and weighs approximately 3.5 pounds. It includes retracts and flaps and is of all-foam construction.


Modification 1: Install Bellcrank and Leadout Guide
The primary modifications are installing a plywood plate to hold the new bellcrank and installing a leadout guide at the wingtip for the lines.
Fred Cronenwett’s article "The Modern Control Line Scale Model," in the June 2015 issue of Model Aviation, does an excellent job of describing where to locate the bellcrank (slightly behind the center of gravity [CG]) and leadout guide (make an adjustable leadout guide). A link to the article is in the "Sources" section.
The new bellcrank plate distributes the pull-test force (5Gs) across the fuselage so that it does not pull out. Depending on the model’s configuration, you might need to reinforce the side of the fuselage. Pete installed a 1/16-inch plywood floor epoxied to the foam structure, distributing the pull-test force over a wide area. A reinforcement of 1/8-inch plywood holds the bellcrank bolt in place.
Pete embedded basswood blocks in the inboard wingtip to mount an adjustable leadout guide. It is removable for static judging and includes multiple holes to adjust the line rake, based on varying wind conditions.
Again, refer to Fred’s article to set the vertical and horizontal location of the leadout guide. He suggests hanging the model from your garage ceiling to help determine the proper vertical and horizontal location of the leadout guide, depending upon the model that you are converting.
The leadout guide is removed for static Scale judging. It is held in place by two #2 sheet metal screws threaded into basswood blocks that are epoxied into the wing.
Modification 2: Add Wingtip Weight
Pete added roughly 3/4 ounce of weight to the outboard wingtip to counteract the drag of the lines.
Modification 3: Lock Rudder and Ailerons
You have a couple of choices. You can unplug the rudder and aileron servos from the receiver so that they do not move, or you can remove the servos and screw the servo arms to a block of hardwood to lock them in place. Pete used the hardwood block method.
The rudder servo should initially be set with zero offset. Set the ailerons with zero offset if you have installed wingtip weight. The main point is that both the rudder and ailerons are adjustable so that you can move them to trim the model to your liking.
Pete replaced the aileron servos with balsa blocks and plywood arms. He set the ailerons in a neutral position because he embedded a solder-filled 9/32 x 3-inch brass tube into the outboard wingtip.


Modification 4: Flying Handle and Radio Transmitter
Your model is complete, but now you must decide how you want to carry the 2.4 GHz transmitter when you are flying. There is no right or wrong way; it is simply a matter of preference. Following are a couple of choices:
- Use a standard CL handle and hang the transmitter on your belt or in a radio tray/harness. I prefer the radio tray because that is how I fly RC and I already have the equipment. I tried hanging the transmitter from my belt, but I kept getting confused with the throttle being an up-and-down movement instead of a forward-and-backward movement.
- Convert an RC car transmitter to a CL handle. Note that most RC car transmitters are only two channels, so that is not enough if your model includes three or more functions. The photo shows a Spektrum DX3E three-channel transmitter so that throttle, retracts, and flaps can all be controlled. The modifications included replacing the steering wheel with a switch for the retracts and mounting the assembly on a 3/4-inch long piece of 4-inch square aluminum tubing. A separate battery box is added.

Final Trim
As noted at the beginning of this article, Fun Scale focuses on the flying portion. Each flight includes a Realism in Flight score.
The Realism in Flight score is based on the impression of the judges on how well the overall model flight simulates the flight of the full-scale aircraft during maneuvers. The speed must seem realistic by subjective judgment. The scale operations performed on the full-scale aircraft (flaps, retracts, etc.) are performed on the model at the appropriate times. The overall smoothness of the performance of these maneuvers will also be considered.
You will want to trim your model to perform a smooth, consistent flight. Pete added roughly 4 ounces of coiled solder behind the dummy engine to bring the CG forward for better flight stability.
Flight Plan and Options
The flight plan consists of three required maneuvers (takeoff, 10 level laps, and landing), six optional maneuvers or scale operations, and one overall judgment of realism in flight for a maximum of 100 points. Each option can be awarded up to 10 points, except for the Retract and Extend Landing Gear and Touch-and-Go maneuvers, which each have a maximum award of 20 points.
Options must be typical of the aircraft—no looping that World War II bomber. Pete’s Bearcat has many options from which to choose:
- Touch-and-Go (counts as two options for 20 points maximum)
- Retract and Extend Landing Gear (counts as two options for 20 points maximum)
- Flaps
- High Flight
- Taxi
By converting an RC ARF that already has retracts, flaps, and an electric motor with an ESC, you will have plenty of options for your flight plan.
Find an ARF model of your favorite aircraft and give Fun Scale a try!

SOURCES:
AMA CL Scale Competition Regulations 2024-2025
www.modelaircraft.org/sites/default/files/events/rule-books/Control_Line_Scale_2024-2025.pdf
The Modern Control Line Scale Model
https://library.ModelAviation.com/article/modern-controlline-scale-model-201506


Comments
Very good work, I loved the…
Very good work, I loved the transformation process, very well done. Very nice work with your 2.4GHz handle, we have been working on a similar solution but you can get it commercially. Here is a link to our facebook page: https://www.facebook.com/profile.php?id=61560480371015
Add new comment