
Written by Andrew Griffith
Bubble top or birdcage?
Product Review
As seen in the June 2019 issue of Model Aviation.
At a Glance
Specifications Model type: Semiscale warbird Skill level: Intermediate Wingspan: 63 inches Wing area: 709 square inches Wing loading: 27.6 ounces per square foot Airfoil: Semisymmetrical Length: 51.1 inches Weight: 6 pounds, 4 ounces (no battery) Power system: 6S 340 Kv electric motor with 80-amp ESC Radio: Full-range six channel Construction: EPO foam Covering/finish: Painted foam with a matte finish Price: $439Test-Model Details
Motor used: 340 Kv electric brushless (included) Receiver battery: BEC (included) Propeller: Scale 18 × 12 three blade (included) Radio system: Spektrum DX20 Servos: Eight 19-gram metal gear; one 9-gram metal gear; two 9-gram plastic gear (all included) Ready-to-fly weight: 8 pounds, 6 ounces Flight duration: 5 to 7 minutesPluses
- Available in birdcage or bubble canopy versions.
- Operational flaps and retractable landing gear, including servo-operated main gear doors.
- Includes scale three-blade propeller.
- Great looks and scale outline.
- 3D printer files available for full interior on the Motion RC website.
Minus
- No built-in options for ordnance or drop tank.
Bonus Video
Image
Image

Assembly
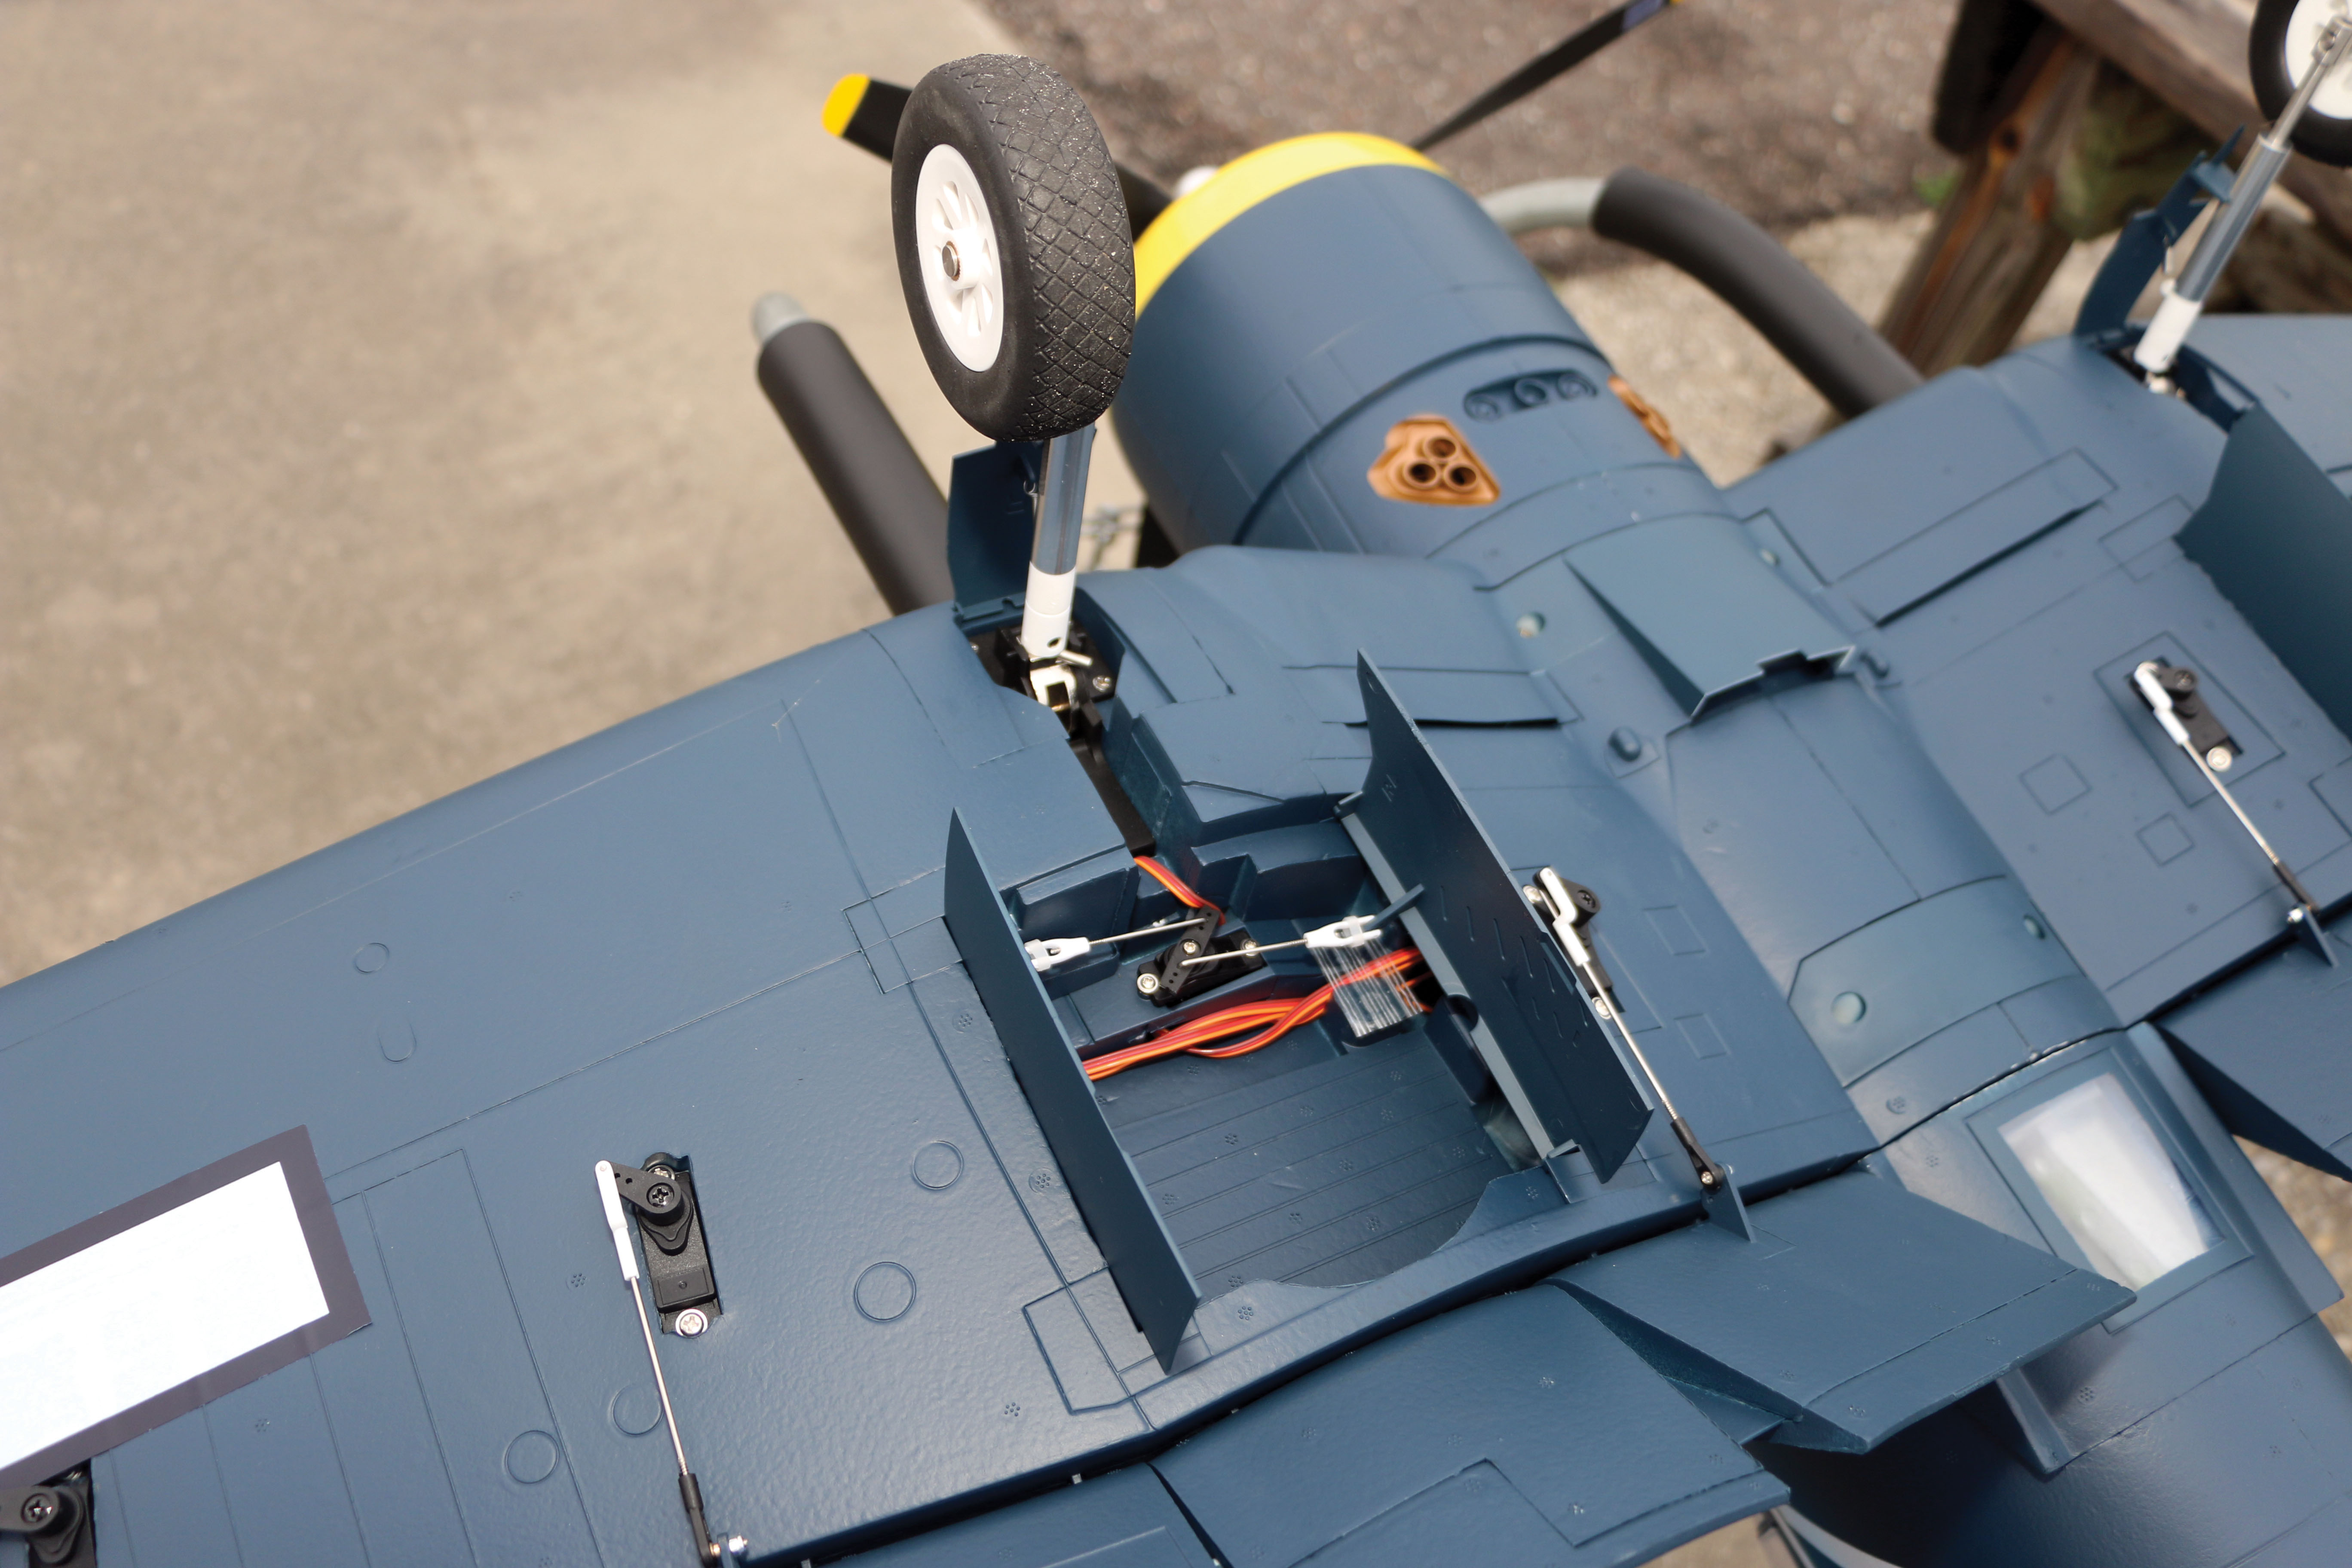
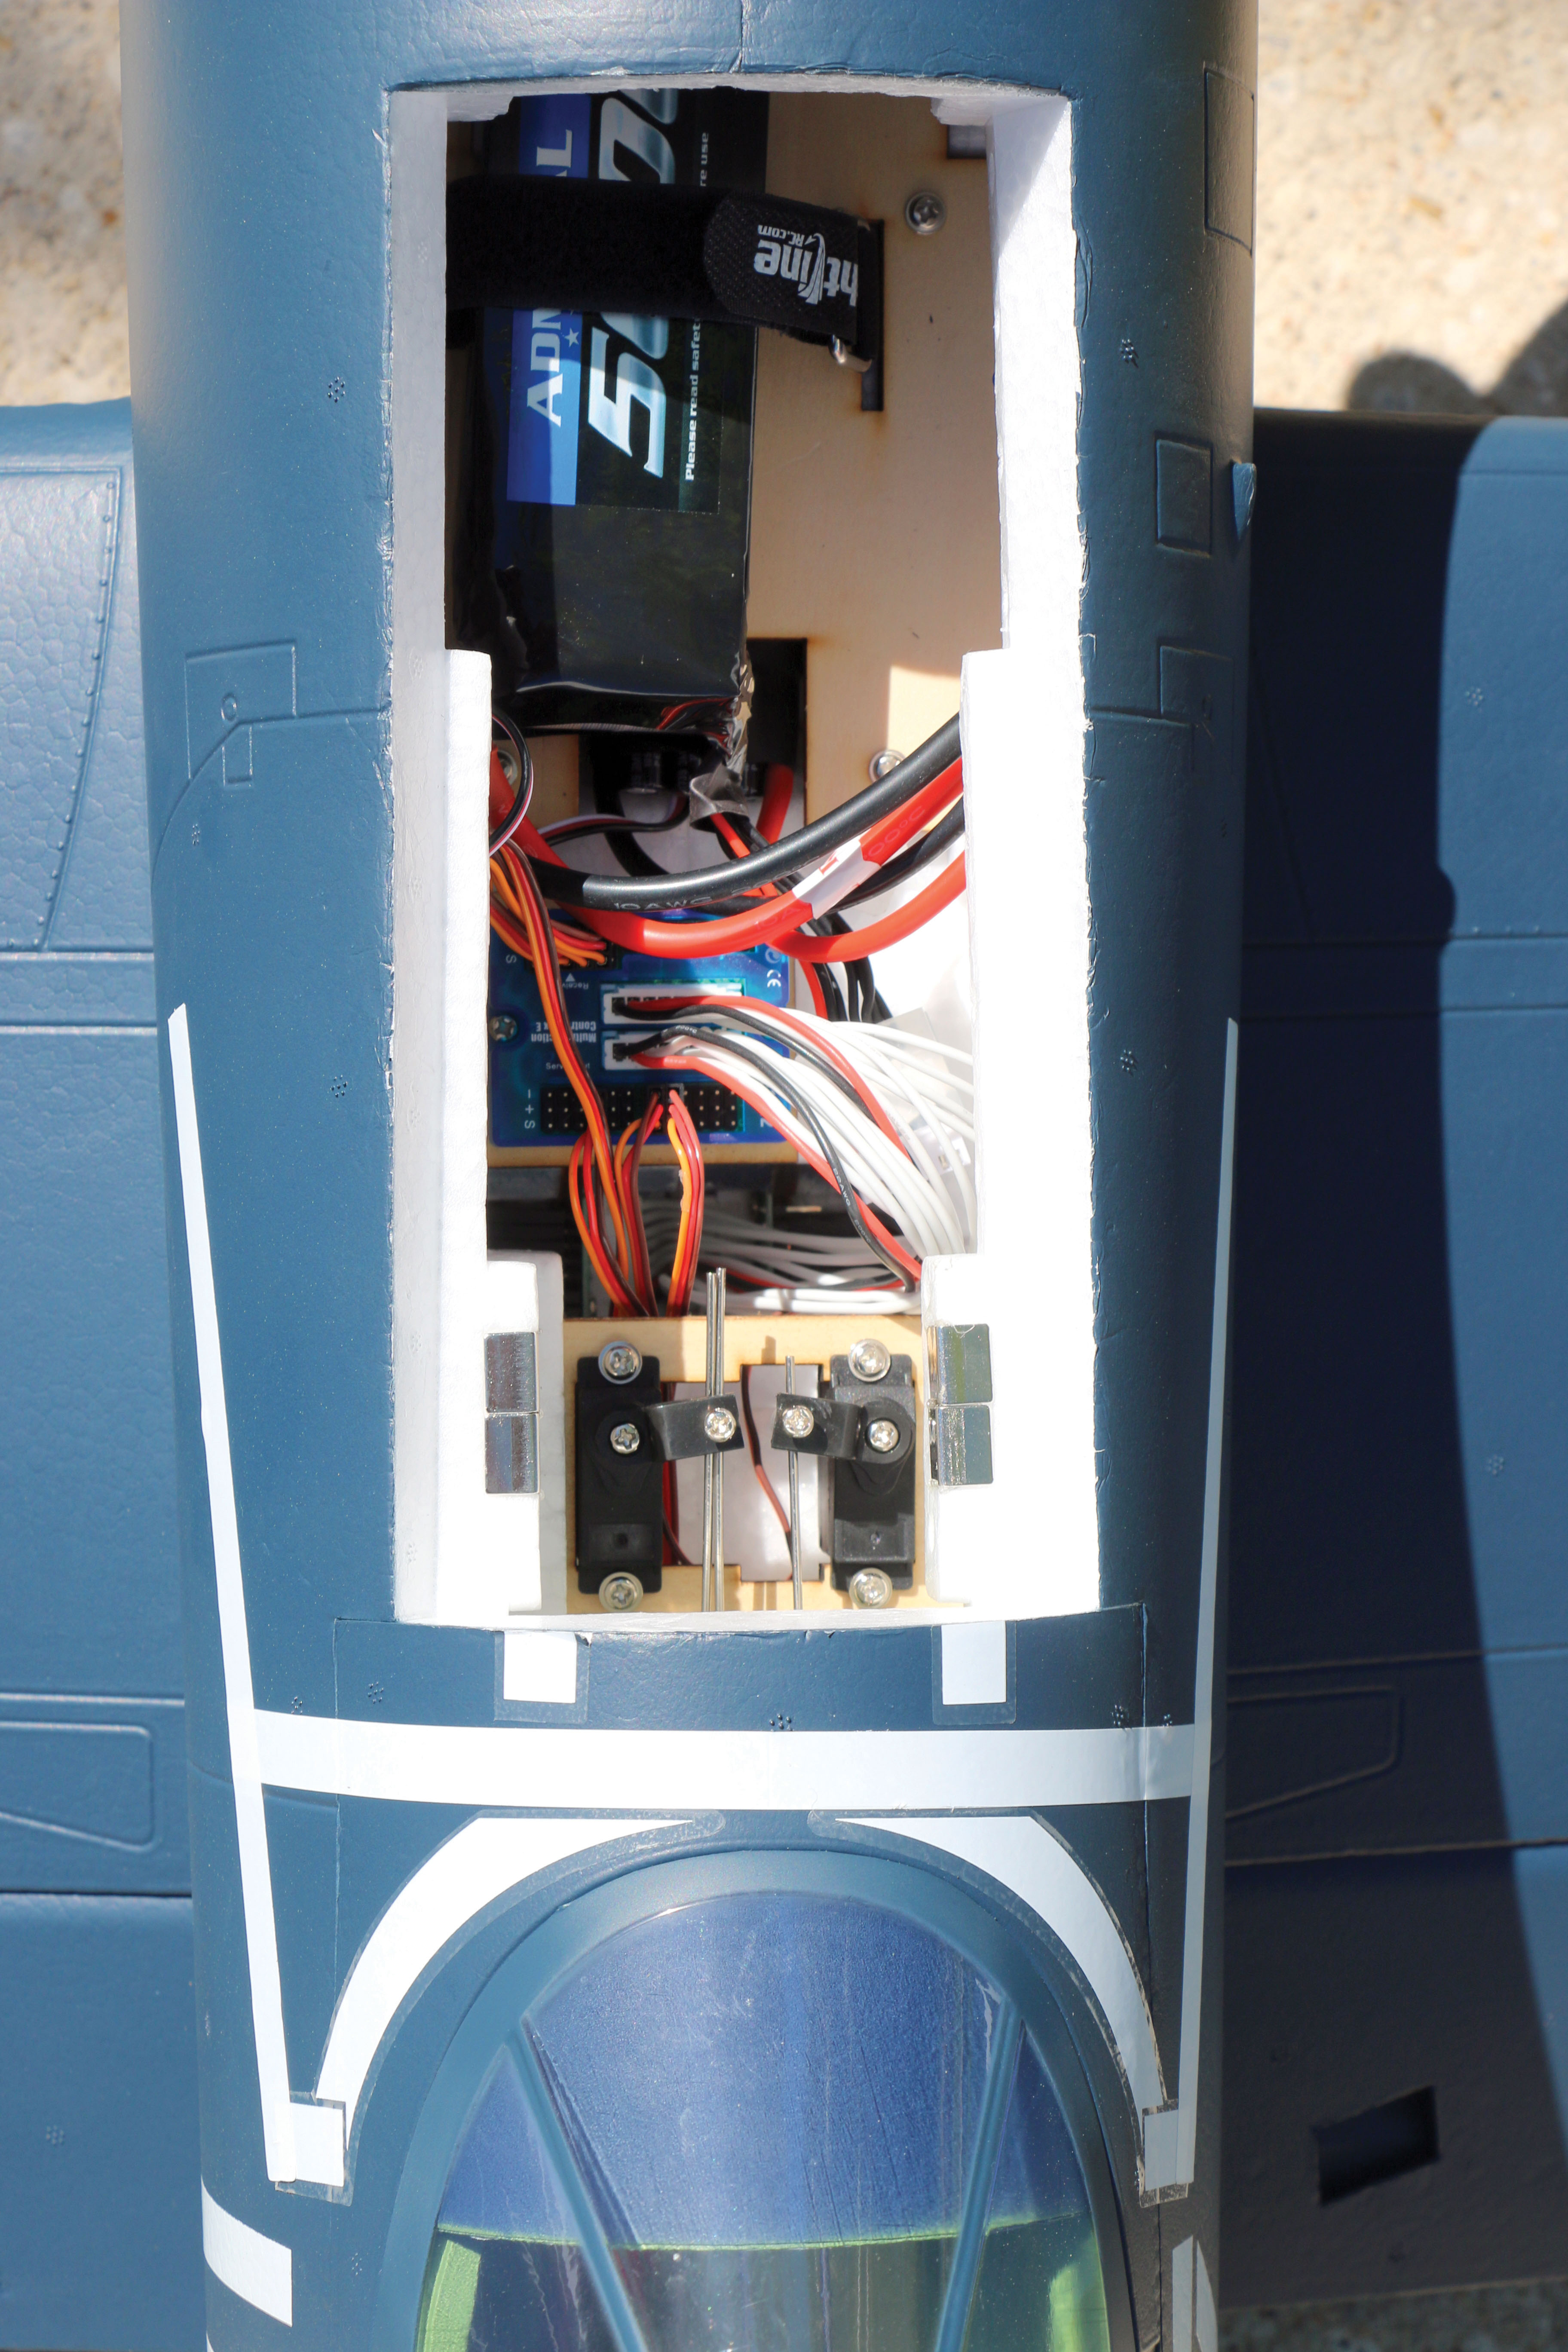
I start assembling any foamie airplane by laying a couple of beach towels over my work surface to prevent me from denting the foam or scratching the paint while I work on it. The manual outlines the assembly sequence and Motion RC has a step-by-step assembly video on its website if any clarification is needed. In addition to the manual, marking placement guides that are specific to the version that you ordered are included. The Corsair arrived featuring a high degree of prefabrication with much of the hard work already completed. The motor, ESC, servos, and servo extensions are factory installed. All of the surfaces arrived hinged with internal hinges—no foam hinge lines on this warbird. Assembly starts with installing the horizontal stabilizer, which bolts into place with four screws. Likewise, the vertical stabilizer and rudder are installed with four small screws, and the pushrod connections are completed for the rudder and elevator. The control linkages use ball links for a slop-free control system. The Corsair uses a control board that manages the multiple aileron, flap, and landing gear connections, as well as the lighting system, which allows the use of a simple six-channel radio system. Ribbon cables, which are installed next, run from the controller board to each wing half, allowing one connection for the bevy of wires on each side. The landing light is tied to the landing gear and illuminates only when the landing gear are extended. The wing halves slide onto a carbon-fiber wing tube and bolts together. Plastic reinforcements are used to protect the foam where the bolts are inserted. Four more screws attach the wing to the fuselage and we have ourselves an airplane. With the main wing mounted, I sighted from the rear to confirm that the stabilizer-to-main-wing alignment was square. I found it to be spot on. The model has three section flaps on each wing. Operating them are two servos on each side. The wing installation is completed by installing the four flap pushrods and one for each aileron. The provided propeller requires assembly and the finished product looks more like a scale display propeller than a flying one. The blades are individually installed and captured when the propeller hub is bolted together. I’m not sure what the company is trying to tell me, but it included a spare propeller blade in the package. As mentioned previously, the Corsair uses a controller board and requires one lead for each control to go to the receiver. Even with four flap servos, dual ailerons, gear doors, and lights, you only need six channels to fly the Corsair. I used an Admiral 6S 5,000 mAh LiPo battery pack and powered up and bound an AR6600T Spektrum receiver to my Spektrum DX20 radio. Control throws were set according to the manual’s instructions. I added a 4-second delay to the flaps to make them look scalelike. I didn’t want to guess on the flap/elevator compensation, so I left those at zero until the test flight. Exponential was set to 30% on all of the surfaces. The battery hatch is between the cockpit and the engine, which is also the location of the fuel tank on the full-scale Corsair. The hatch is held in place with magnets, and a small, clear tab is provided to pull the hatch up without damaging the foam or paint. There should be plenty of room to position the battery pack and access is easy with the topmounted hatch. There is no need to flip the airplane over to change battery packs.Image
Image
Image

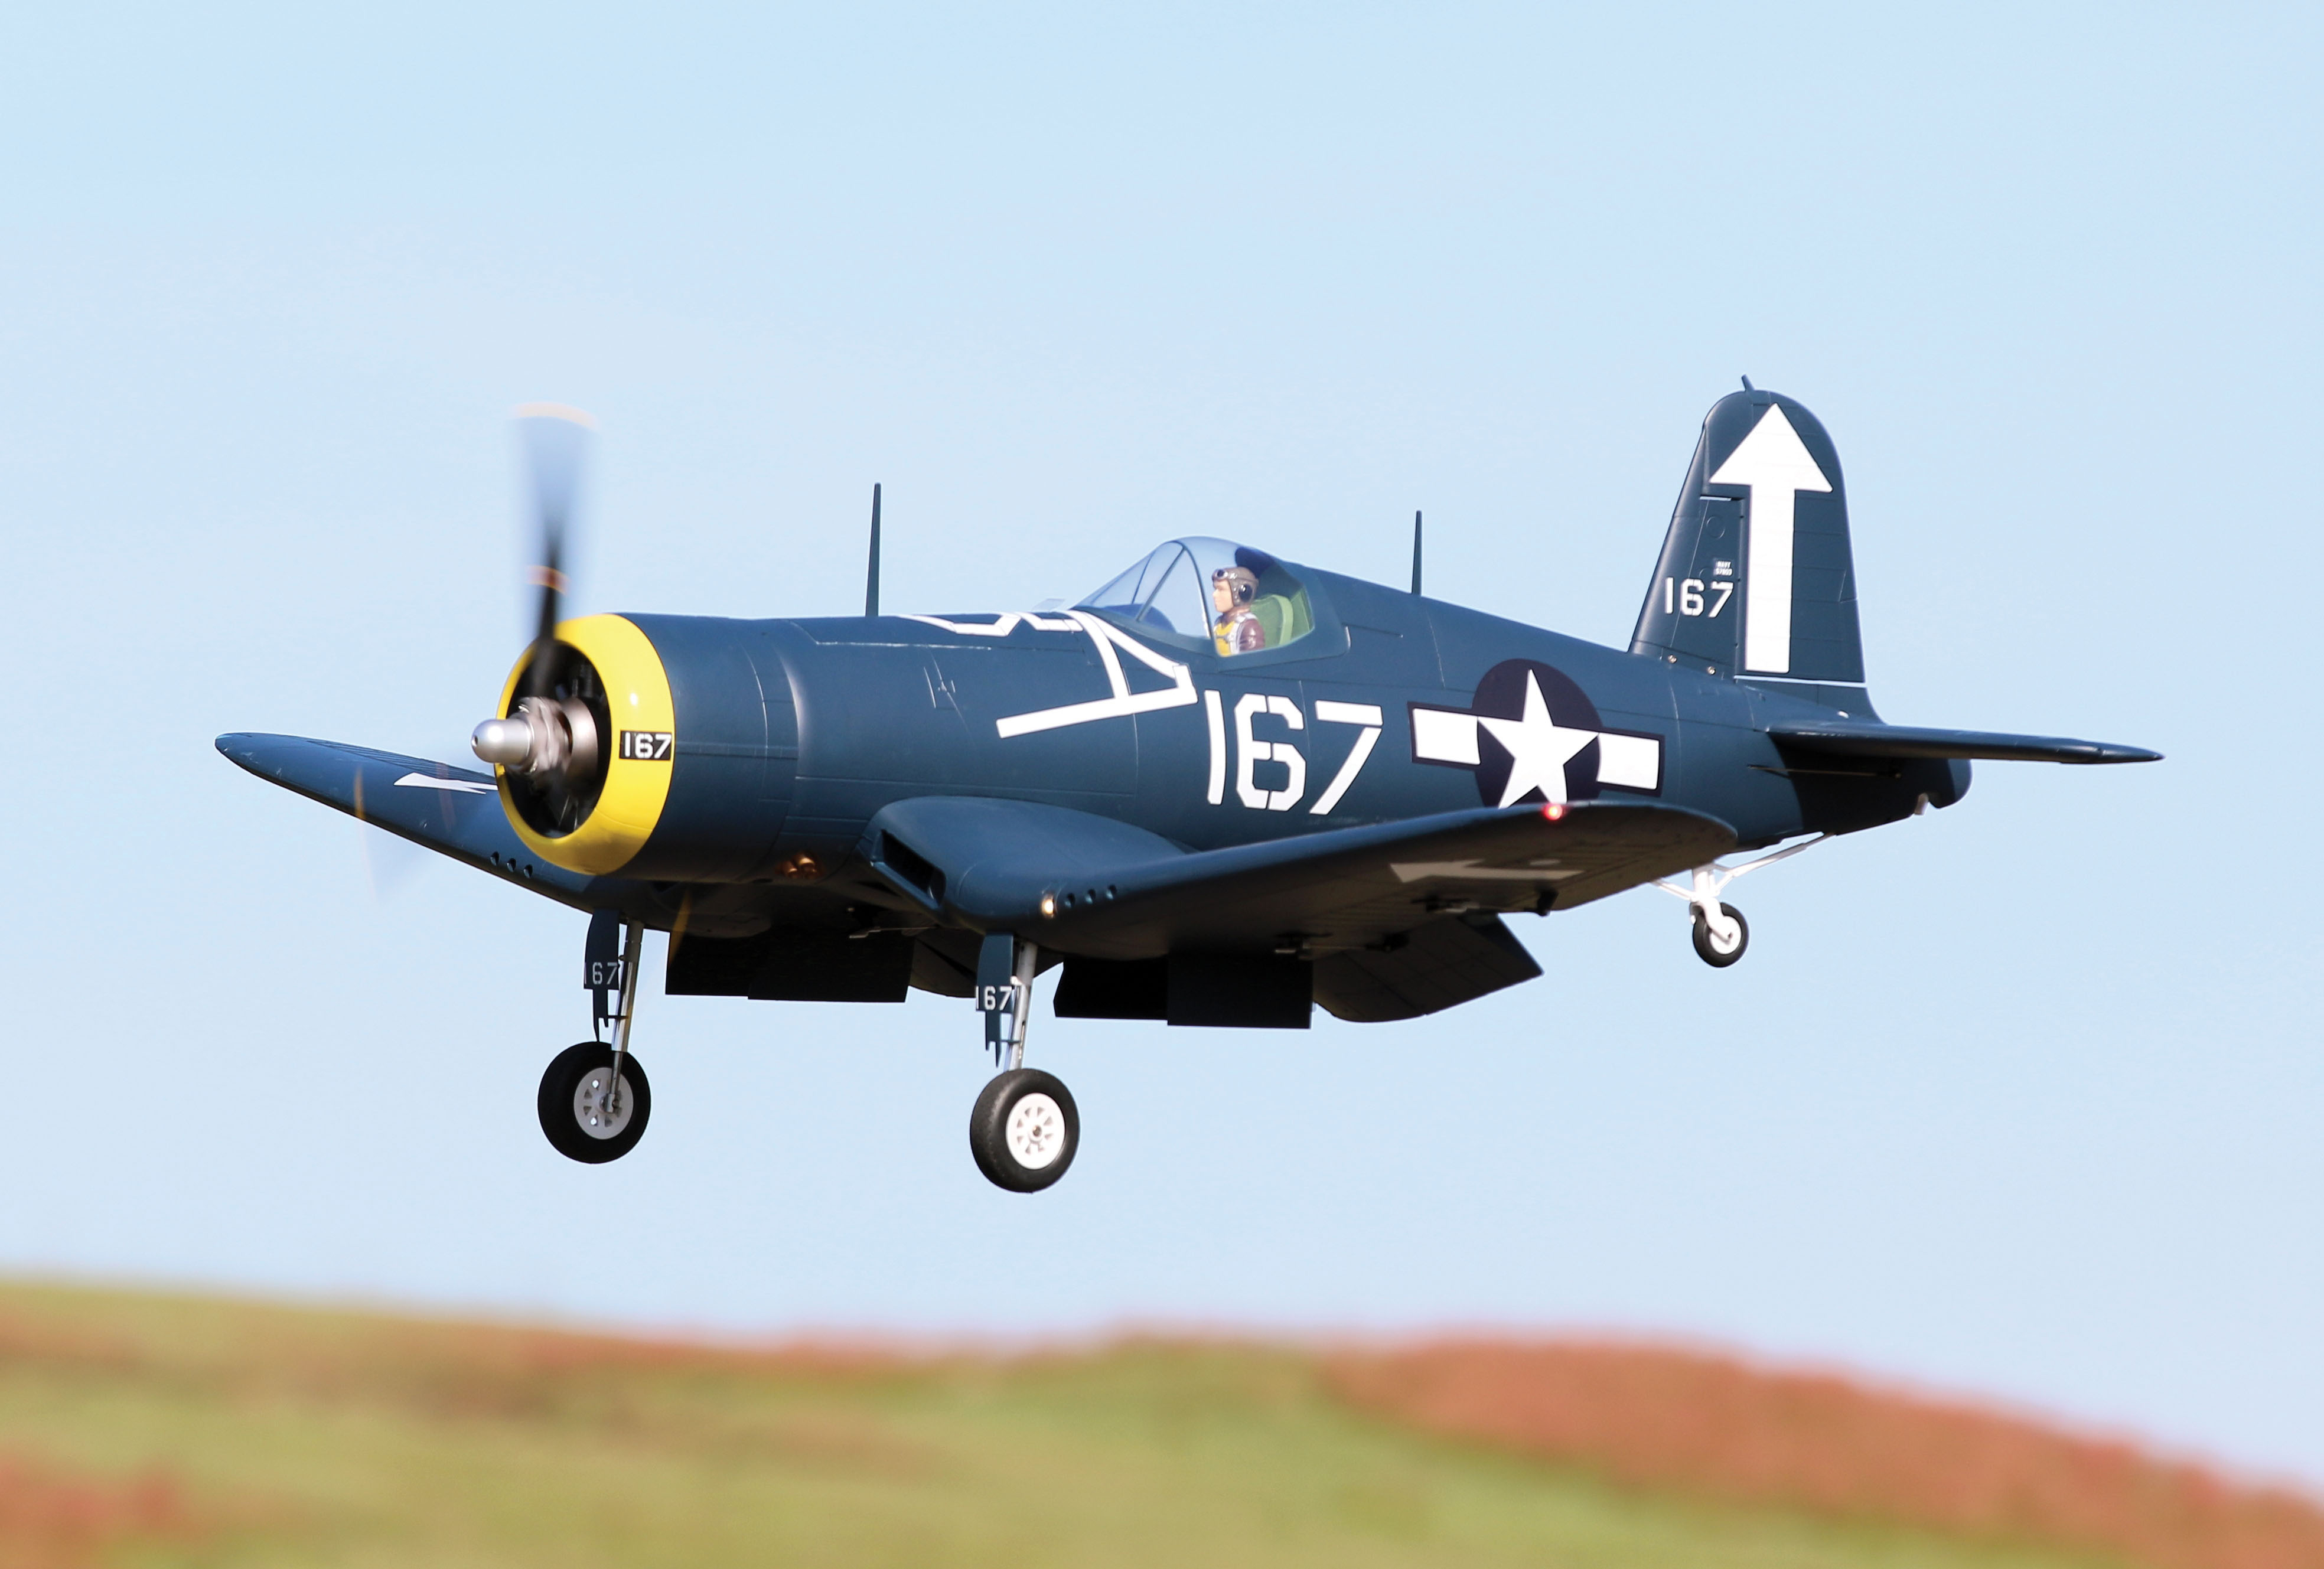
Flying
Many vehicles will accommodate the Corsair fully assembled, but the wing can be removed and quickly installed. Four screws fasten the wing and two ribbon cables connect the servos, gear, gear doors, and lights to the control board. The wide main gear stance means the Corsair is very well behaved on the ground. Taking off of a paved runway requires a classic warbird takeoff technique to keep it going straight. That means gradually applying throttle, a little up-elevator to keep pressure on the tail wheel until it gets moving, and a bit of right rudder. It takes some practice because you must back off the elevator at the right time or it can pop off the ground before the wing is flying, and cartwheel. The Corsair has plenty of power and will accelerate briskly and run on the main wheels until it takes off in 50 feet or so. I made a pass back over the runway to make sure everyone saw the gear retract and rotate into the wheel wells. The retracting tail wheel, that some models of this size lack, completes its clean look. The Corsair needed a few clicks of right aileron and a couple of clicks of up-elevator and was soon flying hands off. It locked into a nice groove at mid-throttle and didn’t exhibit any Dutch roll (tail wagging) that some short-coupled airplanes are susceptible to. The control rates felt comfortable. I did most of my flying in high rate, and the 30% exponential smoothed things out around center stick. Aerobatics were as expected for a scale warbird. Aileron rolls were crisp and fast enough to be fun. Large loops are possible from level flight because the three-blade propeller has lots of pull. Full power passes over the runway were impressive and in the 75 to 80 mph range. The Corsair slows down nicely as the thick airfoil and moderate wing loading combine to make stalls sedate and predictable. Recovery is quick when the elevator is relaxed and power applied. When forced into a hard stall with full up-elevator, the Corsair will drop a wing and start a spin, but it really needs to be coaxed into it. It will stop the spin as soon as the controls are neutralized and some speed is regained. One of the Corsair’s quirks that requires you to plan ahead is the landing gear deployment. It takes several seconds for the landing gear doors to open and the gear to fully extend and lock down. If you have an emergency, you will have to quickly decide whether you have time to get the gear fully down or if you should ride it out and do a belly landing. As with any fighter aircraft with a big radial and its induced drag, the landing approach requires proper power management. The gear doors, wheels, and large flaps, along with the flat nose and big propeller, require roughly 40% throttle to overcome the drag during the landing approach. After you figure out the throttle setting, the Corsair locks into a nice glide and lands on the main wheels. The upturned outer wing panels can make the Corsair a handful during crosswind takeoffs and landings. If I regularly flew in these conditions, I would consider using an AS3X receiver, but other than that, this airplane would hardly benefit from a gyro.Conclusion
Whether you choose the bubble top or birdcage version, you’re going to love the new FlightLine 1600mm Corsair. It has fullhouse flaps, retractable landing gear, lights, and scalelike details, yet only requires a simple, six-channel radio system. Smooth and predictable in flight, the Corsair flies more like a sport airplane than a warbird. A little time invested in detailing and it will look as though it just returned from a mission over Rabaul!Image


Comments
Add new comment