
Written by Terry Dunn
A great glider gets even better
Product Review
As seen in the March 2018 issue of Model Aviation.
Bonus Video
Specifications
Type: Electric glider/sport airplane Wingspan: 70.9 inches Wing area: 518 square inches Length: 42.5 inches Radio: Hitec Flash 8 transmitter; Hitec Minima 6E receiver; four factory-installed Multiplex Tiny-S micro servos Components needed to complete: Minimum four-channel radio system (transmitter and receiver only); 3S 2,200 mAh LiPo battery; basic tools Minimal flying area: Club field Price: $199.99; $104.99 for kit version Power system: Multiplex C28-34 850 Kv outrunner brushless motor (included); 9 x 6 folding propeller (included); Multiplex Roxxy 720 20-amp ESC (included); ElectriFly 3S 2,200 30C LiPo battery Power output: 16 amps, 196 watts Flying weight: 35.3 ounces Flight time: 10-plus minutes Wing loading: 9.8 ounces per square footPluses
• Fantastic fit and finish of components. • Well-matched power system. • Diverse flight performance.Minuses
• Awkward receiver mounting location. • Setscrew-type pushrod connections on removable tail.Image

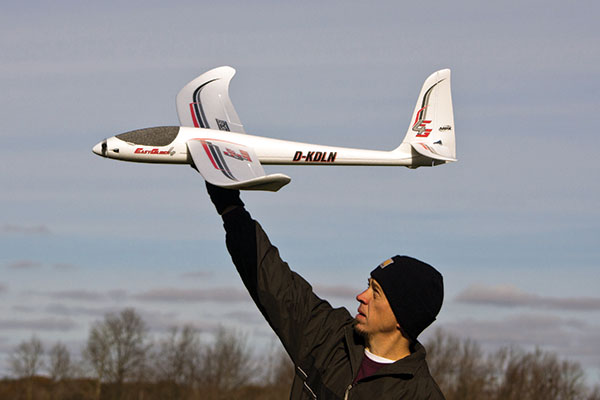
The EasyGlider 4 has a wide flight envelope. You can treat it as a powered glider or a sport airplane.
Product Review
I’ve been a fan of the original Multiplex EasyGlider for several years. That curvy foam airplane helped me realize that gliders do not have to be fragile or complex to fly well. The model’s toughness and good flight performance gave me confidence to expand my comfort zone with gliders. In fact, it was an EasyGlider that provided my first tastes of aerotow and Slope flying. My personal model has endured lots of abuse, but it is still in my fleet and is flown regularly. Although the original EasyGlider is no longer produced, Multiplex has maintained the bloodline with a few variants throughout the years. The company’s latest version, the EasyGlider 4, retains the same look and feel of the original design, but incorporates a significant list of updates and improvements.About the EasyGlider 4
Multiplex offers the EasyGlider 4 to US buyers in two versions. The kit variant includes unassembled foam airframe components, a folding propeller, and a hardware package. Stepping up to the Receiver-Ready (RR) model that I reviewed adds a brushless motor, ESC, and four Multiplex servos. The RR version is factory-assembled as well. All you do is install a receiver for your four-plus-channel radio, add a three-cell flight battery, and complete a handful of final assembly steps. My initial inspection of the EasyGlider 4 left a positive impression. The first thing I noticed was the quality of the molded-foam components. Although my legacy EasyGlider is polka-dotted with mold marks, the new airframe is completely smooth. The only mold marks to be found are located in hidden areas. I noticed that the factory-assembled parts were put together very well. There were no sloppy joints or misaligned seams. I especially appreciated that the decals were correctly positioned without wrinkles or bubbles. The only aspect I didn’t care for was the use of hot glue to hold down the rudder and elevator servos. The gloppy glue works fine. It just looks out of place in the otherwise tidy radio bay.Image

The RR version of the EasyGlider 4 is a molded-foam airplane that has Multiplex servos and a brushless power system installed. Its build quality is excellent.
One significant way that the EasyGlider 4 differs from the first-generation model is that the tail surfaces are now removable, bolt-on pieces. This can be helpful when dealing with tight spaces during storage and transport. The novelty of this airplane’s detachable tail, however, is somewhat offset by the setscrew-type connectors that link the rudder and elevator control horns to their respective pushrods. This setup forces you to center the control surfaces each time you remove the tail, likely fouling your previous trim settings. The original EasyGlider was available as either an unpowered, pure glider or a powered version with a geared brushed motor. Both versions of the new model are designed to be launched using a direct-drive brushless motor with a folding propeller. If you want to use other launching methods with the EasyGlider 4, you can either remove the propeller blades or call Hitec/Multiplex to purchase an optional pure-glider nose cone.
Assembling the EasyGlider 4
Multiplex’s 72-page instruction manual seems intimidating at first. That feeling resides after you see that the same manual also applies to the kit version, which requires many more assembly steps. Did I mention that the instructions are presented in five languages? The steps specified for the RR kit are a small subset of the total manual. You’ll only need an hour or so to get the airplane ready for flight. The 20-amp ESC is factory-mounted to the starboard wall, slightly behind the rudder servo. The self-adhesive loop tape on my ESC would not stay adhered, so I routed a small zip tie behind the hook tape on the fuselage and cinched it around the ESC. I use an ElectriFly three-cell 2,200 mAh 30C LiPo battery to power the EasyGlider 4. The battery is positioned at the entrance of a cavelike area that extends beneath the wing. Hook-and-loop tape holds the battery in place. When installing the loop tape to the airframe, the manual suggests that you shore up the tape’s adhesive with CA glue. I still didn’t trust this bond to last very long, so I applied the loop tape to a piece of rigid plastic sheet (light plywood would also work) then glued the plastic to the airframe with GOOP adhesive. The manual instructs you to mount your receiver behind the battery at the rear of the cave. My Hitec Minima 6E six-channel receiver fit with plenty of room to spare. I routed one antenna through each air-exit slot in the fuselage sides. I then taped the exposed sections of the antennas along the pushrod channels on the outside of the fuselage.Image

The author used a Hitec Minima 6E receiver. The servo wires are tightly bundled to prevent any obstructions concerning battery positioning.
My first attempt at mounting the receiver resulted in a bird’s nest of servo wires in the tunnel, which hindered battery access. I went back and bundled all of the wires using a braided sleeve and heatshrink tubing. That did the trick. I can now install and remove the battery without interference.
Image

There is not much spare room in the radio bay, so keep it tidy. Note the zip tie on the ESC and hot glue holding the servos.
I linked the receiver to my Hitec Flash 8 transmitter and configured the control throws according to the manual. The completed model balanced at the suggested center of gravity with no ballast necessary. Better yet, the ready-to-fly weight of my model is 3.5 ounces less than the specification!
Flying the EasyGlider 4
Image
Half throttle and a casual toss will get the EasyGlider 4 airborne.
Field assembly is a quick process. I’ve been keeping the tail feathers bolted on, but I do remove the wings for transport. I simply have to slide each wing panel over the square spar and plug in the aileron servos. The female ends of the factory-installed servo extensions are hard mounted in each wing socket. The EasyGlider 4 is ready to go when the wings are fully seated in the fuselage. My preflight analysis of the power system indicated a power loading of 86 watts per pound. That led me to anticipate a somewhat lethargic climb rate from the EasyGlider 4. I was wrong! It’s no rocket ship, but this airplane is not a slouch. The model is easy to hand launch at half throttle. With full power, it will maintain a climb angle of 45°. The airplane can reach a comfortable soaring altitude in less than a minute. At that point, you can kill the throttle and let the propeller fold back. Then it’s time to go looking for lift! I admit that I’m not a very good glider pilot, but the EasyGlider 4 is often reluctant to come down. If you let the airplane maintain a moderate speed, it will reward you with impressive glides. You can get numerous climbs on a single battery charge. Flight times are limited only by your thermal-hunting skills, but if you’re like me, achieving maximum duration isn’t really your thing. That’s okay. The EasyGlider 4 has aerobatic chops too. Using the suggested control throws allows a wide range of four-channel aerobatics. The motor has plenty of power to pull the airplane through tall loops and other maneuvers. After you’ve mastered them, you can try doing them with the motor off! Aileron rolls are slightly on the slow side. Keep your airspeed up and be ready to add a little down-elevator as you pass through the inverted phase. Adding rudder input will speed up things. The EasyGlider 4 can easily sustain inverted flight. It simply requires a fair amount of throttle and down-elevator. Yes, it will glide inverted as well, but doing so quickly bleeds off energy. On the subject of killing energy, the EasyGlider 4 does great sideslips! It’s a handy maneuver for slowing down a hot final approach. The manual also suggests programming your radio to use the ailerons as spoilerons. I’m sure that is an effective energy-management tool as well, but I have not yet tried it with my EasyGlider 4. Landing the EasyGlider 4 is no problem. All of the control surfaces remain effective until touchdown. One of this model’s new features is an integrated plastic belly skid. So the only question when landing is, “How far can you make it slide?”
Multiplex MULTIflight Simulator
It’s no secret that RC simulators are great tools for learning to fly and keeping your skills sharp, even if it’s raining outside, but were you aware that Multiplex offers a free RC simulator? MULTIflight is a Windows-based program that can be downloaded from the German Multiplex website that is listed in the “Sources” section. MULTIflight comes with profiles for numerous Multiplex models, including the EasyGlider 4. The emulated airplane’s performance closely mimics the real model. You can even participate in a virtual “Climb and Glide” competition with the EasyGlider 4. The rules are simple, but the challenge is tough! The simulator does not offer a lot of bells and whistles; however, the graphics are outstanding and the program runs well on my aging laptop. You can use a wide range of game controllers or joysticks to fly the models. The best training comes from using your actual radio transmitter. My Hitec Flash 8 works perfectly with MULTIflight using a generic USB transmitter interface that is plugged into the radio’s trainer port. If you’re thinking about buying the EasyGlider 4 (or some other Multiplex model), download the simulator and take it for a test flight.Image


Comments
Add new comment