01. The author’s Old School Model Works Sky Ranger was finished using the same techniques as on the pirate-themed airplane.
02. The author added stripes and used a pattern to make the crosses on the Sky Ranger. The skull pilot came from a craft store.
Tools Needed for Markings
- Scotch Brand tape
- Covering
- Hobby knife with #11 blades
- Tape measure
- Artwork
- Straightedge
- Marker
- Covering iron
- Flat work bench (an interior door blank works well)
- Well-lit work area
One disadvantage to ARF or RTF models is that they generally all look the same. One option to differentiate your model is to change the graphics or to build a balsa and plywood model yourself. There are many options available. You just have to find them.
I enjoy building models, both Scale and sport aircraft. My grandson asked me one day, "Papa, can I have a pirate plane?" After some thought, I said, "Sure you can." I happened to have had a Great Planes Big Stick 60 ARF sitting in a box.
03. Here are examples of the two-views available from BTE and Old School Model Works.
04. Tools needed include tape, covering, #11 blades, a sealing iron, a tape measure, artwork, a straightedge, a marker, and a flat, well-lit work area.
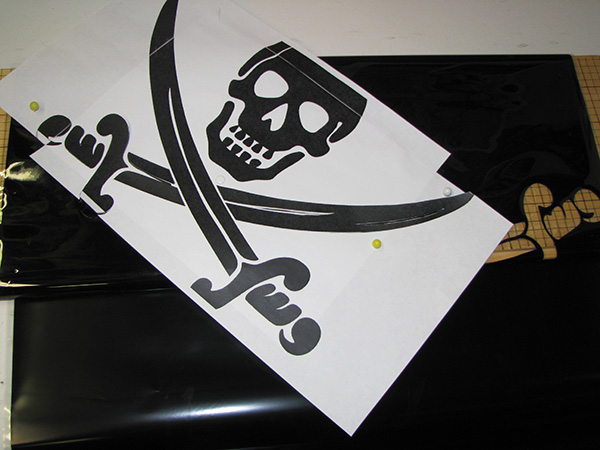
05. The artwork is sized then pinned or taped to the building board before cutting it out with an X-Acto knife. Cut out the larger parts first.
06. Cut away and remove the unwanted MonoKote before applying the new colors.
After some thought, I changed its looks by making it a tail-dragger and removed the white MonoKote on the fin and rudder and replaced it with black. I found a skull and crossbones image that was not copyrighted and enlarged it to get the size I wanted.
I taped white MonoKote to a building board, added the artwork over it, and taped it down. With a hobby knife and #11 blade, I started cutting out the parts of the MonoKote that would make up the skull and crossbones. I did the same thing with the markings on the wing. I drew the small lines on with a black Magic Marker, sprayed several coats of glossy polyurethane over the surface, and allowed it to dry for at least 48 hours. It was fun!
Another Project
Another airplane I recently finished was an Old School Model Works Javelin. It’s a shoulder-wing sport model that has a large cabin similar to some of the 1930s racing aircraft or monocoupes. Some think it resembles a Whitman Tailwind. I’ve seen versions of this model as a J-3 Cub and as the Spirit of St. Louis. It’s a blank canvas of sorts and it’s up to you to make it look the way you want.
I went to Callie Graphics for the artwork, such as the numbers and letters on the fin. I sent Callie a file describing to her what I wanted, including sizes, colors, etc. It took approximately a month, but the outcome was worth it.
After adding the markings according to the instructions on Callie’s website, I started decorating the airframe, adding stripes and shapes with MonoKote and UltraCote.
07. The enlarged artwork shows the crossed swords that were cut out using the same method for the wing.
08. The finished wing center section shows the skull and crossbones and the crossed swords on the wing halves. Use a covering iron on medium heat to apply these graphics and work the bubbles out.
09. On the fin and rudder, always use medium heat and test a piece to make sure the color doesn’t run. Don’t let the iron touch the letters! They will melt.
10. This is some of the artwork that has been cut to shape.
Always be careful when you add a second color to put the light color down first then add the darker color using a lower heat setting on the iron. This will keep the second and/or third color from bleeding through onto the others.
Another kit producer and designer is Bruce Tharpe Engineering (BTE). The company has a line of sport models that are what I call blank canvases. The line of kits includes the Flyin’ King, Venture 60, Delta Vortex, the Reaction Jet Trainer, and the Super Flyin’ King. These sport models lend themselves to modifications, different color schemes, floats, skis, or retracts. Simply let your imagination go!
Both Old School Model Works and BTE have two-views so modelers can download the files, doodle with colored pencils, and come up with unique color combinations.
There are many kit companies out there from which to choose. Think about what you want to do with the model and what type of flying you plan to do. Remember that the included components of a kit are not typically what you’d find in an ARF. Kits usually don’t come with tires, tail wheel brackets, servos, or other hardware.
11. The Javelin has stripes and markings from Callie Graphics. The author added tape to the black edges and used an iron to seal it.
12. On the top of the wing, all of the stripes were cut out using a straightedge. Mark the spots to make your cuts with a Magic Marker. It will wash off with Zip Kicker accelerant.
13. The Vs and stripes were added to the rudder and fin followed by the lettering to avoid distorting the lettering with the iron.
 14.
14. The Flyin’ King is shown with a simple color scheme. Models such as these are like blank canvases.
Most kits can be built with either electric or glow power, and some are large enough to use gas engines. You get to choose your own engines and hardware! You can often construct a model that matches your flying style and goals and have a blast building and finishing it.
Some modelers will look for aircraft with a bright color scheme, such as on Mike Barbee’s yellow T-34 model or his Beech Twin. Both sport a lot of yellow and there is a great reason: Yellow shows up well in the air. Orange shows up well also. Red, under the right conditions, can turn to black, depending on the position of the sun. These are just a few color combinations to think about for your next project.
I go through a lot of #11 X-Acto blades and keep several of the knives handy. When one becomes dull, I switch to another one with a new blade. A metal straightedge is essential for work like this. You can usually pick up a 24-, 36-, or 48-inch aluminum straightedge at a big-box hardware store.
I cut the MonoKote and UltraCote on sheetrock and it doesn’t hurt to cut into it a little. Of course, always be careful when using blades.
Fair skies and tailwinds.
SOURCES:
MonoKote or UltraCote
(800) 338-4639
www.horizonhobby.com
Old School Model Works
(513) 755-7494
www.oldschoolmodels.com
BTE
(800) 557-4470
www.bte.com
Callie Graphics
[email protected]
www.callie-graphics.com


Comments
Add new comment