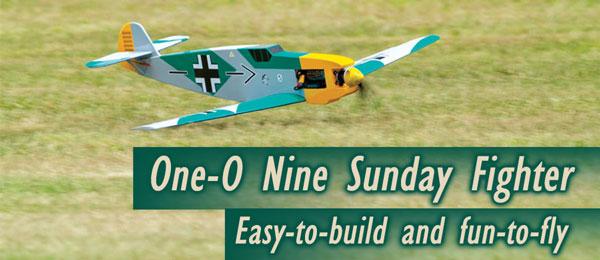
Easy-to-build and fun-to-fly warbird By Fitz Walker | [email protected] Photos by Lee Ray and the author As seen in the October 2022 issue of Model Aviation. "WELL, THAT’S INTERESTING!" was my reaction upon first seeing Old School Model Works’ newest balsa kit, the One-O Nine. Part of the company’s Sunday Fighter series, this rather distinctive model features a simple-to-build, nearly profile fuselage that is fully sheeted along with the wing. It has no landing gear because it is designed to be hand-launched.
Image

The One-O Nine is a delight to fly with easy handling and a wide speed range. The model slows down nicely for belly landings on grass. In the benefit of being a quick build, the all-balsa kit is designed to give you an easily identified warbird without all the mucking about with forming compound curves. The One-O Nine is obviously a word play on the Messerschmidt Bf/Me 109. The Old School Model Works version quite obviously looks to be the Battle of Britain-era Bf 109E, which is my favorite of the 109 variants. I previously built another Old School Model Works model and was impressed with the engineering, so I looked forward to how this one would go together.
Construction
For such a small box, you get quite a bit of wood—actually four sheets of laser-cut plywood and 16 sheets of laser-cut balsa, plus various bits of wood sticks and trailing edge (TE) pieces. There is also a small bag of screws and control horns, although you will have to supply your own control rods. The plans are clear and well laid out between two rolled sheets—one for the wing and the other for the fuselage and tail. Seventeen pages of the build manual features many black and white photos and verbose step-by-step instructions. A color version of the manual is available as a printable PDF file for download from the manufacturer’s website. The laser-cutting quality is particularly good, with just a few heavy scorch marks here and there that are merely cosmetic. Cutting is clean through both the balsa and plywood parts. Because there are so many sheets of wood, a handy parts’ identification guide is located in the appendix of the manual, which came in handy numerous times.Image

The kit has numerous laser-cut parts. There is little for the builder to fabricate.
Image

Laser-cut alignment triangles and dihedral guides are included in the kit. Construction starts with the wing, but the first real pieces to build are a couple of alignment triangles. These two-piece wood assemblies are used to vertically align pieces, such as wing ribs, if you so choose to use them. It is a nice touch if you don’t happen to have similar tools in your workshop. All of the wing parts align well with the plans’ outlines. Because you are building one wing half at a time, construction does not take up much of your workbench real estate. Except for the basswood spars, the wing is built using an assortment of lasercut parts for the ribs (with lots of lightening holes), TE supports, and a dihedral brace spar box. Several key parts use tabs in such a way to allow only one correct way of assembly. Still, you want to read twice and glue once because some steps require a specific build sequence. A combination of Starbond thin, medium, and thick CA glues were used in building the model.
Image

Wing halves can be quickly framed up. Note the lightening holes in the ribs. The wing halves are fully sheeted with 1/16-inch balsa sheets edge-glued and trimmed to utilize the wood as efficiently as possible. The instructions do a good job of explaining the process, and I was impressed with the efficient use of wood. Aileron servos are mounted in the wing halves, so you will need to cut out their panels in the wing sheeting. That is easily done thanks to the cutting template supplied in the PDF. To preserve the manual, I printed the template from the downloadable manual; however, printing this template required slight resizing. Elevator and rudder assemblies are entirely laser-cut, including the surface sheeting. These tail parts are framed up then sheeted. It was nice to not have to cut any custom pieces for the tail—just pop out the parts and glue them in place. Fuselage construction is the most interesting aspect of the kit. Care needs to be taken when cutting the sheeting to ensure you have enough to complete the aircraft. Multiple puzzle-like pieces of laser-cut sheeting are edge-glued together first. These make up the side profile of the fuselage. When one sidewall is completed, the internal structure—specifically the battery/motor box assembly—is installed at the front. At this point, you will need to decide if you will use a glow or electric power system because there are some slight differences in the structure. For the fuselage rear, a crutch assembly is constructed from laser-cut formers that define the tapered fuselage. Building the fuselage does not require placement over the plans. The entire structure can be built using the plans only for reference. I should note that the rear-most former (F8) is very delicate. I ended up breaking it when joining the rear fuselage halves. After the top and bottom of the fuselage are joined, they are sheeted with with 1/16-inch thick balsa (pretty much the only part that wasn’t laser-cut). At this point, I installed the servos and control rods into the fuselage. Control rods are not included in the kit, so I used Sullivan flexible golden rods found at my local hobby shop. The aileron servos are mounted in the wing where the hatches are cut out of the wing sheeting using those handy printed templates from the manual.
Image

The sheeted model is ready for covering. All of the covering is Hangar 9 UltraCote. After giving the whole structure a good sanding, all of the parts were covered using Hangar 9 UltraCote. The color scheme is loosely based on famed pilot Adolf Galland’s Battle of Britain Bf 109 from the JG 26 group. Gray, green, and sky blue make up the core colors with yellow for the nose and tail (the spinner was painted yellow to match). Vinyl decals that come from Callie Graphics already have the proper size information for this kit.
Flying
The power setup I used is the BadAss BA2820-1080Kv brushless motor system with a Renegade 65-amp ESC from Innov8tive Designs. A 3S 2,200 mAh LiPo battery pack provided the initial power supply, and the first flights were performed with an APC 10 × 8 propeller.Image

The BadAss 2820-1080Kv brushless motor and 65-amp ESC provide ample power on 3S or 4S power. Because there are no wheels on the One-O Nine, a hand launch is required. I always recommend a helper for the initial launch and this was no exception. Fortunately, launching the model is straightforward (no pun intended). A running start is not required. Just point the model up approximately 30° and give it a good toss. It will arc over to roughly level and you will have had plenty of time to respond on the sticks. I’ve subsequently self-launched both overhanded and underhanded with no problems. The One-O Nine gets on step pretty quickly and grooves along in no time. The recommended control throws are a great place to start and have a well-balanced feel in all axes. Speed was good but not excessive, with comfortable flying at half throttle or less. At full throttle, I had unlimited climb with power to spare for vertical rolls. While I was up high, I tested stalls, which tended to drop a wing but recovered quickly. I had plenty of warning as the model slowed down to a crawl before the break. Aerobatics are a joy to perform. Loops and rolls are a non-issue. Lots of other traditional maneuvers could be done as well. Rolling circles, spins, snaps, and even sustained knife-edges (with just a touch of down-elevator coupling) were good. Rudder authority is quite effective throughout most of the flight envelope, although it is slightly mushy when doing Hammerheads if some throttle is not kept in. Inverted flight needed a touch of down-elevator, but otherwise, it was just as stable as when upright. Depending on the wind, landing might require reducing power earlier in the pattern than expected because the One-O Nine seems to have a low drag profile. I found the glide to be flat and good at maintaining momentum. With a little nose-up on the flair, the model settles in nicely to land. I was curious about its performance with 4S power, so I swapped to a lower pitch, 10 × 6 APC propeller to keep from pulling too many amps. To go along with the now-louder growl from the motor, I also had noticeably faster speed in flight. Power was still good enough for unlimited verticals and now had overdrive when horizontal.
Conclusion
Old School Model Works has another winner on its hands with a fun-to-build, distinctive warbird. It is a relatively simple, quick-to-build project, yet it packs in a lot of fun in a capable but relaxing model to fly. SOURCES:
Old School Model Works
(513) 755-7494
www.oldschoolmodels.com
Innov8tive Designs
(442) 515-0745
www.innov8tivedesigns.com
Starbond
(800) 900-4583
www.starbond.com
Horizon Hobby/ Spektrum RC
(888) 959-2307
www.horizonhobby.com
www.spektrumrc.com


Comments
Add new comment