
Written by Paul Kohlmann
CONSTRUCTION SERIES
As seen in the December 2015 issue of Model Aviation.
Remember when you finished building that plastic model when you were a kid? It looked okay, but boring. Luckily, the kit included a sheet of full-color waterslide decals and they made that airplane come alive!
I was thrilled when I learned that I could make my own custom decals at home with only a standard graphics program and an ordinary color printer. This article will explain how to create the artwork, print, and apply your own custom-made waterslide decals on your project.

Artwork
The aircraft I’m working with is a 30-inch Messerschmitt Bf 109 Dora. This is a great subject because there is quite a range of paint schemes covering the Spanish Civil War, the early years of World War II in Europe, and even some race schemes from the last international meets in Zurich before Europe was consumed by hostilities.
I settled on the aircraft flown by Luftwaffe ace Werner Molders from his tour in Spain. It’s not the flashiest scheme, but Werner’s story and the Mickey Mouse emblem popular amongst the Condor Legion clinched my decision.
The Spanish Nationalist insignia and other markings were quickly found online, but there was one piece missing. A key characteristic of the Bf 109 was the half-exposed wheel and partially open wheel well. This little Messerschmitt was built as a belly lander, so an illusion was needed. A more skillful modeler might paint the wheel and well directly onto the covering, but the same can be done using the computer and decal paper. This is where today’s tutorial begins.
Software
There are dozens of graphics programs that can handle a simple project such as this and they range in cost from free to very expensive. This project will be done with a combination of two Microsoft products: Paint and Word.

To be frank, neither of these is very capable as a graphics program—they were selected only because many people have them at their fingertips. A more sophisticated software program might get the job done without jumping between programs, but the basic steps in creating the image would be similar.
The Insert/Shapes toolbox in Word is handy at assembling collections of lines and basic shapes. It also provides an easy way to resize and rotate shapes to fit them neatly onto the page.
Word has the added benefit of allowing the user to fill shapes with transparent color and to arrange the order of shapes when they are stacked on top of one another. What it does not do well is trim or edit out unwanted portions of the drawing that has been created.
In contrast, Paint performs the editing function well, but it doesn’t do the transparent or stacking part at all.
Printing the Decals
Now that the file is done, you have an option: the same Word file can be used to make decals using your color printer at home, or you can send it out to have self-adhesive vinyl graphics or “stickers” made. For vinyl, Callie Graphics is tough to beat on price and service.
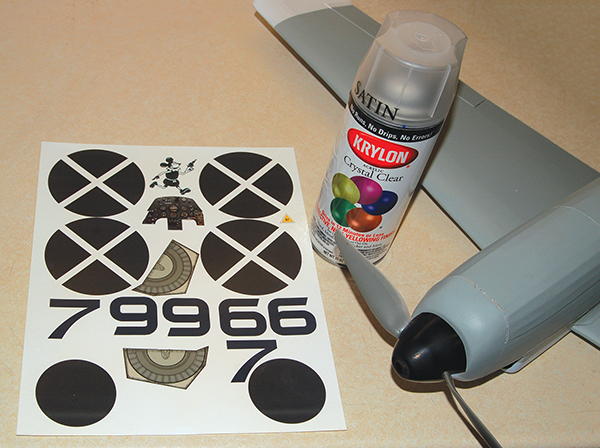
Waterslide decal paper is readily available. Papilio.com offers clear and white decal papers for different types of printers. The colored ink used in your printer is transparent, so be aware that the color beneath the decal will show through anything but black when using clear. This can be useful at times, such as when putting clear decals over silver covering to get a colored metallic appearance.
The colors from your printer will look different when printed on plain paper versus glossy paper. It’s a good idea to print a final test on glossy paper before risking a sheet of decal paper. Make sure that your printer is set for high quality and glossy paper. If the colors are off, you can return to your graphics program and adjust them.
When you are happy with the sizes and colors of the test sheet, load a sheet of decal paper and hit print. Be careful because the fresh ink smears easily—it can’t soak into the glossy decal paper. Give it an hour or more to dry completely.
Home printer inks will run when they get wet. This is a problem for waterslide decals! Prevent this by sealing the print with acrylic clear coat from the hardware store. Spray a thin, mist coat and let it dry first, followed by a full coat. If the coat is too wet then the colors may bleed. Give your decal sheet at least a couple of hours to fully cure.
Application
You know what to do now! Just cut out your decals and dunk them in warm water until they begin to loosen. Dampen the area where they will be applied to make it easier to move them into the perfect position. After they are in place, gently smooth out any bubbles and excess water with a damp napkin. Work from the center out.
Remember that the adhesive takes time to fully dry, so try not to touch the decals for a day or two. I’ve had a few lift and curl over time, but never after a coat of acrylic clear coat.
Wrapping It Up
Now that you can make decals of virtually anything, the possibilities are endless. Duplicating the markings from your grandad’s unit, adding scale details to your ARF, or making your favorite NFL team the sponsor of your 3-D airplane are all within your grasp.
—Paul Kohlmann
[email protected]

Image
Although a lot of work has gone into this project, it won’t turn any heads looking like this.
Image
Outlines of the landing gear doors complement the wheel well decals to complete the illusion.
—Paul Kohlmann
[email protected]
Image
With all of the decals in place, the Dora needs details and panel lines.
The following eight steps were used to create a simple, yet convincing, image of the wheel well:
Image
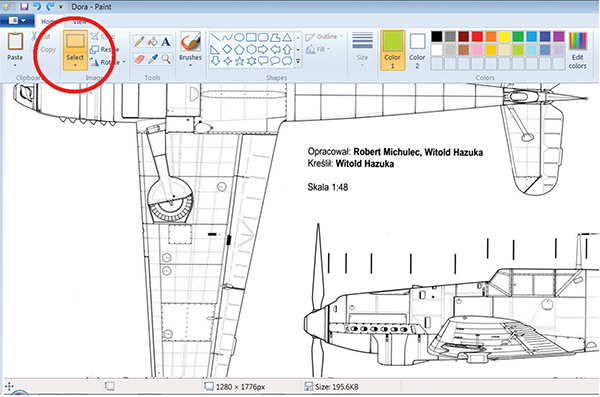
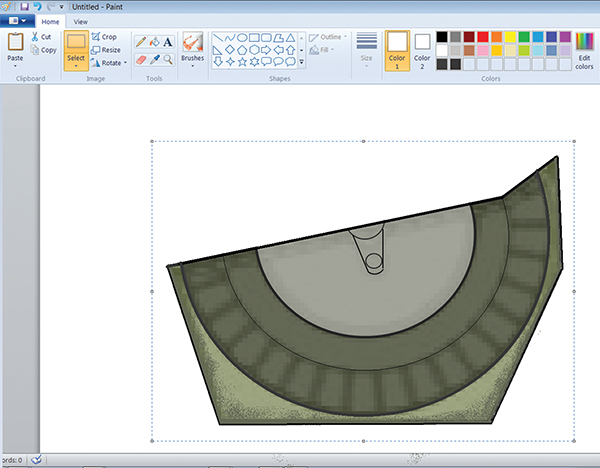
1 A high-resolution drawing with good detail of the wheel well was opened in Microsoft Paint. The Select-Copy tools were used to copy only the wheel well portion of the drawing.
 2 The wheel well was pasted into a new Paint image file. The Erase tool was used to completely isolate the wheel well. When it was isolated, the well was copied using the Select-Copy tools.
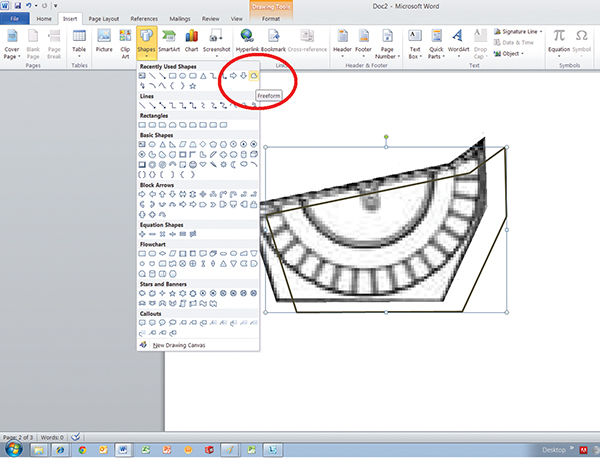
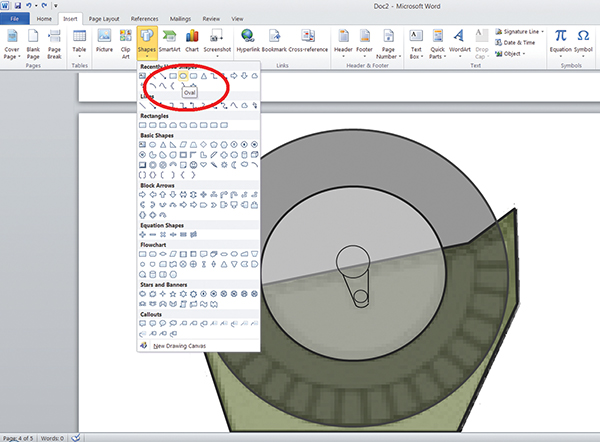
 3 The bare wheel well was pasted into a new Word document. A closed outline was made in Word by using the Insert-Shapes-Freeform tools. The outline is shown pulled away only for clarity.
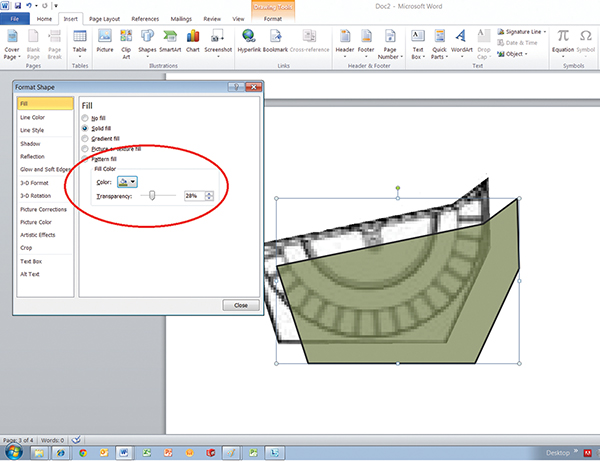
 4 Color fill was added to the Freeform shape using the Format Shapes toolbox. Word’s ability to make the new shape transparent makes it easy to stack layers. Surprisingly, Paint does not work well for this step.
 5 The tire, hub, and spindle were added and formatted as three separate layers. After everything was aligned, the individual shapes were selected and locked together by using Drawing Tools-Format-Group. The Print Screen function was used to copy a screenshot of the drawing.
 6 The screenshot was copied and pasted back into Paint where it could be isolated as was done with the original drawing. The Airbrush function was used around the edge of the wheel well. When finished, the completed wheel well was Select-Copied in Paint and then pasted back into Word.
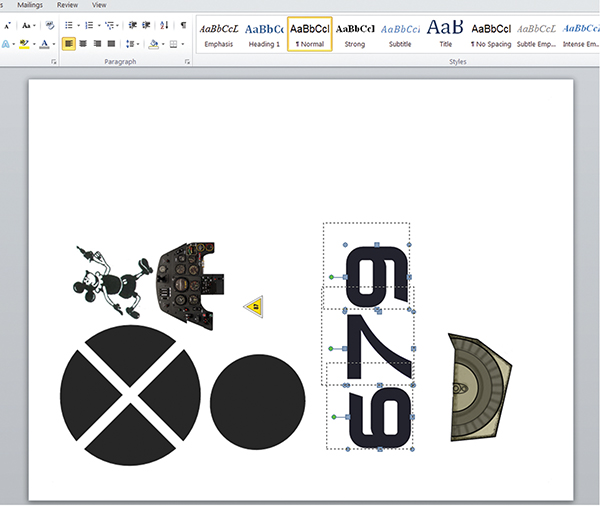
 7 Images of the Spanish Nationalist insignia, aircraft numbers, instrument panel, and Mickey Mouse were added to the sheet in Word using Insert-Picture. A black-and-white print was made on plain paper to check the size of each image. The image sizes were adjusted by selecting them and pulling or pushing the sizing handles as needed.
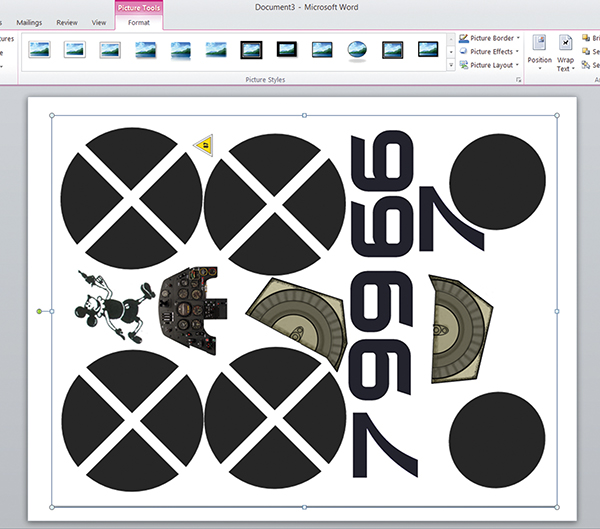
 8 When the sizes of all of the images were finalized in Word, copies were made of those that were needed in multiples. In the case of the wheel well, the copy was flipped to make each a mirror image of the other.
Photos by the author
by Paul Kohlmann
Image
Image
Image
Image
Image
Image
Image
Image
SOURCES:
Papilio
(940) 627-0112 www.papilio.com
Krylon www.krylon.com
Callie Graphics
[email protected]
www.callie-graphics.com
Photos by the author
by Paul Kohlmann


Comments
Add new comment