A trusted brand offers a new take on a beloved sailplane—this time in 2 meters!
By Kyle Jaracz | [email protected]
As seen in the September 2023 issue of Model Aviation.
MY ROOTS LIE in hi-start 1.5- and 2-meter sailplanes, so when I saw the new Tower Hobbies ASW 28 release, I was naturally excited to get it into the air. The other thing that caught my attention was the brand associated with this model aircraft. Tower Hobbies has long been synonymous with quality model aircraft, but it hasn’t had many recent releases. As such, any new release with Tower Hobbies branding is cause for celebration!
Launches are easily accomplished with a firm toss and 70% to 80% throttle.
About the ASW 28 Glider
The full-scale ASW 28 is a single-seat composite sailplane with a 15-meter wingspan. The undercarriage is retractable, utilizes a water ballast system, and is a highly regarded sailplane known for both its beautiful lines and its docile yet nimble flight characteristics. The aircraft was designed by well-known German designer Gerhard Waibel, with production beginning in 2000.
The Tower Hobbies homage to this incredible aircraft does a good job of replicating those lines, as well as the docile flight mannerisms of the full-scale aircraft, while adding flaps. The build process will take experienced builders a few minutes. Newcomers will have an easy time getting this aircraft built in a short period of time.
Setting up your radio will take longer than the build. I chose to use a Spektrum system for both the battery and radio system. The iX20 radio, paired with the AR8020T, provides great telemetry and connection, while ensuring that you have access to the most modern setup options available.
I used several online videos to better understand this aircraft’s setup and, depending on the system you use, you can add crow onto the throttle with a switch to activate the motor (a more traditional sailplane setup) or go the route I took with setting up traditional flaps on a switch with the motor paired to the throttle stick.
I used no exponential on my setup and used 100% throws. I added in 5% down-trim for 20mm of flap travel, and 11% down-trim for 40mm of flap travel in my setup. The 2,200 4S battery is a great balance between power and weight—the latter being the bane of sailplane pilots who are trying to thermal.
At a Glance
Specifications
Type: PNP sailplane
Construction: EPO foam
Servos: 9-gram metal gear
Wingspan: 79.5 inches
Weight: 65.5 ounces
Length: 45.9 inches
ESC: 40 amps
Motor: 3542-850 Kv outrunner
Components needed to complete: Receiver; six-plus-channel transmitter; and 4S 2,200 mAh battery
Components used: Spektrum AR8020T receiver; iX20 transmitter; and Spektrum 2,200 mAh Smart LiPo
Flight time: Variable
Pluses
- Fast and easy build.
- No wrangling with hi-start setup.
- Extra winglets included.
- Preinstalled decals.
Minuses
- Winglet glue was questionable.
Manufacturer/Distributor
Tower Hobbies/Horizon Hobby
www.towerhobbies.com
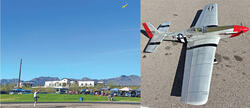
To take off, you provide a firm launch at a 30° angle of climb paired with 3/4 throttle. Be prepared to counteract any roll on climbout. My initial flight required only a couple of rudder clicks to find its balance point, with the motor providing plenty of thrust to swiftly gain altitude.
This capability ensured that I had plenty of time to hunt for thermals three or four times before I eventually ran out of altitude and battery life. That’s one of the best parts of having an aircraft that can propel itself. Rather than resetting your hi-start before every flight, you simply engage your motor and off it climbs, ready for the next thermal hunt.
The aircraft is packaged well, and all components arrived safely. The build instructions were easy to follow, and no glue is required!
Use a set of tweezers to pull out the servo connection prior to connecting the elevator. This will ensure that you pair the appropriate (color-coded) wire connections.
The solid aluminum wing spars do a great job of both reinforcing the root of the wing, as well as lining up the servo connection points. Two screws hold each wing panel to the fuselage. Servo connections are automatically aligned when placing the wing into the fuselage.
Of course, you carry this extra weight with you for the rest of the flight, but for a casual sailplane experience, it’s hard to beat. Its ease of use more than makes up for the setup time for a hi-start. This makes it perfect for when you don’t have all day to spend at the flying field but want to get a few flights in.
The duration of these flights depends entirely on your success in finding lift. The 2,200 mAh 4S battery is a great solution, providing motorized boosts in altitude while carrying reasonable additional weight.
I found lift, but the additional weight inherent in this aircraft is noticeable. In my experience, you’ll need a big-lift day to really extend the flights beyond 15 minutes or so. If you would prefer to fly with the motor on for longer durations, the battery bay provides a lot of extra space to accommodate a larger-capacity battery. Just be sure to check the center of gravity. It should be roughly 70mm to 78mm back from the leading edge of the wing (at the root).
I flew with and without the winglets. I found the aircraft’s inherent stability increased with the winglets, while roll response was increased when flying without them.
The difference was perceptible but not dramatic. It’s also great that the kit comes with two sets of winglets on the off chance that something happens to one of them I was surprised on my first landing (a smooth one, I promise!) when one of the winglets dropped off the wing. Upon inspection, I noticed the glue that had been holding the EPO foam to the plastic attachment point had failed. Pay close attention to this in your preflights to ensure that yours are solidly affixed.
The aircraft handled windy conditions just fine. Flying in a stiff breeze was comfortable, but higher wind means that searching for lift is additionally challenging. On calm days, you really can appreciate the ability of this aircraft to catch that free lift. When you decide to turn the altitude you’ve acquired into energy, the ASW 28 provides a most pleasant sound as it carries speed into passes, loops, or rolls that you can then enjoy.
The author experienced a failed glue connection between the plastic connector and the winglet. Be sure to check yours prior to flight!
Flaps do a great job of slowing down the aircraft.
The flaps really slow the aircraft down, enabling you to capture lift when you find it, as well as preparing for the landing approach as you set it down. Touch-and-gos are entirely possible if you retain energy, but be aware that if you bump your throttle too late or too early, you’ll likely break a propeller.
In summary, this is a great flying sailplane that’s perfect for kicking off a few flights and hunting thermals! It is always great to see Tower Hobbies releasing quality aircraft, and this is no exception.
See you at the flying field!
SOURCES:
Spektrum RC
www.spektrumrc.com


 At a Glance


Comments
Add new comment