By Fred Cronenwett | [email protected]
As seen in the August 2023 issue of Model Aviation.
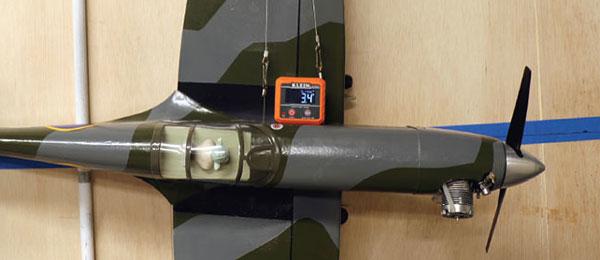
Hang the model from the ceiling to measure the angle of the fuselage relative to the ground. The blue line is horizontal to the ground.
FLYING A NEW MODEL for the first time, or even after a major repair, will require several flights to work out issues so that it flies the way you want it to. There are several things that affect how your model will fly when it comes time to get it airborne. The most important item is the model’s center of gravity (CG).
Another is the location of the leadout guide. If the leadout guide is too high or too low, it can affect the location of the outboard wing when it is viewed from the front. The forward/aft location of the line guide will determine how much line tension you will have (line rake).
The location of the CG in the forward/aft direction is the most critical. If the CG is too far aft, the model will be unstable or maybe impossible to fly. As you move the CG aft, the model will become what I call pitch-sensitive, where even the smallest movement of the elevator results in a fast change of direction. If you want to make a sharp turn, this can be helpful, but if you try to fly steady and level flight, this can be a problem. As the CG moves forward, the model becomes more stable, and it takes more elevator movement to make a change.
I start with the CG at 25% of the average wing chord. Follow the instructions on the plans if you build from them. Locate the average chord and use the 25% rule. Measure the wingtip chord and the root chord, and then determine the average of those two numbers. Locate the area of the wing that has that chord dimension and mark that location with tape to indicate where the CG should be. There are other graphical methods to determine the CG location, but if you are not certain, always start with the CG in the forward location and then move it back as you test-fly the model.
Keep in mind that this is just the starting point. As you trim out the model, you might add some more nose weight or tail weight as you put in the test flights. The vertical CG will be difficult to change significantly, but if you have really heavy wheels on the bottom of the model, it can move the vertical CG on the model downward. On models such as a Piper Cub, the wing on the top of the fuselage will affect the vertical location of the CG. If you have retractable landing gear, the CG of the model will be different between the up and down positions of the gear.
Here are a few definitions. Line rake is the angle that the model is pointing to the outside of the circle during flight. If you have a 0° line rake, that means that your model is perfectly tangent to the circle. Any disturbance might turn the model inward toward the circle.
You always want to have some positive line rake. If you use an adjustable line guide, you can make small changes to the line rake at the flying site as needed. Any changes to the location of the CG will change the line rake. Adding nose weight increases the line rake and adding weight to the tail decreases the line rake, so if you add nose weight to make the model less sensitive with the elevator movement, you are also changing the line rake.
Watch my video on my YouTube channel that shows how a CG change will change the line rake of the model. The link is listed in "Sources."
When I test-fly a model, I first check the ground handling when taxiing the model. See whether the model can remain in one spot with the engine(s) at idle, and then apply power to do a slow taxi lap and determine whether any of the wheels appear to be out of alignment. Be prepared to adjust the tail wheel or the nose wheel.
If the taxi ground handling works well, the next step is to throttle up so that the model is moving quickly but not fast enough to fly. You are looking for any indications that the model is going to turn in toward you. Be prepared to throttle back quickly and regain line tension if the model turns in.
If the high-speed run feels good, increase the speed so that the model can fly, but only a few feet off the ground. You are trying to determine whether the model is stable or pitch sensitive. If you have too much elevator throw, or if the CG is too far back, the model might be difficult to keep level (pitch sensitive). When this happens to me, I lock my wrist to decrease the elevator movement to try to regain control and throttle back to get it on the ground again.
If there is too much elevator throw, there are several things that you can do: move the pushrod connection to the farthest hole on the elevator horn, move the attachment point at the bellcrank closer to the center bolt, and/or use a handle with smaller line spacing. If the model is still pitch-sensitive after all of that, the CG might be too far back.
On my rebuilt Corsair, it required four flights to work out the elevator throw and handle spacing. Because two models rarely fly the same way, it takes multiple flights to get used to one and how to land it. You learn what speed you need to fly at for landing and whether the model is better suited for a two-point or three-point landing.
A two-point landing is where you land on the main wheels and rotate the nose or tail wheel to the ground or have all three wheels touch at the same time.
This adjustable leadout guide can be mounted to the model and adjusted at the flying site.
Leadout Guide Position
The second important item that needs to be correct before test-flying a model is ensuring that the line guide in the right spot. A common question is where the bellcrank should go. The bellcrank position in the model does not affect the line rake. The location of the CG and the location of the line guide will determine how much line rake you have.
When the model is flying, there is a straight line between the model’s CG, the line guide, and the handle. If you move the line guide forward, you will have less line rake; if you move the line aft, the line rake will increase. One test is to hang the model like a plumb bob from the ceiling to determine where to put the line guide to maintain positive line rake. You want the nose to be lower to the ground than the tail so that the model is continually trying to fly away from the center of the circle. I start with 3° of line rake.
The adjustable line guide on a CL Scale model is helpful in making sure that there is enough line tension, but not so much that the airplane is trying to drag away from the center of the circle.
Contest Calendar


Comments
Add new comment