
An attractive, World War II twin-propeller foam ARF with electric retracts
Article, photos, and video by Terry Dunn
Read the full article in the August 2015 issue of Model Aviation.
The Flying Bulls is a group of full-scale aircraft enthusiasts based in Austria. Several of the airplanes in The Flying Bulls’ eclectic collection are replicated in Flitework’s new line of RC models. Among them is a mirror-polished P-38 Lightning that was previously owned by air show pilot and racer, Lefty Gardner. The Flitework P-38 is a large foam ARF with brushless motors and retractable landing gear. The P-38 is a thorough kit. You will only have to provide a minimum six-channel radio system and a 3S 2,200 mAh LiPo battery. The result is an attractive model that definitely captures the essence of The Flying Bulls’ Lightning.
Building the P-38
The kit includes an assembly manual with text and photos to guide you through the process. Anyone who has built an ARF or two should have no problem following along. However, I noted a handful of areas on the P-38 that had room for improvement. Some adjustments were made during my initial assembly, while others were done after test-flying. There were no major problems with this kit—it simply had a collection of small ones. I didn’t have to buy any additional hardware, and none of the corrections were difficult to implement. Addressing these areas made the P-38 more reliable and predictable. Rather than cover the entire assembly process, I will focus on the changes that I felt were necessary. Although the P-38’s main components are attached with screws, it isn’t feasible to disassemble the model for transport. The fasteners allow considerable flex in the airframe. Retain the screws, but glue the components such as the wing and horizontal stabilizer to the booms. I removed any paint in the area with a few swipes of sandpaper and then applied modest amounts of Gorilla Glue. It is especially important to glue the vertical stabilizers in place. In stock form, there isn’t much meat to support them and they could easily flex out of position. I glued each vertical stabilizer to the top and bottom of the horizontal stabilizer. I also strengthened the joints by pushing a toothpick into the foam through both parts. I found it unnecessary to glue the wing center section or the cockpit gondola. I did, however, add washers to the six machine screws that secure these joints. The screw heads were not much larger than the holes in the mounting plates. Adding the washers alleviated my concern that the screw heads might slip through the plates. The manual mentions that the aluminum paint on the model could block radio signals. It also illustrates a suggested mounting location for a Tactic TR624 receiver, which has a single, short (30mm) antenna. Flitework’s method routes the antenna through a hole in the cockpit floor. I’m sure that this arrangement works fine, but I used a Tactic TR625 receiver, which has two longer (150mm) antennae. Using a sharpened 1/8-inch diameter brass tube, I drilled a hole through each side of the gondola. These holes are used to route the antennae to the outside of the airframe and keep them oriented at approximately 90° to each other. The protruding antennae are hardly noticeable in flight, and I have experienced no reception problems with this arrangement. Every control surface has a dedicated, factory-installed mini servo. The elevator actually had two. The pushrods have a Z-bend on the servo end, while a setscrew connector links them to their respective control horns. Unfortunately, the setscrew connectors were a loose fit on the control horns, which would have resulted in a lot of slop on every control surface. I corrected the fit of each setscrew connector by adding a washer to the threaded post. I then tightened the nut until it was barely snug against the washer and locked it in place with a drop of medium CA glue. This removed most of the slop while still allowing the setscrew connector to rotate freely on the control horn. There are several important areas where all of the work has been done for you—notably the installation of the brushless motors and the electric retracts. It’s a good idea to inspect these areas and make sure that everything is in order. I did not find any problems, but I added threadlocker to the screws retaining the front retract assembly for extra hold. The servo for nose wheel steering is connected to the rudder channel via a three-way splitter that also connects the dual rudder servos. Because I had a free channel on my receiver, I plugged the steering servo directly into channel 5. I then configured a mix on my Tactic TTX850 transmitter with the rudder channel as the master and the steering as the slave. This allowed me to independently trim rudder and steering and set individual end points for each channel.Image

The kit includes everything you need except a minimum six-channel radio system and a flight battery.
Image
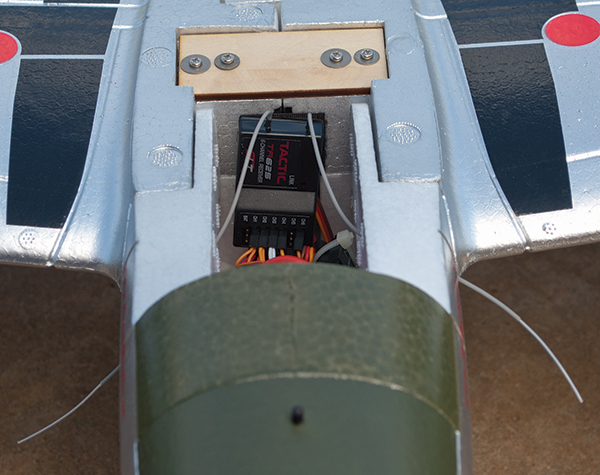
The author cut holes on each side of the gondola to route the antennae from the Tactic TR625 receiver to the outside of the airframe, keeping them roughly 90° apart.
I installed the faux elevator counterbalances using five-minute epoxy. Both of them, however, broke in half during the model’s first flight. I presume that the foam parts weren’t tough enough to handle their own aerodynamic drag. Either leave the counterbalances off or reinforce them in some way. Be sure to balance the propellers. The manual mentions that they are packaged in matched sets, but mine were not. Both required balancing to run true. The manual provides one set of recommended control throw values. I programmed these values as my high rates and added 30% exponential as well. For my middle and low rates, I set the control throws to 75% and 50% of the suggested values. The P-38 uses a single battery mounted in the gondola. I used a 3S 2,200 mAh 30C ElectriFly LiPo. With the battery fully forward, the airplane balanced at the suggested location with no ballast needed. With this battery, the power system pulled slightly more than 50 amps and produced more than 550 watts of power. These values suggested that the P-38 would have great power loading, but I was concerned about short flight times.
Image

The model flew more consistently and predictably after the wings and tail feathers’ attachment points were reinforced with Gorilla Glue.
Flying the P-38
On my first two outings with the Flitework P-38, I had not yet glued the major components in place. They were secured with only the stock fasteners. The Lightning was not difficult to fly, but it would not stay in trim, and it didn’t behave consistently to control inputs. After gluing the wings and stabilizers, it was like a whole other airplane. I trimmed the model during the first circuit, and numerous flights later, I still haven’t touched the trims. The rest of my flying summary reflects the model in this state. Like the full-scale P-38, this model sits on the landing gear with a slight nose-up attitude. The nose wheel steering is effective and ground handling is easy. I set the rudder to low rates for takeoff to help me avoid overcontrolling the steering. The main wheels are located significantly behind the center of gravity (CG), so the model doesn’t really rotate during takeoff. After it gets up to speed, it simply starts flying. On the paved runways from which I fly, the takeoff is uneventful. I have not tried operating the P-38 from an unpaved runway. When in the air, the P-38 Lightning behaves like a sport model. It has a good speed range and plenty of power for simple aerobatics. The suggested control throws are a good starting point. I typically keep the ailerons and elevator on high rates for the entire flight. This makes the model maneuverable, but not snappy.Image

The Lightning’s factory-installed brushless motors are attached to 30-amp ESCs.
The P-38 is at its best when performing scale maneuvers. Rolls are fast enough that I don’t need to input elevator correction when the airplane is inverted. Loops can be nice and big. Inverted flight is easy, with a small amount of forward elevator pressure required. The twin rudders are surprisingly effective and their use comes with a fair amount of roll coupling. The aluminum paint job on the model looks fantastic, but inflight orientation can be difficult. I am considering adding a few broad stripes on the bottom of the wing to improve this. I’ve found that the P-38 can comfortably cruise around at half power. I rarely use full power during my flights, so my concerns about brief flight times didn’t prove true. With the mixed flying that I do, 5- to 6-minute flights are normal (leaving some reserve power). If you desire longer flight times, the battery bay can accommodate larger packs. I have flown the Lightning with alternate batteries including a FlightPower 3S 3,350 mAh 30C LiPo. I simply had to place it rearward to maintain CG and trim away a small piece of foam to fit the battery leads. Despite being 3 ounces heavier with the FlightPower pack than with the 2,200 mAh battery, the P-38 doesn’t fly much differently. The biggest difference I notice is increased flex in the outer wing panels when pulling positive G-forces.
Image
The author added a washer to every setscrew connector to eliminate slop where they attach to the control horns.
Image

The P-38 slows down well for landing and really sticks to the runway.
The Lightning slows down nicely for landing. All of the controls remain effective until touchdown, which is surprisingly slow. Because of the aft placement of the main wheels, the P-38 sticks to the runway after you touch down. I’m sure you could make it bounce, but it hasn’t happened to me yet … and that’s saying something.
Image

With throttle management, an ElectriFly 3S 2,200 mAh 30C battery provides 5 to 6 minutes of flight time.
Image


Comments
p-38 nose gear steering
I have never yet got the nose wheel steering to work properly if you tighten everything up as it should be the wheel rotates and will not retract loosen it up like it comes out of the box and it will not turn earter way rt or left what am I doing wrong larry
reply to nose wheel moving.
Take the nose wire with tire out of the plane. Put some mark around the wire about were the screw hits the wire and then insert it back into the plane. Tighen the screw to mark were the screw hits the wire. There should be a mark where the screw was tightend on the wire. Take a file and file a flat spot at that mark. Re-install the gear into the plane and tighen the screw.
It should then hold. If the wheel does not let the plane go streight then adjust you wire linkage until it goes streight.
P - 38 Nose Gear Stearing
The nose wheel set up on the P-38 is not the best design I have ever seen. After painfully remanufacturing all the parts to achieve precision fit, it still would not work correctly on a consistant basis. I ended up replacing it with a 15 to 25 retractable gear that had an expanding arm to keep the steering control in the same position as the gear retracted and extended. It worked like a champ and was well worth the extra expenditure and time spent installing everything
P-38 Nose Gear Stearing
The standard nose gear set up on the P-38 is not the best design I have ever seen. After painfully remanufacturing all the pieces to a more precision fit, it still did not work. I replaced it with a 15 to 25 sized retractable with an extending link that the steering link attaches to. It works great and was worth the expense and time.
P 38 Nose Gear Steering
I also have experienced nothinh but problems with the nose gear stearing. After remanufacturing all the parts to better match what I believed to be the intent of the designer (remove slop in action), I gave up and bought a 15 to 25 retractable with the colapsing arm. The new set up works fine which makes me wonder why they used the screwball set up that comes with the plane in the first place
P-38 Nose wheel
The nose wheel servo will not extend all the out and the black plate that the servo mounts on to is crack in so many pieces that I can not glue it together.
Red Bull P-38 Nose Gear
I have to agree with the other posts. The nose wheel steering leaves allot to be desired. Well, the entire nose assembly is the best for this plane. The wheel is so loose it will barely turn to the left and nothing to the right. I have tried everything to correct this but I think I am at the point where I would rather purchase another nose wheel and start over. EXCEPT, as with most of the spare parts they are on back order. Now expected to come in "late December". You guys have any ideas on a fix please email me.
NEW INFO FOR P-38 TOWER KIT
Just a quick update on the Tower P-38 kit, as the latest ones posted seem to be somewhat out of date. My P-38 Feb. 2016 delivery. First of all this plane flies terrific and is suitable for anyone above basic beginner level. All the posted comments a reviews are pretty accurate. The nose gear issues haunt most foamies and are easily fixable. My plane came with update kit for some of the nosegear issues. (Bigger set screws,instructions to modify links,brass axle shims for wheels). So what needs to be done? 1-remove the nose gear assy and copy the pattern of the bottom plastic mounting plate to thin plywood, cut this out and resin it, The foam support in the plane is marginal so it should also be coated with resin to beef up the support. Replace the lower mount plate with the plywood part (this part is getting the big hit on a hard landing. To help support the upward shock, remove the upper plate and replace it with small wood strips epoxied into the upper foam (create a box shape in the hole, leaving room to access the 4 screws that attach the gear motor to the gear mount plate. Re install the nose gear tighten the 3 screw that go through the lower and upper gear plates (remember do not use the factory upper plate) Carefully use epoxy to bond the upper plate to the wood supports (box) leaving room to access the 4 small gear motor mounting screws. This mod will make the nose gear solid but removable if needed. The steer links work good after the factory mod kit is used. The wheels and struts in this kit are larger than the same parts in the competitions P-38 (made by same factory in China) making landings on rough strips easier and more forgiving. 2-The ESC's used should be programmed to your Tx during setup if not they may be out of sync. You can find instructions for programming the ESC's at the Hobbywing website under SkyWalker 30amp ESC. The props are NOT balanced, order extras and then sort through them for equal weight blades, you still may have to add or remove weight to blades to get good balance. Check every screw and nut in the kit for tight and locktite them. My motor mounts had screws behind mount plate not even in the screw holes. The plastic motor mounts are another weak point. There is no air circulation around the motors, only the ESC's. The motors will get hot at full throttle and melt the plastic and then the motor is loose in the plate.Fix, I made small vents on top of nacelles to let air escape, and then made plywood motor mounts with a thin aluminum heat sink (fins around edge) I put a baffle in the bottom center air hole of the nacelle and removed foam from nacelle and boom to get air up to and through motors. Now no heating problems. I also installed flaps (not true fowler flaps but split flaps which work terrific) and I am using differential throttle settings for taxiing which lets me turn on a dime. Other mod main shocks, trailing arm nose. For photos or help you can email me at [email protected]
TOWER P-38 PARTS
One more comment about the Tower P-38 and replacement parts. It seems that ESC's Motors and props are not currently available as parts from Tower. This may get remedied in the future, but for now many parts can be purchased for the P-38 on other suppliers websites. Whenever we buy a new plane kit we try to pick up the parts we know will get hammered first, tail appendages, landing gears, props and spinners (shafts). Sometimes you need to do some research to be sure you are not getting a plane that can not be supported. Tower has been very good about trying to keep in touch with the consumer (us) and maintaining a pipeline for parts.
Flitework P-38 Propeller
Help - Just made maiden flite on P-38. Took off and flew great. However, due to sloppy nose wheel steering, on landing, the left wing dipped causing one of the 3 blade propellers to break off. anyone have an idea where I can get a replacement???
P-38 Lightning
Do you make one out of wood and not owned???
Add new comment