Nostalgia isn’t the only reason to build this model
Image
Written by Bob Benjamin Review
As seen in the February 2021 issue of Model Aviation.
At a Glance
SpecificationsModel type: Laser-cut balsa kit
Wingspan: 34 inches top; 25 inches bottom
Wing area: 236 sq. in.
Flying weight: 16 ounces
Wing loading: 9.8 ounces per square foot
Test-Model DetailsRadio: Spektrum DX6i
Receiver: Spektrum AR6335
Servos: Two TGY 50090Ms from Retro RC accessory pack
Recommended power system: .049 to .051 glow/diesel engine with radial mount or electric equivalent
Motor used: Cobra 2205-2300 outrunner
ESC: 20-amp MayTech ESC w/BEC
Battery: BadAss 45C, 850 mAh 2S LiPo
Price: $114.98 for kit; $46 for power package; $18 for servo package
Pluses
This is a genuine Old-Timer RC model with new kit engineering to take advantage of laser cutting.
Complete hardware pack.
Built-in FF stability.
Minuses
This model is easier to fly than to build. It is not a good choice for a first time balsa build.
Manufacturer/Distributor Retro RC
(248) 212-9666
www.retrorc.us.comThe Chicken Hawk, parked on the author’s club’s new geotextile runway, shows up in sharp contrast.WHEN MARK FREELAND AT RETRO RC announced the release of a new, updated kit for the Chicken Hawk biplane, it was as though I had met a long-lost friend. That model first appeared as a construction article by Ted Strader in Flying Models magazine in August 1963.
When I read Mark’s description of this old, single-channel RC and Sport Free Flight (FF) design for 1/2A engines, it made me think of the "time machine" effect favorite models like this one from our past can create. Mark states that this is what Retro RC is all about, and it sure worked its magic on me.
During spring 1966, I was living alone in Boston, working days, and taking university courses at night in preparation for returning to full-time college study for my teaching career. A few model airplanes, and the friends I met because of them, added a lot of sunshine to what might otherwise might have been some dreary days. The best of them was a Chicken Hawk model that I built from one of the original Special Edition Plans kits based on Ted’s design that I’d discovered at a local hobby shop.
Let’s discuss that old single-channel design. In 1966, CA adhesives had not yet been invented for model builders, and those one-step, iron-on coverings were still on the horizon. Balsa, silkspan (maybe silk if you could afford it), butyrate dope, and Ambroid model airplane cement were the order of the day.
The rear fuselage sides were drawn together to meet formers 6, 7, and 8 then glued. It helps to wet the outer surfaces of those sheet balsa parts for safe and easy bending.The styrene tube pushrod guides are in place. You can’t see it, but the tailskid mount plate is also in place. Both of the fuselage rear bottom sheeting pieces have been trimmed and beveled and are ready to be glued.Building the wings starts with laying out the bottom leading edge and trailing edge sheets for both the top and bottom wings, along with all of the wing root center sheeting and gluing all of the edges together.
The original kit included plans, plain white silkspan covering, die-cut balsa wing ribs, fuselage formers, and lots of unmarked balsa strip and sheet stock, from which you were expected to measure, mark, and cut everything else.
Single channel meant just that—one signal that was either on or off. The most common setup consisted of a hand-held transmitter with a slide switch to turn on the dry-cell battery power and one push button to key a signal. When everything was working right, that signal was picked up by a receiver (powered by more dry cells). It activated a relay to send current to whatever device was in the model to move the rudder.
That was often a rubber band-driven clockwork compound escapement. Push the key button and you got full rudder one way then it went back to neutral when you let go. Clicking once and holding it in a second time moved the rudder the other way. That was it. It was possible to use multiple escapements to achieve rudimentary elevator control and maybe two-speed throttle, but that was at the expense of prodigiously delicate gadgetry.
There were multifunction, resonant, reed-controlled RC systems then, but none of them even came close to fitting into a little model like the Chicken Hawk. There was also a handful of what we would now call proportional radios, but they were frighteningly complex, fussy, and even more frighteningly expensive.
One option required a pulse encoder connected to the transmitter to switch the signal rapidly on and off with a basic control stick to vary the on/off ratio. With an actuator made from a small DC electric motor, spring centering, and a double-size battery pack, you got rudder movement that would generally follow the motion of your hand on the stick. That’s what I had in my Cox .049-powered, red and white, doped Chicken Hawk. I invested a lot of extra money and effort setting that up, but it worked!
Those little single-channel models were fun to fly, and the sense of accomplishment you got from making a couple of flights and bringing the model back in one piece was a big deal. With today’s radios and electric power (or an .049 glow engine), the new Retro RC Chicken Hawk brings back all of the good parts we remember, with a reliability we didn’t even dare to imagine in the 1960s.
The instructions contain much information about assembling the wings. The author used Deluxe Materials Aliphatic resin glue, wetted the joining surfaces of the balsa parts, and held them together like this. You can see pins, weights, and clothespins at work here. Leave the assembly to dry overnight before you even think about touching it.Remember all of that sanding advice? The nose of your model should look like this before going any further.
Construction
With Retro RC’s new laser-cut kit and one of the company’s optional accessory packages, you can share in the fun that we remember from the old days (when things were working right) without worrying about the RC part.
The the new instruction manual advises, "This retro kit was engineered by Mark Freeland during the COVID-19 lockdown in 2020. This is a full kit and includes all necessary hardware including prebent aluminum landing gear, wheels, nuts and bolts, etc., to build a Cox Baby Bee-powered model (except the engine).
"If you are going electric, then you need an adaptor engine mount and eight additional 1/4 × 1/16-inch magnets for the battery access hatch."
The kit I used to build this model came with some optional extras, including the RRC 0102-sp package, two TGY-50090M servos, and the RRC 0102-ep e-package, containing one Cobra 2205-2300 Kv outrunner motor, one Cox .049 outrunner motor adaptor mount, one 20-amp MayTech ESC with BEC, one 2 mm gold-plated connector set (three pairs), and eight 1/4 × 1/16-inch battery hatch magnets.
Retro RC’s instructions suggest using Deluxe Materials Eze-Kote and 0.6 fiberglass cloth to reinforce the entire fuselage assembly. The far side of the fuselage, along with the top of the nose, have been given a single layer of fiberglass cloth attached with a single, wet (penetrating) coat of Eze-Kote. There is plenty of cloth to ensure a good overlap when the loose edges are sanded clean and the second side is covered.Remember that dyed silkspan? The author covered the wings off camera. He suggests attaching silkspan over fully sheeted surfaces. Use a wide brush to "paint" Deluxe Material Tissue Paste generously through the dry silkspan. Push/spread the silkspan aggressively until it is tight and smooth against the balsa.
Mark calls out several Deluxe Materials products in the instruction manual. I used those plus a few more, including 0.6-ounce fiberglass cloth, Eze-Kote laminating resin, Eze Dope, aliphatic resin glue, and several grades of Roket CA glue. These adhesives do not smell and do not shrink.
My covering job was traditional dyed silkspan and Eze Dope. Some of my articles about using silkspan appeared in the March 2018, August 2018, and March 2019 issues of Model Aviation. These offer far more detail than I have room for. Readers might also like to check out some of the traditional aeromodeling information in the archives of my Master’s Workshop website (see the link in "Sources").
One detail might seem out of place. Because this is a kit for a model that originally flew when a Cox .049 engine was practically the only choice for power, Mark suggests that an electric-powered Hawk would look retro with a dummy Cox .049 cylinder in the appropriate place on the top of the cowling.
I decided to go even deeper on my nostalgia trip and dug into my parts collection for parts of an OK Cub .049 B engine from approximately 1955. By the 1960s, there were still OK Cubs around wherever you looked, and it fit nicely.
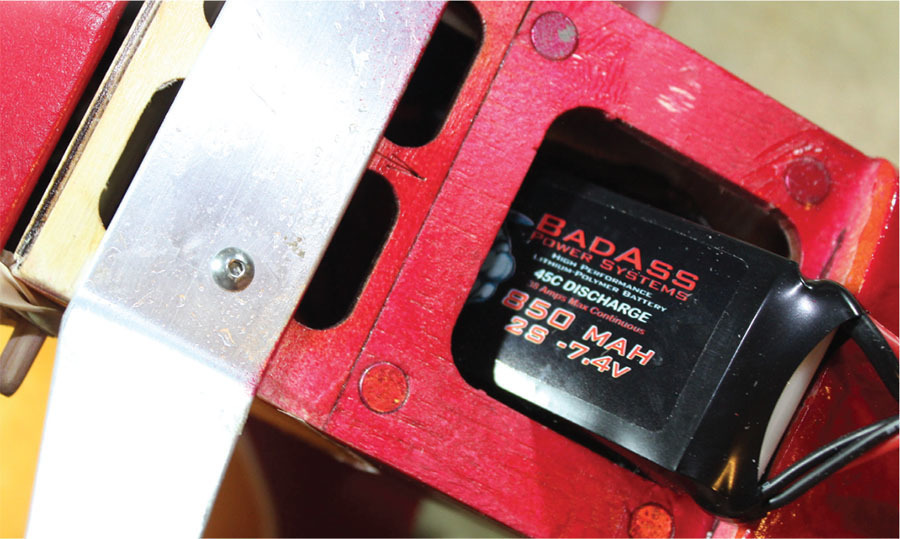
Along with the glue and finishing materials from Deluxe Materials, there is another product line I would like to bring to your attention. Retro RC’s e-package includes a Cobra Golden CP2205/2300 brushless motor from Innov8tive Designs. This is an excellent motor choice for the Chicken Hawk. Throughout the years, I have used many other Innov8tive Designs products, and when I saw the company’s new BadAss LiPo battery line, I had to try them.
The BadAss 45C 850 mAh 2S LiPo battery is a perfect match for this airplane. With those new LiPos and the servos and ESC included in the Chicken Hawk e-package, all that was left was to pair up my Spektrum DX6i transmitter with a Spektrum AR6335 receiver that I had on hand. This combination provides you with Spektrum’s AS3X flight stabilizer technology. If you have access to this feature, use it!
When you are done, it should look like this. The outer edges are later trimmed with sandpaper after the Tissue Paste is dry. The silkspan should take several hours to dry. Don’t rush it! The rest of the model’s finish consists of several coats of Eze Dope, sanded carefully between coats. The author used Stits Polytone (full-scale aircraft coating) to add the red color. Whatever covering/finish you choose, keep it neat and lightweight.Here, everything is in place. The ESC is at the upper left beyond the servos. In the front is the Spektrum AR6335 receiver. Just above it, the servo cable connector is secured with a zip-tie.
The Retro RC construction manual is well written, and if you have enough model building experience to understand that in addition to gluing, balsa needs to be cut, trimmed, and sanded, you’ll have no dificulty building a model airplane from this kit. Along with a complete plans sheet, the kit also includes full-size patterns for every balsa and plywood part in the box. This is a real help if any of the burned-in parts numbers on the various laser-cut sheets are hard to read.
Construction of the fuselage is complex enough that it’s a good idea to refer to the details on the plans and the manual’s photo illustrations to be certain that you get everything where it is supposed to be. Some parts outlines have been designed slightly oversized so that variations in material won’t leave you with gaps to fill.
Check the fit of every part as you work with it and don’t hesitate to trim as necessary where that little bit of extra balsa turned out not to be needed. There are several places where wetting the outer face of sheet balsa parts is a good idea, both to ensure an easy bend for a good fit and to avoid the chance of splitting. I did this with the fuselage sides, as well as on the preassembled upper balsa sheet surfaces of both wings.
The Du-Bro 1-3/4-inch wheels that come with the kit will work fine. A pair of old Williams Bros. 2-inch streamline wheels were adapted to add more of a retro look. The hubcaps were cut from the bottoms of aluminum drink cans, covered with dyed silkspan, and attached with Eze-Kote.The LiPo battery pack slips neatly into the open area just ahead of the landing gear. The bottom hatch will snap into place against the magnets and close it.
Flying
I want to mention several points about the Chicken Hawk design and the fight characteristics that result from the decisions that Ted made in 1963.
Sport FF means no radio control at all. You balance the airplane, adjust the engine thrustline and rudder offset, testglide the model until it descends smoothly in a gentle turn, and then turn it loose from a hand launch with the engine running slow/rich on a small amount of fuel—maybe enough for 10 or 15 seconds.
When you get it all dialed in, with 30 to 40 seconds of leaned-out running, your model will circle up over your field for two or three circuits and smoothly glide back down when the fuel runs out.
Why would you do that? In the 1960s, RC equipment was far more expensive than it is today. Think of spending $1,000 today for the limited, rudder-only control that I mentioned. Most couldn’t afford it.
Setting up a stable RC model for FF was a fine way to do some real flying right away. With that noted, FF stability is part of the design of the Chicken Hawk. The model is designed to fly safely on its own, with no control inputs other than those preflight trim adjustments.
What that means with today’s RC is that the Chicken Hawk can be the ultimate relaxation airplane, flying big lazy circles on its own until you choose to throttle back, or it’s capable of some nice, graceful basic aerobatics.
With that in mind, you can’t help but notice the small rudder and elevator areas. There is no need to "correct" those by enlarging them. It does not need ailerons, either. That built-in dihedral keeps it out of trouble just fine. The Chicken Hawk is probably not the best choice if you want to do aggressive flying.
SOURCES:Deluxe Materialshttps://deluxematerials.co.ukDu-Bro
(800) 848-9411
www.dubro.comHorizon Hobby/Spektrum
(800) 338-4639
www.horizonhobby.com/spektrumBob Benjamin’s Master’s Workshopwww.rcmodel.comInnov8tive Designs
(442) 515-0745
www.innov8tivedesigns.com
Written by Terry Dunn Retro RC 1951 Flying Wing As seen in the October 2020 issue of Model Aviation. Bonus Video At a Glance Specifications Type: Laser-cut balsa kit Wingspan: 56 inches Wing area: 423
Written by Andrew Griffith New laser-cut kit gives a nod to the Curtiss Robin Review As seen in the October 2019 issue of Model Aviation. At A Glance Specifications Model type: Golden Age sport scale
Written by Terry Dunn. Experience early English aircraft design with this laser-cut kit. Flight video and photos by the author and Bryan McLarty. As featured in the May 2015 issue of Model Aviation
The Chicken Hawk in my life occurred in the 70s. RC radios had vastly improved and prices were "affordable...want one" level. I visited a club at a forest preserve park near Lansing, IL. Brought the 'Hawk with me. It was powered with the Cox engine and a Mattel pulse radio. Nobody paid any attention to me as I started the plane and gave it a toss launch. Suddenly a couple of the fellas noticed the wagging thing on the rear. "The rudder's coming loose!". " I think it will be okay", and continued flying. None of them had seen pulse-proportional before. Would like to build another Chicken Hawk but whoa.....that's an expensive kit.
Well written article.
Jim


Comments
The Chicken Hawk in my life
The Chicken Hawk in my life occurred in the 70s. RC radios had vastly improved and prices were "affordable...want one" level. I visited a club at a forest preserve park near Lansing, IL. Brought the 'Hawk with me. It was powered with the Cox engine and a Mattel pulse radio. Nobody paid any attention to me as I started the plane and gave it a toss launch. Suddenly a couple of the fellas noticed the wagging thing on the rear. "The rudder's coming loose!". " I think it will be okay", and continued flying. None of them had seen pulse-proportional before. Would like to build another Chicken Hawk but whoa.....that's an expensive kit.
Well written article.
Jim
Add new comment