
Create a quick reference for all of your aircraft
Photos by the author
As seen in the April 2022 issue of Model Aviation.
For many of us, flying RC airplanes is akin to collecting RC airplanes. Having a large variety of different models on hand is part of the fun for me. It seems that I am always working on a new project (probably several) while also enjoying my old favorites. Consequently, my workshop is filled with a large stash of models, radios, batteries, propellers, and other equipment. I’m sure that many of you can relate.
The tradeoff for this aviation smorgasbord is that it can be difficult to keep track of the important details about each model. Some of those details are essential when it is time to fly. Which transmitter is the model linked to? What flight battery does it need? Where is the center of gravity supposed to be? What is the flight time?
Other details are less crucial but can have a direct impact on your enjoyment of your flight. What are the settings of the stabilization system? What switch operates the landing gear? Flaps? Flight modes? I can tell you from personal experience that it is not much fun to figure these things out at the flying field, especially in the air!
The strategy that I use to manage my fleet of airplanes is centered on data sheets that I create for each model. These data sheets provide a quick reference with all of the necessary information to get the airplane into the sky without any guesswork. I think you will find that these little cards can be a huge asset!

The author uses small data sheets to remind him of important details about each of his RC models.

Write down problems on the back of the data sheet so that you remember to repair them. The ink can be removed later with rubbing alcohol.

The author uses precut laminating pouches and an inexpensive laminator to put the data sheets together.

A #64 rubber band looped though the data sheet provides convenient options for attaching it to the relevant model. Whenever I decide to fly a model, I review the data sheet before even leaving the house. This helps ensure that I packed the correct transmitter, battery, and any required support equipment. It also lets me know if there are any issues that need to be addressed or components that need to be repaired. I would much rather know that while I am still in my workshop! At the field, I remove the data sheet from the model and give it a thorough scan to ensure that I am familiar with all of the switch functions, the motor arming process, and any particular flying quirks that are noted. I then use the rubber band to hang the data sheet on the handle of my transmitter while I fly. When I am done with that particular airplane for the day, the data sheet goes back to its storage location on the model.
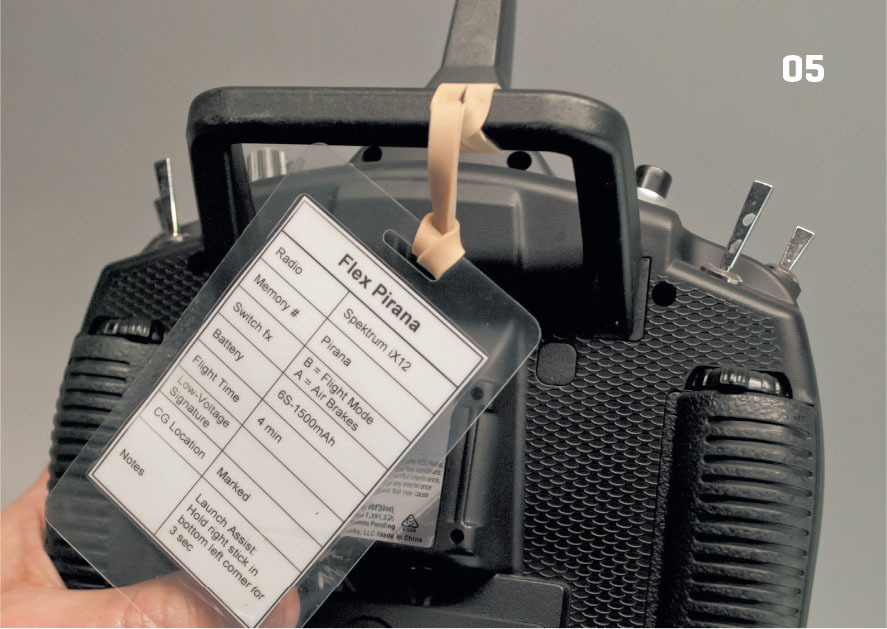
Data sheets can be stored on your transmitter handle while flying.

Surface RC vehicles can benefit from data sheets too.
Creating Data Sheets
Conceptually, making a data sheet for a model can be as simple as jotting down a few notes on an index card. That’s how I started, but I have since refined my technique. I now prefer to create the data sheets on my computer and print them. This allows me to get more information into a small space and ensure that it is legible. It is a good idea to laminate your completed data sheet. This makes the data sheet much tougher and it will last longer. Another benefit of lamination is that you can write field notes on the back of the data sheet with a Sharpie marker. Did you notice on your last landing that the left wheel was a little sticky? Maybe you chipped the propeller and need to replace it. Write those issues on the data sheet so that you remember to address them back in your workshop. You can then wipe away the marker ink with a little rubbing alcohol. I created a template in Microsoft Word that allows me to create up to three new data sheets at a time. I simply fill in the relevant fields on the template and print it out on normal paper. Next, I use scissors to cut out the data tables from the paper sheet. By folding along the line at the midpoint of the table, the data sheet becomes two-sided. My data sheet template can be downloaded from the "Forms" link on the RCRoundtable Podcast website. The particular categories that I use might not be ideal for you. Feel free to edit them however you like. The printed and folded data sheet is intended to be inserted into a Scotch Thermal Laminating Pouch for an ID badge that measures roughly 2 × 4 inches. This is a convenient size. These pouches typically cost less than a dime each when they are purchased in quantity. Buy them in bulk and share them with your flying buddies. You will need a laminating machine to seal the laminating pouches. I use a no-frills unit from Amazon that costs approximately $25. This is another opportunity to pool resources with your clubmates to make laminated data sheets for everyone. All you have to do is insert a filled laminating pouch into the feed side of the laminator. A sturdy, plastic-coated data sheet will emerge from the other side of the machine a few seconds later. I wish they made a machine like this for applying covering to our models!Using Data Sheets
After you have created your data sheets, you will need to decide how you want to use them. I keep each data sheet attached to the relevant model. There are a few different ways to fasten the data sheets. Most of the time, I use a trusty #64 rubber band. I loop the rubber band through the built-in slot in the laminated data sheet. This allows me to stretch the rubber band over and behind the model’s propeller. On my gliders and ducted-fan models that do not have propellers, I can usually find a way to attach the data sheet inside of the battery compartment with hook-and-loop tape. There are no hard and fast rules here. The basic idea is to have a convenient and secure place to store the data sheet so that it is there when you need it.Image
The author uses small data sheets to remind him of important details about each of his RC models.
Image
Write down problems on the back of the data sheet so that you remember to repair them. The ink can be removed later with rubbing alcohol.
Image
The author uses precut laminating pouches and an inexpensive laminator to put the data sheets together.
Image
A #64 rubber band looped though the data sheet provides convenient options for attaching it to the relevant model. Whenever I decide to fly a model, I review the data sheet before even leaving the house. This helps ensure that I packed the correct transmitter, battery, and any required support equipment. It also lets me know if there are any issues that need to be addressed or components that need to be repaired. I would much rather know that while I am still in my workshop! At the field, I remove the data sheet from the model and give it a thorough scan to ensure that I am familiar with all of the switch functions, the motor arming process, and any particular flying quirks that are noted. I then use the rubber band to hang the data sheet on the handle of my transmitter while I fly. When I am done with that particular airplane for the day, the data sheet goes back to its storage location on the model.
Air, Land, and Water
This article focuses on using data sheets for fixedwing aircraft, but they can be used for any type of model. I’ve used them for multirotors and helicopters too. If you scan the RC cars and boats in my workshop, you will find data sheets hanging off of them as well. No matter what you fly or drive, data sheets are an easy way to manage and enjoy a large and diverse collection.SOURCES:
Amazon
www.amazon.comRC Roundtable Podcast
www.rcroundtable.comScotch Brand
(800) 328-6276 www.scotchbrand.com By Terry Dunn | [email protected]Image
Data sheets can be stored on your transmitter handle while flying.
Image
Surface RC vehicles can benefit from data sheets too.


Comments
Add new comment