Large tires and a wide flight envelope make for a versatile aircraft
By Greg Gimlick | [email protected] Photos by the author
As seen in the September 2022 issue of Model Aviation.
Other Remote Video URL
Everything is laid out and ready for assembly, which can be quickly accomplished.The Cessna’s large tundra tires allow the model to be flown from nearly any surface. It has a wide flight envelope to satisfy beginner to expert pilots.MY FIRST IMPRESSION was that the box was so big that the FedEx driver was dwarfed by it! The airplane itself is remarkably well packaged in its custom-fit foam case, and each part was protected by plastic or some other packaging.
The finish on the EPO foam surface was excellent. The tundra tires look massive and are way cool. All of the hardware was individually bagged for its particular assembly.
Assembly
Read the manual thoroughly ahead of time to familiarize yourself with the assembly process and radio programming. E-flite makes radio programming as simple as possible, and there are charts in the manual showing proper setups to work with the installed and preprogrammed Spektrum AR637TA receiver. You can also download the .SPM or .NSPM file that is appropriate for your transmitter. I compared the two and decided to program mine from the chart so that I could select a couple of different switches than what the factory file called for.
The rudder is the first assembly step and the only one requiring any glue. The CA hinges are fastened to the rudder and need to be glued into the vertical stabilizer. Be careful to route the taillight wire in the groove on the left side of the stabilizer so that you can cover it with the provided red tape. When it is installed, the tape blends in perfectly. Two of the hinge slots on mine were slightly oversized and required some pressure until the glue set.
The horizontal stabilizer halves slide on a joiner and interlock before being secured with a screw.The motor is installed on the preinstalled plastic mounting bracket, which sets the proper thrust angles.
The tail wheel assembly and main landing gear are the next steps. They simply bolt into provided slots. A retention plate goes over the two-piece main landing gear, and an extra set of hands comes in handy to hold it while you install the first couple of screws.
The motor is included but not installed. The ESC is preinstalled in the fuselage, so it only requires plugging in once the motor is in place. The cross bracket is installed on the back of the motor and aligns with a preinstalled plastic mount to ensure proper thrust lines. The motor bolts have threadlock on them from the factory.
Everything is laid out and ready for assembly, which can be quickly accomplished.
After it is bolted in place, the foam cowling is attached with two screws, but be sure to plug in the landing light first. A collet, propeller, and spinner complete the motor installation. Check for proper rotation before installing the propeller.
If you’re going to use the optional thrust reversing, this is a good time to set that up and check for proper operation before you install the propeller.
The horizontal stabilizer halves slide over a joiner and interlock with each other. Two retention screws are used to lock it all in place. The control rod had a ball-joint connector to attach to the preinstalled horn, just like the rudder.
The main wing slides onto a joiner and is retained with a single thumbscrew for each side. As you set the root of the wing, ensure that the connectors all line up and are fully seated. There are no wires to connect because the connectors are built into the wing root and fuselage side. The wing struts are fastened to the fuselage with quick connectors. Because the quick-connect pins can be easily dropped and lost at the field, I taped a spare set to the inside of the cockpit/battery hatch.
With the assembly complete, take a few minutes to examine all of the components and ensure that they move properly and are secure. The hatch in the top of the fuselage allows access to the wing-retention screws and receiver area. The rudder connector wasn’t fully seated into the receiver, so take some time to check all of the connections there. I also secured a couple of wires so that they didn’t move around and contact the receiver antennae.
Control Throws and CG
The center of gravity (CG) is set at 95mm to 105mm behind the leading edge as measured at the root of the wing. Throws are listed in the manual for high and low rates. I did not have to adjust any linkages or programming for my setup to be in line with the suggested throws. Do not use any subtrim when setting up your throws. If they are not centered, adjust them mechanically.
The airplane can be bound with SAFE Select activated or not. If you choose not to use it, you will have AS3X at all times regardless. I set mine up with SAFE activated and assigned a switch to turn it on and off.
A word of caution: If you’re using the optional motor reversing for braking, be sure not to set up the switch for that on the same channel as flight modes. If you do, it will reverse the motor in flight as you change modes. The manual guides you through this in two areas to ensure that you get it right.
The manual has the throttle reversing set on the switch that is usually used for the landing gear because this airplane has fixed gear. I was afraid of negative habit transfer and assigned it to a switch on the transmitter that I seldom use. I was concerned that I’d hit that gear switch without thinking and activate the reverse in flight.
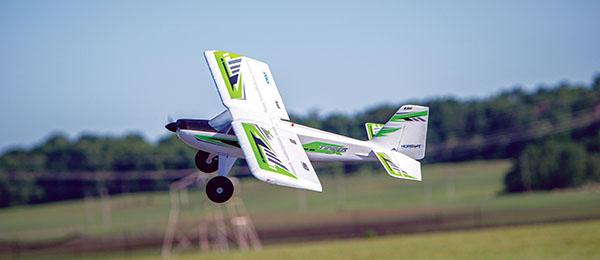
The author displays the Carbon-Z Cessna. This model is a good size to handle wind and be easily seen in the air, while also being easy to transport.The battery compartment is sized to allow for LiPo batteries ranging from 4S to 6S with a 3,200 to 7,000 mAh capacity.
Options
I’ve already mentioned the programming options for SAFE Select and throttle reverse, but there are also some hardware options available separately. E-flite has a set of landing gear should you wish to make the Cessna into a tricycle gear configuration, and also a set of floats if you want to fly off water. Both options appear to be quick and easy to mount to the airframe.
Flying
I did my test flight with SAFE off and only AS3X active. Keep in mind that it isn’t activated until the throttle has passed 25% the first time, so do that on your preflight check. With everything thoroughly checked, it was time to take to the sky.
The weather was approximately 82° with wind gusting 8 to 15 mph. There were no surprises on the takeoff roll or climb. It was stable, and more than ample power was available with the 6S setup. After a gentle climb and trip around the pattern to check controls and the CG, it was off to the races.
The big 150T is not a racer by any means, but it has good speed and performance that is far beyond scalelike. I haven’t tried a 4S or 5S battery pack but have no doubt that the aircraft would do fine with either. I prefer higher voltage for my setups and will stick with my 6S selection. The 6S pack easily flies the model for 10 minutes. I started with the timer set for six minutes and increased it until I settled on 10.
The stall is gentle and straight ahead with no tendency to drop a wing. Spins are easily recovered from with little more than relaxing the controls and letting it level itself out. It just refused to stall and snap to either side, which makes a great feature for less experienced pilots. This model could easily go from flight trainer to an aerobatic trainer.
Loops are big and round, and rolls are as axial as one would expect from a highwing design. Inverted flight requires a slight bit of elevator to maintain, but it will happily fly around like that all day. While not designed to be a 3D aircraft, it will also do a respectable hover with the 6S setup.
The flaps are quite effective and the suggested elevator mix seems nearly perfect. With the flaps fully deployed into the 10-mph wind, it slowed to a crawl. I got a bit obsessed with trying to do zero rollout landings. Of course, with the thrust reversal for braking upon touchdown, we had people wondering what was going on. The airplane is a floater, so plan accordingly.
Conclusion
This airplane is simply a joy to fly—I don’t know how else to put it. Everything feels solid, and the AS3X does an excellent job of dampening the effects of wind gusts without ever feeling like you’re fighting an over-zealous flight controller.
The SAFE Select is effective for what it’s designed to do and nice to have if you let an inexperienced pilot take a turn. The Cessna 150T looks great in the air, flies like a dream, and flight duration is more than adequate. I’d say E-flite has another winner in its lineup.
Written by Chad Budreau A technology-evolved electric trainer Complete product review and video Featured in the September 2015 issue of Model Aviation. Specifications Model type: RTF trainer Skill
Written by Jay Smith Horizon Hobby E-flite Timber X 1.2m BNF Basic with AS3X and SAFE Select Review As seen in the September 2019 issue of Model Aviation. At A Glance Specifications Type: Foam
Written by Jon Barnes Horizon Hobby E-flite Viper 70mm EDF BNF Basic With AS3X and SAFE Select Product Review As seen in the July 2019 issue of Model Aviation. At A Glance Specifications Type


Comments
Carbon Z Cessna
I need one
Add new comment