
Written by Pat Tritle
Build the last dive bomber operated by the Navy Product
Review
As seen in the March 2019 issue of Model Aviation.
Download free plans!
Full-size plansDocument
Document
Document
Document
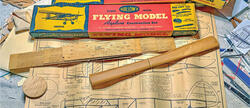
Order Plans from AMA Plans Service
Image
Image

At A Glance
Specifications
Wingspan: 48 inches Length: 37-3/4 inches Wing area: 396 square inches Flying weight: 24.3 ounces Wing loading: 8.84 ounces per square footMaterials List
Wood: Sheet balsa is required if the laser-cut parts package is not used Five 1/16 × 4 × 36-inch balsa Four 1/8 × 4 × 36-inch balsa One 3/16 × 3 × 36-inch balsa One 1/32 × 8 × 18-inch birch plywood One 18 × 4 × 8-1/2-inch light plywood One 1/32 × 4 × 18-inch balsa Two 1/16 square × 36-inch basswood Eighteen 16 × 1/8 × 36-inch balsa Two 1/16 × 3/8 × 36-inch balsa Eighteen 3/32 square × 36-inch balsa Two 3/32 × 1/4 × 36-inch balsa Eight 1/8 square × 36-inch balsa One 1/8 × 1/4 × 12-inch hard balsa (servo rail) Two 1/8 × 3/8 × 36-inch balsa One 3/8 × 1/2 × 12-inch basswood (landing gear mount) One 1/4 × 6-inch triangle stock One 1/8 × 6-inch dowel One 3/16 × 1-inch dowel One wood toothpick Wire: One .025 × 18-inch steel wire One .032 × 18-inch steel wire One .046 × 12-inch steel wire One .093 × 36-inch steel wire Miscellaneous: One pair 2-1/12-inch main wheels One 1-inch tail wheel Three feet of nylon thread (rudder pull-pull cable) Four 3/32-inch wheel collars One manila file folder Two 8-32 × 1 nylon socket head bolts Twelve 3/16 × 1/16-inch rare earth magnets One .008 × 8 × 18 clear acetate One 3/16 × 8 × 18 artists foam boards One 3 × 6 × 8 mm Depron sheet Twelve #2 flat washers Twelve #2 × 3/8 sheet metal screws Power: Suppo 2217/9T outrunner brushless motor 20-amp ESC APC 11 × 5.5E propeller 2,000 mAh 2S LiPo battery Guidance: Two Suppo S-60 servos (ailerons) Two Suppo S-90 servos (rudder and elevator) Three 6-inch servo extensions One 6-inch Y leadImage

Image

Image

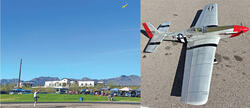
The Model
The purpose for building the Helldiver was to offer a tribute not only to the crews that manned and maintained these airplanes during the war effort, but also to those stateside who built them. Without their efforts, the crews would not have had airplanes to fly. To them, I would like to offer a big debt of gratitude. The model was designed with a 48-inch wingspan at 1:12.5 scale. The idea was to provide a simple park flyer-style model that could be built and flown by anyone with intermediate modeling and flying skills, was large enough to fly well, yet would be easy to transport. The model is primarily built from balsa and plywood. The fuselage features an internal truss frame with external formers and stringers, and the wing is of egg-crate-style construction. Guidance is four-channel RC with power provided by an economical brushless outrunner motor powered by two battery cells. Access to the internal components is through removable canopies on the front and rear cockpits. The wing is also removable. Meanwhile, don’t let the full-scale Helldiver’s checkered beginnings scare you away from pursuing this project. The model is a solid, stable flier that can be flown easily by anyone with some "low-wing" experience.Building the Helldiver
Full-size patterns are provided to cut out the shaped parts. A list of additional materials is also provided on the plans, along with the full-size bowing patterns. To aid less-experienced scratch builders, a laser-cut parts and plastic pack is available from Manzano Laser Works. Construction begins with the various subassemblies. Start by bowing up the laminated outlines using the forms made from foam board. Bend the landing gear struts to shape and make up the landing gear mount blocks. Fit and glue the stiffeners in place on formers 7A, 8, and 11. Finally, build up the wing spars according to the detail drawing provided.Tail Section
Begin by building up the vertical stabilizer assembly directly over the plans using the part numbers and wood sizes shown. Shims are used to center the leading and trailing edges (LEs and TEs) on the ribs. Remove the assembly from the board and sand to an airfoil shape. Fit and glue the tail wheel strut in place as shown. Cut in and dry-fit the hinges and drill the hole for the toothpick control horn. Build the horizontal stabilizer in the same fashion.Wing Assembly
Cut the left- and right-hand wing panel drawings from the plans and tape them together at the centerline. The wing is built directly over the plans beginning with the center section. Fit ribs R1 and R1A onto A1 and A2 and pin in place over the wing plans. Fit and glue WBP in place followed by the TE. Laminate the LE (inner) together and, using the 3/16-inch wing hold-down dowel to aid with alignment, glue the LE in place.Image


Comments
SB2C Helldiver kit
Do you make a large scale version of this plane? Maybe 2x the scale here = a 96"+ version?
Helldiver
Where do i sign up for the free digital plans for the Helldiver? It's not given with the article.
Helldiver plans
Very cool! Looks like a
Very cool! Looks like a interesting and fun build! KWC
Add new comment