Written by Greg Gimlick
Get started with the basics
Feature
As seen in the October 2020 issue of Model Aviation
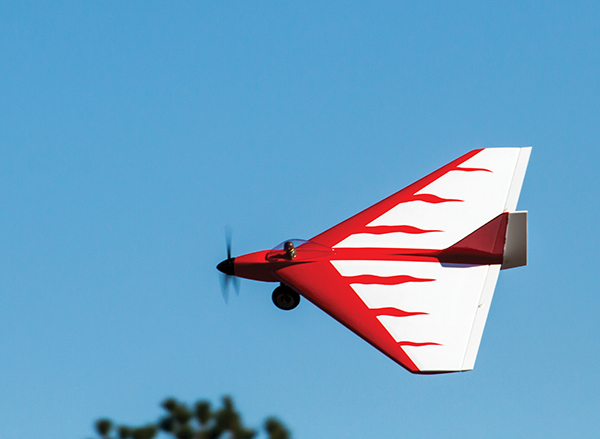
01. The is the author and his Old School Model Works Comet.
02. The Comet looks great in the air.
I’ve received many questions lately about building kits and scratch-building. One of the clubs that I belong to regularly held meetings for people who hadn’t built before to learn from those who had. Obviously, those have been suspended, but they continue as best they can with online sessions. They encourage all sorts of construction methods, but I’m going to focus on traditional balsa model building.
No Big Shop or Fancy Equipment Required
Naturally, we’d all love to have a huge shop with the ultimate in equipment and tools. Because that’s not practical for most people, it’s important to realize that it’s also unnecessary. Most of us started out building in corners of basements, garages, dorm rooms, etc. Many of us use portable building tables that we can slide under beds or out of the way when not being used. Let’s break it down and get started.
Building Surface
The primary need is to have something sturdy and flat. Any flex in your building surface can lead to structures that have interesting curves built into them—and that’s not good. Everyone has preferences for building boards, so simply find the one that suits you.
My favorite for many years was hollow core, lauan interior doors. These are hard to find now because most are sheeted in Masonite-type surfaces and you can’t stick a pin in them. So, where does that leave us?
I have a 30 × 48-inch piece of hollow-core Masonitesurfaced door with a 2 × 4-foot piece of acoustic ceiling tile attached. The ceiling tile holds pins well and is inexpensive to replace when needed. A three-pack of tiles sells at big-box stores for $20 or less.
In the October 2019 issue of Model Aviation, Joe Vermillion wrote an excellent article about how to construct a building worktable. It is a solid, true surface that will last for a long time and is suited for larger models as well. This heavy table is not something you’re going to move around. If you want to make a lighter-weight big table, you could replace the sheetrock top with homosote or a similar surface.
Whatever you choose, be sure that the top surface is perfectly flat! That is the key. Some people build on 2-inch, high-density pink foam, but I find that it dents easily and doesn’t hold pins well. If you’re building small models, it might be fine for you. Don’t be afraid to experiment, but find something flat that holds pins well.
Tools of the Trade
Those of us who have accumulated a lot of tools tend to scare off new builders by declaring, "The only way to do something is …" The truth is, we forget that we started by using whatever we could find and make do with. You don’t need the best-of-the-best tools to get started. Let’s look at some of the "must-haves."
Cutting tools: You will need tools to cut anything from so balsa to harder spruce and plywood. I love X-Acto #11 blades and buy them in boxes of 100 to use in my Zona handle. I have multiple handles that use them—everything from padded to ribbed to lighted versions. Any of them will work.
03. Inventory the pieces in your kit, but don’t remove the parts from the carrier sheets.
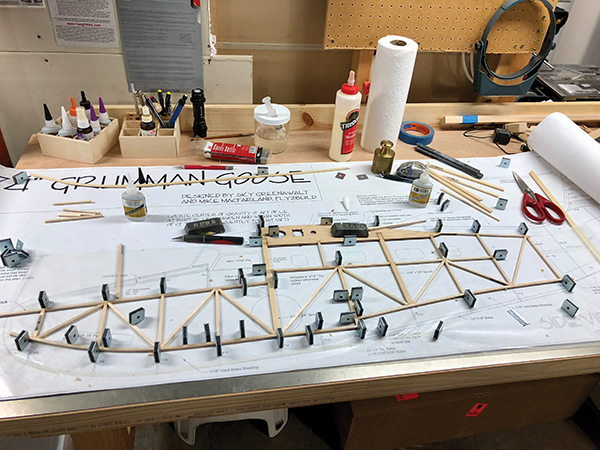
04. The plans are laid out on a building surface and covered with plastic to protect them.
05. John Kauk’s steel building surface employs magnets to hold things in place.
06. Another shot of John’s table shows jigs attached to magnets to align a large fuselage.
In the absence of (or in addition to) X-Acto blades, a batch of single-edge razor blades is essential. When I was a kid, these were all I had, and I happily built hundreds of airplanes using just razor blades. You can also use the disposable, snap-off box-cutter blades. They come in a variety of sizes and strengths, so look them over and choose one that has fine blades, and maybe also a heavier version for cutting tough materials.
07. The author’s collection of cutting tools.
08. Various types of glues serve different purposes.
09. Clamps of all sorts come in handy.
10. Tools for making sure things are straight and true are useful.
I also keep a selection of fine-tooth saw blades to fit my handles. These range from 16 to 32 teeth per inch. I keep an eye out at craft stores for other small saws that might be handy. In a pinch, I’ve used hacksaw blades without the handle. A small aluminum miter box comes in handy and can be found at most hobby shops or online.
Clamps: From my woodworking days, I hold onto the mantra, "You can’t have too many clamps." I have all sorts, in all sizes, and continue to add more when I see new ones of interest. You don’t need anything fancy. None of the ones pictured are expensive, and most can be found online or at local discount tool stores.
Don’t overlook the handiness of plain old clothespins either. They’re getting harder to find, but craft stores and big discount stores still carry them. I like them because they can be altered as needed.
Pins: These can be anything from pins found in a sewing department of a discount store to specialty products sold by modeling supply places. T-pins arepopular because they are easy to hold when trying to pull them out or push them in. They are T-shaped and the top can be used to apply pressure on a piece that you don’t want to stick a pin through.
I tend to use modeling pins from online hobby supply shops that are extremely sharp and have a tapered plastic tip. They are easy to pull out and some have small, flat ridges under the plastic grip that can do the job of a T-pin for putting pressure on the edge of a piece of wood. I buy pins by the hundreds and use a lot of them.
Triangles, right-angle fixtures, etc.: As you line up wing ribs, fuselage sides, and other parts for gluing or clamping, it’s important to line them up squarely. Some kits come with little fixtures to help place them accurately.
The wooden ones shown in Photo 10 came from kits and I keep them to reuse. I have found aluminum and plastic versions at various hobby shops throughout the years. The large one is a plain carpenter’s square from a big-box hardware store.
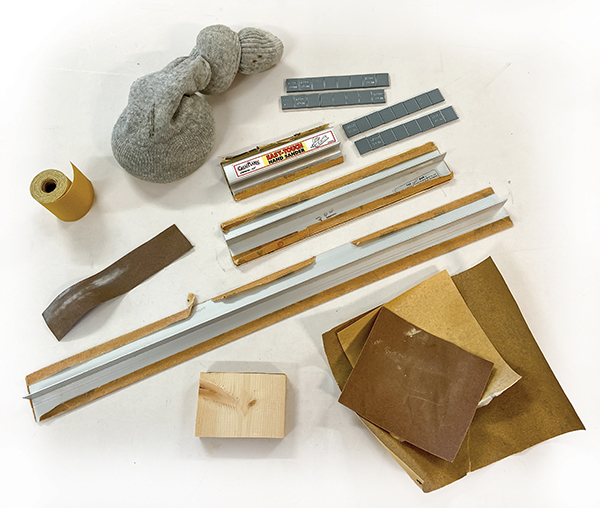
11. Sanding tools can be homemade blocks or aluminum bars.
12. Covering tools vary according to the need.
13. Pins galore on John’s Goose hold the sheeting in place while the glue dries.
14. The author sets wing ribs in place with jigs and lots of pins to secure things.
I also keep some levels on hand to level the building board, but also to check alignment as I assemble certain things. These are simple, inexpensive devices, but feel free to upgrade to digital tools if you want.
Waxed paper or clear plastic to cover your plans will pay dividends. It protects the plans and keeps you from gluing your airplane to the plans.
Glues: There is no shortage of glue types. Some claim to have specific purposes and some claim to do it all. I haven’t found a one-size-fits-all solution yet. Depending on your purpose and possible allergies, you’ll need to do some looking or experimentation.
I love CA glue, but throughout the years I have developed a serious sensitivity to it. Take precautions when using glues and you can extend your years of using them. When it comes to CA and epoxy, I have to wear gloves and a respirator now and I blame my careless youth. They are all safe products, but pay attention to the cautions that the manufacturers provide with the product.
All of the glues in Photo 08 are used in the course of my building a model. I love aliphatic resin (woodworker’s glue) because it allows working time, is water soluble for cleanup, and causes no allergic reactions. The downside is that you have to be more patient, and it requires holding fixtures to keep things in place while it dries.
If you use a lot of CA, you might want to buy some debonder for those moments when you accidently glue your fingers together. Epoxy comes in various time formulas, but the most popular are 5-, 15-, and 30-minute variants. I keep some of each on hand, and each has its own best application. Most kit manuals will recommend which ones to use where.
I also keep a small container of water-soluble joint compound to help on the finishing portion of the framework. It is easy to sand and fills small scratches and gaps in sheeting well before covering.
Sanding: An assortment of sandpaper will come in handy. Don’t buy a lot, but I find 80-, 100-, 120-, 150-,220-, and 400-grit sandpaper are handy to have. I also suggest some sort of sanding block or bar. You don’t need fancy aluminum sanding bars, but they are convenient and use sticky-back rolls of sandpaper. A good, smooth block of wood behind a piece of sandpaper will do the job.
You’ll also notice a homemade beanbag in Photo 11. This is actually a sock filled with old lead shot and placed inside another sock. I use it o en to help weigh something down or as a third hand. It conforms to odd shapes and is one of the handiest homemade items that I use.
Specialty building systems: My friend and former Model Airplane News columnist, John Kauk, is a big fan of magnetic building board systems. The beauty of magnets is that they come in various sizes and strengths, but more importantly, they don’t require you to penetrate the wood with anything.
15. Clamps and pins are used constantly during a build. A variety of each is useful.
16. The author’s Comet is nearly framed as the glue on the sheeting dries.
17. This is another shot of the jigs attached to magnets on John’s building system.
Magnets are strong and will hold the largest of models in place when used properly. Practice makes perfect, and those who use this system swear by it with great results. A beginner builder might find this system an initial expense that is somewhat shocking, but keep it in mind as you progress in your building future.
Covering tools: Different covering techniques require different methods, but the tools are much the same. It’s important to have adjustable temperature controls on your irons.
My first covering job was literally done with a conventional home iron. It was awkward but it worked. I then discovered trim irons and conventional covering irons. Each has temperature control and I keep "socks" for my big iron to prevent scratching the covering.
A heat gun is also handy to have, but remember that if covering is done properly, there won’t be a lot of shrinking required from the gun. Don’t rely on a heat gun to remove wrinkles from a poorly done covering job. Work slowly, watch videos on techniques, and experiment before actually covering your model. Different coverings require different temperatures to adhere then shrink. Read the instructions and trust them.
For cutting and trimming covering, I use a big, self-healing quilter’s/sewer’s mat. Mine is from Olfa, but others are available. I use rotary cutters and aluminum straightedges to cut the covering to size. I have a small covering trimmer from Higley to make all of the edges clean and accurate before the final sealing. Covering is something for which you acquire skills by doing it over and over. Taking your time is key. Don’t try to cover an entire model all at once.
What’s Next?
After you’ve assembled a basic tool kit, you need to build the model. Choose your subject. Don’t start with a complicated scale model. Choose something with simple lines to learn the techniques. I suggest building a kit instead of trying to build from plans for the first time. This eliminates having to guess in what order to do things and makes the whole job easier.
Modern kits are beautifully laser cut, and the parts just seem to fall into place. Cutting your own parts for the first time can lead to frustration and ill-fitting pieces. Choose a model that isn’t going to be a two-year project; you’ll lose interest if it’s too complicated and intricate. Start with a smaller model to get practice and move up from there.
So, You’ve Bought a Kit
Stop right there! Don’t open the box and dump it out. I know it’s tempting but taking a bit of time now will make the build more enjoyable and successful. One of the great things with today’s market is that most manufacturers allow you to see the manual online and even download it. I always do this before buying a kit so that I can go through it and see how it’s organized.
If you have your kit, go ahead and take the plans and manual out then close the box. Take time to read through the manual, study the plans, look at the building steps carefully, and familiarize yourself with the process. Go online and see if there have been any updates or addendums to the manual or plans. If so, download and study them.
18. John’s wing is built up using his magnet system.
19. Don’t fear built-up assemblies that require shaping. Aliphatic resin will make the final shape sanding much easier than using CA glue.
20. The cowling assembly is glued, clamped, and drying.
21. The finished cowling is sanded and covered with UltraCote. Time and patience are key.
Now that you’re familiar with the plans and instructions, sort out the parts in the box. Resist the urge to remove all of the laser-cut parts from their carrier sheets! Sheets of parts are usually grouped by assemblies and it’s best to keep them in the carrier sheets until you’re ready to use them.
If you’re not familiar with laser-cut parts, you’ll notice the edges are slightly burned. It might range from black to a light amber color, and you might find that some of it comes off on your hands like ashes—because that’s what it is. Different materials show varying degrees of it. Depending on the laser cutter, it can be pretty heavy or almost nonexistent.
Don’t fret over it and don’t worry about having to clean it all off. A touch of sandpaper will remove it, but don’t get heavy handed and change shapes or dimensions. Most of the time you’ll find that sanding the airframe before covering will take care of it.
Sort your plans out and find the section you’ll be building first. Ensure that the plans lie nice and flat on your building surface and cover them with whatever you’re using to protect them during the build. This is one reason I prefer rolled plans over those that come folded. Fortunately, most kit manufacturers now roll them.
Be sure to have your knives, saws, glues, etc. ready then settle in for a nice build. Don’t rush through the steps and be sure to follow them accurately. Most manuals now are fully illustrated and some have little blocks to check off as you complete the steps.
If you have trouble making out a picture, check to see if the manual is available online. If so, download it and see if the photos are better. Many are in full color in digital form. If your kit didn’t come with a printed manual and instructs you to download the digital version, you might find it handy to print it for assembly.
Don’t be afraid to use a lot of pins to help hold parts in alignment as you build and glue. Don’t rush the glue-drying periods. Letting the parts cure completely before unpinning them will pay dividends in the end.
Airframe Assembly
When you reach the stage where you’re gluing the tail surfaces in place on the fuselage and attaching the wing, you’ll begin to feel a sense of accomplishment. Don’t get excited and rush through these steps. Most kits have you mount the wing before gluing on the tail surfaces. This allows you to perfectly align them. Using string or a long metal ruler to measure the geometry will ensure that everything is true before final gluing.
Kits vary on when to cover assemblies before joining them and this is one area to be particularly sure of. It’s much easier to cover the horizontal and vertical stabilizers before they’re glued to the fuselage, but it’s not always done that way. I try to complete the final sanding before I do any of these last steps.
Sanding, Cleaning, and Covering
The time spent preparing the surface before covering determines how well your covering comes out. Small surface blemishes appear much larger when covered with shiny, new covering. Sand everything completely and do whatever works best for you to remove all of the dust. I vacuum my airframes then go over them with a tack cloth to ensure that they are dust free. That last step is done a er I’ve cleaned my shop.
True building gurus such as Keith Shaw go to extreme measures to ensure that their shops are absolutely dust free before applying covering. Keith’s results show it! I stood by his Scale entry at the Toledo Show: R/C Model Expo one year as two bystanders argued about whether the airplane had been painted or covered with iron-on covering.
The truth was that Keith used iron-on covering. The surface was prepared impeccably and done in a dust-free environment. That means that if you have a blower or something that might come on during the process, turn it off. Preparation and practice determine your level of success.
I spread out my 36-inch Olfa cutting mat and get my rotary cutters and a metal straightedge. I only cut enough covering to do the surfaces that I’m working on. Don’t try to cut out all of the pieces for the entire model. Plan ahead and try not to waste covering. Cut everything slightly larger than required because you need something to hold onto as you work the covering.
There is no way to describe the covering process in the context of one article, but there are multiple videos online that are worth your time to watch. You’ll see in Photo 12 that I have a glove with little silicone grippy things on it. It protects my hand from the heat gun and helps grip the slippery covering.
There is also a small tool there that looks like a pair of pliers with a duckbill. That duckbill end is covered in silicone and grabs covering nicely while stretching it. These are little things you pick up along the way. You can make do with a leather glove when starting out.
22. The Comet’s frame is complete and ready for final sanding and covering.
Conclusion
When you try building, you’ll find new aspects to the hobby that you’ll treasure for life. The thrill of accomplishment and seeing something you built yourself in flight is a wonderful feeling. You don’t need all of the things I’ve discussed to begin with. A razor blade, saw, and a flat surface will get you off to a great start. Many of us enjoy building as much as we do flying. In times of "stay-at-home" restrictions, it can be a real mental boost.
Even if you don’t take on building all of the time, the skills acquired will make those ARF crashes suddenly look repairable instead of disposable!
SOURCES:
Model Aviation
www.ModelAviaton.com
Old School Model Works
(513) 755-7494
www.oldschoolmodels.com
By Greg Gimlick Photos by the author
[email protected]


Comments
Thanks to Greg and the AMA
Thanks to Greg and the AMA for the October building suggestion. As a result I now have two "all balsa" projects on the bench. Woo Hoo!
Add new comment