Written by Phil Calvert
Minimoa Semi Scale Glider Kit
As seen in the Ocotober 2021 issue of Model Aviation.
Review
Image
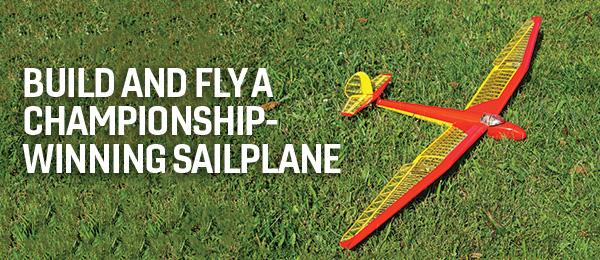
The Hobby Club Minimoa is covered with transparent UltraCote Lite to showcase the beauty of the built structure.I RECEIVED A CALL from Model Aviation Executive Editor Jay Smith, who said that he had what looked to be an unusual build, and he wondered if I was interested. Because I enjoy building and had built and flown a full-scale, high-performance sailplane, I agreed to take a look at it. He had a compact 20 × 5-inch box with a picture of a beautiful Shemp-Hirth Minimoa sailplane. I had seen a couple of these sailplanes in European museums, and I was hooked.
The Minimoa is a single-seat sailplane produced in Germany. It first flew in 1935 and was made from wood and fabric with a cantilevered gull wing. At that time, it was at the top of its field. Richard du Pont and Chet Decker flew Minimoas to win the US Sailplane Championships in 1937 and 1938.
This well-designed model features great details. The included print is well drawn. I received a photocopied pack labeled build instructions. It consisted of numerous pictures of the building process with an occasional note.
I was dissatisfied and, with the help of the internet, was able to find digital building instructions on the Tony Ray Aero Model Co.’s website. I downloaded them to my iPad, which allowed me to expand the photos for better detail.
I feel that better building instructions for some of the vague parts of the build would enhance this kit. One example was the absence of the mounting details of the full-flying rudder.
The laser-cut parts are cut to close tolerances. The parts require light sanding and trial-fitting before assembly. I used Deluxe Materials Laser-Cut Kit Glue with a fine applicator tip to glue the parts that didn’t require sanding. These glue joints can be unglued by applying heat.
For wing and fuselage sheeting, I used Ambroid glue because it sands well. The laser cutting could use some guidance for the depth to which the parts are cut. The wood selection could be better and the plywood was especially warped.
The wing ribs are designed in great detail and are difficult to cut out with the undercut laser cutting. Some of the outboard wing ribs are dime size. The part numbers are laser cut into the parts, and the laser labeling burned through the aileron trailing edge parts, leaving them structurally weak.
The build starts with the full-flying rudder, followed by the horizontal stabilizers and elevators. It is fragile, but it is solid when sheeted. The included hinges were quite stiff. I was afraid that the micro servos might lack the power to operate them, so I used some CA hinges that I had on hand.
Image
The wing rib detail is typical of this kit.
Image
The fuselage halves are fragile before they are joined. The bulkheads must be at 90°.
The fuselage is assembled as two halves. The bulkhead/stringer assemblies are quite fragile. As they are joined together and sheeted, the fuselage becomes quite rigid. The forward area of the fuselage is planked with balsa strips.
I beveled the edges to achieve a tight fit. I wetted the top side of the planks to make the necessary bends.
The hatch assembly also starts out fragile, but it becomes stiff as it is planked. I waited until the model was covered and the electronics were installed to mount the canopy.
The wing halves are made up of an inboard and an outboard section in order to produce the gull wing. The blueprint has a detail that shows the top forward skin being wetted and bent down over the bottom skin to form the leading edge (LE). I did not like the results and sanded the LE square. I then glued a square balsa stick to the LE and carved and sanded a nice LE airfoil.
I covered the model with UltraCote Lite, using transparent covering in the open areas. The wing, stabilizer ribs, and structure look so nice that I did not want to hide their beauty.
I used four Hitec HS-40 nano servos. The provided servo mounts only needed to be slightly enlarged. The aileron mounting is tight, but it fits without requiring disassembly. The aileron servos should be installed before covering the wing.
I set the transmitter to the flaperon wingtype servo connections. The left wing servo is connected to the auxiliary 1 servo port while the right wing servo is connected to the aileron servo port on the receiver. The aileron wire extensions were installed before covering the top inboard wing segments. The quick connects would not fit through the wing ribs, so I soldered them and covered them using heat-shrink material.
This is a beautiful model with great details. Hobby Club designed it well and the parts match up beautifully. Quite a bit of forward ballast is required to balance at the reported center of gravity.
I have yet to fly the Minimoa; however, by the time you read this, it should have some flights on it.
Add this distinctive glider to your collection of aircraft By Fitz Walker | [email protected] As seen in the April 2023 issue of Model Aviation. FIRST FLOWN IN 1935, the Göppingen Gö 3 Minimoa is
Written by Jon Barnes Alien Technologies Micro Aquila As seen in the December 2020 issue of Model Aviation. Review Bonus Video At a Glance Specifications Model type: Micro-size sailplane kit Skill
Written by Fitz Walker Moustache Model Works 20cc DHC-2 Beaver As seen in the FEBRUARY 2020 issue of Model Aviation. Bonus Video At A Glance Specifications Model type: Semiscale electric/gas Skill


Comments
Tony Ray Minimoa
How do the wings fit are they removable. would fitting a motor work compensating for necessary ballast
finally how much ballast
Add new comment